DIY Barn Door Wainscoting Tutorial
We are big fans of everything barn door here at Remodelaholic, and we love great wall treatments (like board and batten and our plank wall). When I saw this barn door wainscoting, I was in love — a perfect match of two of my favorite things!


The barn door style is finding its place everywhere around the house lately. Here are some of our favorite barn door inspired projects:
 Dutch Barn Door with Baby Gate | Remodelaholic
 Barn Door Shelf | Lovely Little Snippets
 Barn Door Closet or Cabinet Doors | Four Generations, One Room on Remodelaholic
 Barn Door Headboard | The DIY Adventures
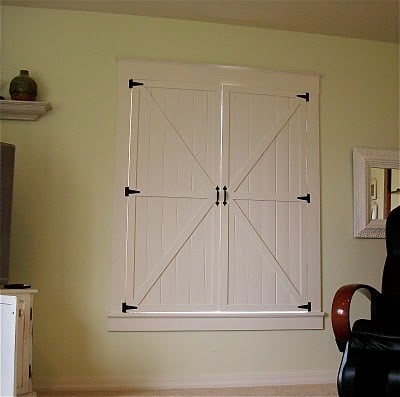 Barn Door Interior Window Shutters | Meridian Road on Remodelaholic
And now, here’s Traci with her awesome tutorial for this barn door inspired wall treatment, written exclusively for us here at Remodelaholic.


Barn Door Inspired Wainscoting Tutorial
Hello Remodelaholic readers! We are very excited to be featured on one of our favorite DIY/home design websites! We are the Monsons, self-proclaimed DIYers. We have been married for almost 6 years and spent most of our married life moving around the country, renting and wishing we had a house of our own. We were finally able to settle down and buy a house in beautiful South Carolina a little over a year ago.
Our days are very busy with our three rambunctious little boys and our sweet dog but we love spending our late nights together working on projects. We are customizing our builder-grade house into a home we love, one project at a time. We like to call our style “clean rustic.” We don’t even know if that’s a real style name but it best describes our taste: fresh and light, kind of a country, Americana feeling.
If you’re interested in what other things have kept us busy, we suggest checking out our barn door, my youngest son’s vintage all-American boy nursery, and our current project, the laundry room.
But enough about us. Let’s move on to the project you want to know about, shall we?
…our Barn Door Inspired Wall Treatment
Our living room is the first room you walk into when entering the home so we wanted this room to really show our style. Here is a before shot. We tried a variety of furniture on this wall but it all looked bland and boring; we knew it had more to offer us.

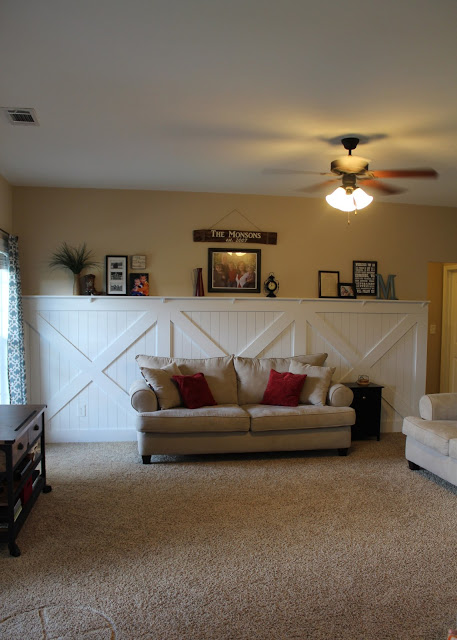
And here is our after…


We started by measuring our wall and figuring out what sizes we needed the squares to be. Our wall is 15’6″ long and we wanted the treatment to go a little more than halfway up the wall (we have 9′ ceilings). After figuring out our dimensions, we drew our plans out on the wall in pencil, everything – the squares, the X’s…we needed to know if we’d encounter any problems (which we did and we’ll discuss later), wanted to see how the couch would look and just get a general idea of whether we liked it.
And we definitely did. It was go time.
The wall is two layers deep: the back vertical slats and the decorative front. For the back vertical slats, we considered using 1x4s but after pricing it out we decided to go with the more affordable option of MDF boards. These are sold in sheets so we bought four sheets of 5/8″ thick MDF and asked the Lowe’s lumber associate to cut them into 4″ slats. Lowes will likely charge you for that many cuts but it wasn’t much, around $10 for the cuts.

We used 1×6’s for the decorative front and 1×4’s for the mantle.
We brought everything home and the tedious, boring part of this project began. We sanded, primed and painted all 50-some boards individually. Not the most fun part of the project but way easier than painting it all after assembly. The insides of the vertical slats are visible so they need to be painted white.

Now back to the drawing board. Here’s a picture of our plan drawn on the wall, as well as a tape outline of where the couch was going to go. Do you see the issue that we encountered?

Yep. Our electrical outlet was right where our decorative front needed to go. This shows how important it is to draw out your plan! Thankfully Jeff has electrical experience and knew how to safely move an outlet (consult a professional before attempting any electrical work, as codes are different depending on where you live).
Regardless of whether you need to relocate the outlet, you will need to install mud rings. These are spacers that are designed to extend the outlet past the wall treatment. Otherwise your outlet will be set back and buried into the wall treatment, a look you probably don’t want. Ask for help in the electrical department at your local home improvement store for advice on installing mud rings (they seem intimidating but they are a piece of cake. Promise).
|
|
|
Mud Ring |

Now that we had our plans figured out, we painted the wall white to match the wall treatment. You don’t *need* to do this part, but if you were to look closely enough through the gaps, you would notice if the wall was a different color than the wall treatment.

Now it was time to install our vertical MDF boards. Before installing any boards we marked the vertical centerline of each square above where the wall treatment was going to go (as marked in the picture below). We installed our first MDF board in the center of each square, using our marks as a guide. Then we worked our way out. The bigger gaps shown below will be covered by the decorative front, so we had a little room to play if needed.
You could also just start at one side of the wall and work your way towards the other but we wanted all our squares, vertical slats and all, to be identical. Also, we installed the slats directly above of the existing baseboard (we covered up the existing baseboard with a 1×6 later).

To achieve equal spacing between the MDF boards, we used quarters. Butt your quarter up against a board that’s already nailed on the wall and then sandwich it with the next board. Make sure your boards are straight (use one quarter near the top, one near the bottom) and install with a finish nail gun. Pull your quarter out and move to the next board.

Also, you will need to use a jigsaw to cut around the outlets. The flange on the mud ring does add some thickness, so you may also need to chisel out the backside of these boards so they sit flat against the wall.

Next it was time to install our decorative front, starting with the squares. Technical tip: when making plans for the decorative front, be sure you are measuring based on the CENTERLINE of each vertical 1×6 board. If you measure from the outsides of the 1×6’s at each end, you will not end up with three equal squares. We made this mistake and had to pull some boards off to correct it.

Notice how the previous baseboard is now covered. The picture below shows where the new wall treatment meets with the baseboard on the perpendicular wall. Using a jigsaw, we had to cut out around where the two meet so we could get a nice tight fit. We then used wood filler or caulk to close up any little gaps (not done yet in the picture).

Now that we had our back vertical slats installed and our square fronts put on, it was time to move on to the decorative X parts.
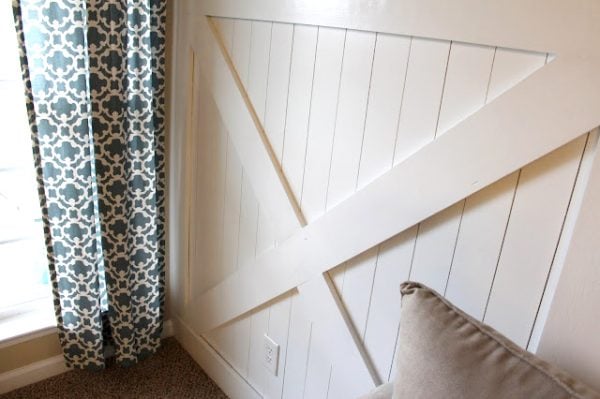
When installing the decorative X’s, first we measured the EXACT corner-to-corner length for your first board, which will span the whole diagonal. Keeping your miter saw set at 0 degrees for now, cut your 1×6 to the exact length of the diagonal. Then on the ends of the 1×6 you will need to mark the centerline of the board along it’s width (for a 1×6 it will be 2-3/4″ from each side).
Align these centerline markings with the corners of the 1×6 squares and have someone hold it in place while you mark the angles. Cut at your lines and glue/nail your first diagonal into place. Repeat the same process for your next diagonal pieces but you’ll have two short boards rather than one long one.


Almost done!
We needed to put some kind of cap on top of our wall treatment so we chose to use 1×4’s and create a long shelf or mantel. We nailed these down through the top of the 1×4 into the wall treatment with a finish nail gun.
Simply nailing it into place would have been enough to hold the weight of the few decorations we would put up there but, remember, we have three little boys and we knew they would likely try hanging from it someday. We needed more durability. We cut triangle pieces from scrap wood and installed them under the shelf, nailing them into place.

We could not find a piece of wood that could span the whole length of our long wall so we ended up using two 1×4’s. If you also need to do this, be sure to cut your boards that meet at an angle, like the picture below, so that it can help create a seamless look.

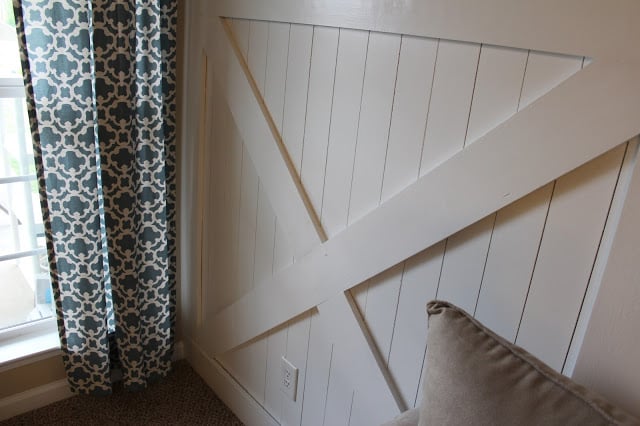
Here’s another tricky part of the process. If you’re very lucky, your wall will be perfectly straight and you won’t need to worry about this next step. However, long walls are rarely perfect. They look straight to the naked eye but they can have a bit of a wave to it, especially true if you’re in an older home.
Our home was only built a year ago and it still had wave to it so we could not install our shelf directly (flush) against the wall. We had to pull it away a bit, leaving a gap. It doesn’t really bother me that much because I’m too short to see it but you can always use quarter round molding to cover it up if you’d like.

Now we have a beautiful, long shelf we could use as our mantel!

So close to being done! It’s easy to just call it good and not add the finishing touches but it is so important to cover up all your nail holes with wood filler, caulk any joints you don’t want visible and hide imperfections. So fill, sand, caulk and then give it one final coat of paint. Then, finally, you can stand back and enjoy your beautiful new barn door inspired wall treatment!


Time and Cost Breakdown
Roughly 3 evenings
Lumber – around $250
Paint – $40
Wood Filler/Caulk – $10
Mud Ring/outlet supplies – $10
Thanks for checking out our favorite home project! Best of luck on yours and if you have any questions, feel free to leave a comment and we’ll try our best to respond!

WOW! What an awesome style wainscoting, right?!? Thank you so much for sharing with us, Traci!
You can keep up with Traci and her other projects at The Monson Family blog.

Lorene has been behind the scenes here at Remodelaholic for more than a decade! She believes that planning projects and actually completing them are two different hobbies, but that doesn't stop her from planning at least a dozen projects at any given time. She spends her free time creating memories with her husband and 5 kids, traveling as far as she can afford, and partaking of books in any form available.


Simply Amazing!! What a difference this makes!!
Shawna
I love the barn door look on just about anything and everything. I’ve never tried to do this myself, but it appears easy enough. (famous last words!) Thanks for the tutorial. Now I need to get busy. 🙂
I’ve seen it in person; it’s AWESOME! Way to go Traci!
Looks great! What a fun way to add character to a boring wall!
Thanks so much for featuring us!
You are welcome. Great job!
neat project, but you don’t need to gap the top board from the wall. Just scribe it and cut it to fit the contours.
https://www.familyhandyman.com/tools/how-to-scribe-for-a-perfect-fit/view-all
Great project, so how tall did you end up making the panels? I’m guessing 5′ on yours but I also have 8′ ceilings for my project.
I just ADORE this kind of trim!! We added it a few years back in our basement. here is the link to our room. Your tutorial is WAY more detailed. I would LOVE a kitchen island in this look one day!! SWOON!!! Love this room!!!!!
https://www.homebyheidi.com/2011/04/boys-trim-work.html
Thanks, Heidi!