DIY Dutch Barn Door Building Instructions

Build a stylish DIY Dutch barn door from scratch, to your custom measurements. The lower section makes a perfect baby gate or pet gate.
After I designed the barn door baby gate for the stairs, I realized that I could add the same type of door up above and make it into a Dutch barn door. Double the barn door, double the love! (See more of our favorite barn door ideas here.)
I do speak Dutch, so having a Dutch barn door door sounded like a genius plan to me! Between the Swedish mora clock we built, the classic full-height board and batten, and the Dutch door, this view of the living room has plenty of European influence in the design! Maybe now I should add my wooden Dutch shoes to finish it off.
Adding the top Dutch door to the baby gate adds both style and privacy to our living room. You could build this door to fit any doorway in your home where you’d like to keep kids or pets in (or out) or where you’d like to add some style with an adjustable level of privacy.
How to Build a Dutch Barn Door
This post contains affiliate links. Learn more and read our full disclosure policy here.
The split barn door is basically just two wooden baby gates hung in the same doorway. Once you’ve built the first gate, adjust the height of the baby gate building plan to your desired height to fill the rest of the door frame.
Purchase the Dutch barn door instructions here. The woodworking plan includes step by step instructions for the half door gate as well as tips and a measurement/calculation worksheet to determine the dimensions of the Dutch door.
This is a great farmhouse door: rustic wood, barn door design, and the split door resembles a stall door, too!
We also have another Dutch Door DIY Tutorial which starts with an existing solid wood door.
Tips for Building a Split Barn Door
All these tips and details are in the woodworking plan as well for easy reference.
Cut the main pieces of the door to length, but wait to cut the cross braces so you can cut them to fit exactly.

After you’ve built the frame, check it for square with an easy measuring tape trick. Just measure one diagonal, then compare it to the measurement of the other diagonal. If the piece is square, they’ll be the same length. Adjust the pieces (by squeezing or pulling apart the corners) until the measurements match, then secure the frame for a practically perfect square.


Once the frame is squared, use the exact dimensions of the frame to mark the angled cuts for the cross braces to ensure the best fit possible.
")
After cutting all the pieces, shave off all the square edges on every side of the board, with a razor blade, to give it a hand carved look. This was Cassity’s idea, and, as most of her ideas do, it turned out nice with the perfect rustic barn door look.
")
")
Lightly sand all the “hand-carved” boards as you assemble the door.
")
As you install the back stiles, keep all your screws lined up on the back to keep it nice and clean looking. A neat line of screws makes the difference between looking “homemade” and “handmade” — a pro craftsman trick.
")
After the door is assembled, sand it again before staining. You want it to *look* like an authentic barn door, not *feel* like it’s actually lived in a barn!
We used an awesome tool called the Dremel Multi-Max MM20 to get in the tricky corners. This tool can sand in corners easily… along with a million other great uses, which I have been trying out lately. Anyway I grabbed my new tool and lightly sanded off any imperfection with little effort.
")
How to Stain a Wooden Dutch Door
After the Dutch barn door is assembled, it’s time to stain it.
We originally went with a gray stain for these doors. We purchased Minwax Water Based Wood Stain at True Value, tinted Charcoal Grey.
We applied the stain and wiped off the excess almost immediately, to let the knots show in the pine. We didn’t want to add anything else to it after the stain. We wanted the rustic feel, so no shiny finish necessary! (You could look for a wax if you felt like you needed a finish, or a satin finish.)
")
Stain the back first and be sure not to drip stain through to the front. If you do drip through, wipe it off right away, to avoid really dark spots of stain. Start with one or two boards at a time. I used a foam brush to apply the stain in the joints first. Then I brushed the stain on the length of boards and wiped it right off. This is how it looked with wipe on, wipe off.
")
Here is how it looked after staining it. Very nice! We wanted the rustic feel and the gray wood stain did a great job of giving the look we originally wanted.
")
Later, after we also painted our interior doors, we adjusted the color of the stain to match by using this easy paint trick.

Dutch Door Hardware and Installation
To match the rustic farmhouse look of the Dutch barn door, we chose outdoor gate hardware that was all black.
With this type of hinge, I had to hang it differently then you would a typical door hinge that would be hidden at the end of the door. We wanted to see these hinges so they had to be hung on the outside if the door and on the door jamb.

You could avoid this if you wanted, by using regular door hinges (just adjust as you build so you’ll have room for a different hinge type!).
On top of the door I added a ball door catch, similar to what you would see on a bedroom closet door. This helps the door stay closed without needing a latch.
We wanted a simple handle and latch that so we could lock the door by drilling a hole into the door frame. But just by opening the top door you can unlock the door from either side.

In order to open the full door together, I added a small piece of molding on top of the baby gate to push the upper door open at the same time as you opened the bottom gate.

Here is the final door put together in all it’s glory.


(This is a view from the stairs side.)


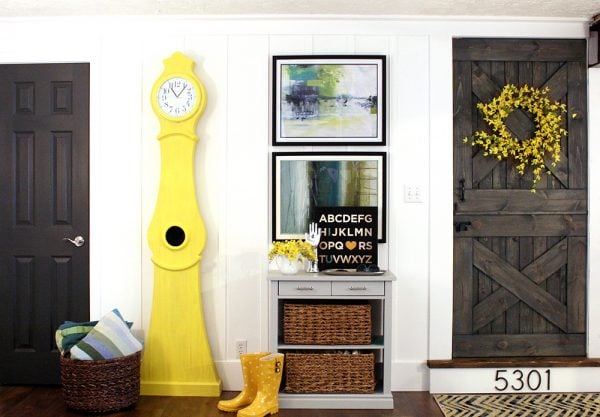
And here’s the updated FINISHED product! (As finished as it’s probably going to get… just don’t look too close!)

This is after we stained it to match our interior door paint, installed new flooring, remodeled the stair riser and installed house numbers, installed floor-to-ceiling board and batten, built the Swedish mora clock, and built the console table from a thrift store find. Phew! That’s a lot of projects for just one wall of a living room!

More DIY Barn Door Ideas:
- How to Upgrade an Existing Door to a Wood Barn Door
- How to Turn an Old Door into a Rolling Barn Door
- How to Build a Simple Barn Door
- 35+ DIY Barn Doors and Barn Door Hardware Ideas


I am the husband of the amazing Cassity of Remodelaholic. I love to problem solve and to design and build things inside and outside the house to make life better. I am a professional Landscape Architect by trade and love the outdoors.


Great construction and idea. I’d have to put the lock on the inside of the stairs otherwise my rascally kids would just open the door themselves 🙂
Your door is amazingly gorgeous. Thank you for a great tutorial, because I am going to ask my hubby to make one exactly like your.
You’re welcome! We’d love to see it when you finish!
Blown away with the creativity and craftsmanship on this. One of the best I’ve seen in a long time. If I could only find a carpenter with your skills near me. I do a lot of houses and this type of door would have really popped and wowed my clients. Thanks for posting.
Outstanding job, I love it! Would to own one, because I love Dutch doors.
Quick Questions for the Minwax Waterbased wood stain did you use the clear tint base or the white tint base?
It was the white tint base. Great question! Thanks for the comment.
We just made this (the bottom portion), and it’s great! Really love it! Keeps the kids in, and the dogs out!
I was thinking for the top portion, maybe putting a glass insert in there to let some light through (we put this door in a doorway between rooms, not at the stairs). Any idea how I could do this? Is there a somewhat easy way to modify these plans to allow for glass, or do you perhaps have another tutorial involving a glass door that I don’t know about?
Thank you so much!
I’m so glad you are finding these plays useful. I haven’t thought about glass, but I think it can be done. That’s a great idea. I was looking at it and thought that maybe you could leave out the x and just start with the frame and put the glass or plexi glass where the second layer of boards would go. You would just have to frame in on both sides of the glass to keep the glass from falling out. Sorry I don’t have time to draw it out right now but it can be done.
Love this will try this for sure , thank you so much for sharing.
Send us pics when you do!
Love the door did you use all 1×6 and 1×3?
Tom, I used 1×6 and 1×4 Here is the post the the details. https://www.remodelaholic.com/diy-barn-door-baby-for-stairs/
The sequence of pictures and adjoining explanations were very helpful and an enjoyable read. Thank you for sharing your design and expertise.
I’d love to know how you chose what wood to use for this project!
Thank you!
I chose pine boards because its affordable and easy to work with.
Did you install hardware to latch the top to the bottom? And if so did you install it on the opposite side of the door than the wall latch so ensure you can’t get locked out? I’m just trying to get an idea of where I need latches and how many handles and where to place them.
Thanks! Yours looks great!
Heather, great question. We installed latches on the same side. We were trying to lock people out. We had a latch to connect the door to the gate and then a latch to lock the gate to the wall. We also had a ball latch on top of the door to keep it closed but not locked. I think having a latch on the opposite side of the gate latch is a great idea if you don’t want to get locked out. Thanks for asking! Hopefully that helps.
I’ve always loved a dutch door. Yours turned out so pretty.
Thanks for sharing such helpful content!