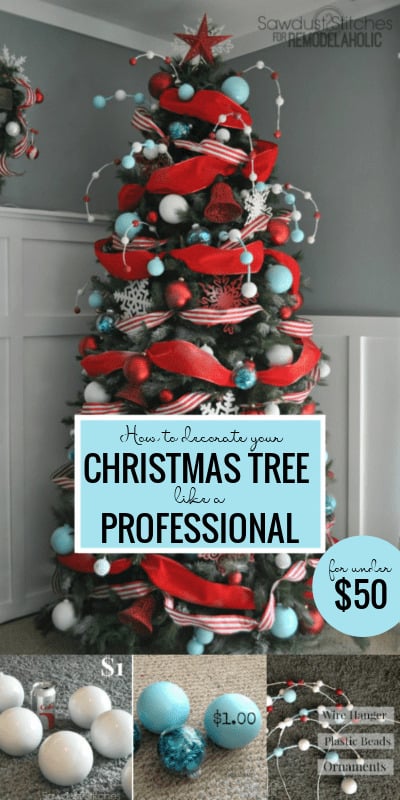
How to Decorate a Christmas Tree Like a Professional, but on a Budget
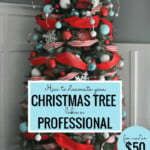
Here are some awesome decorating tips and tricks to make your Christmas tree look like it was done by a professional! Best part? This 10′ tree was decorated for less than $50!
See more budget friendly Christmas tree decor with our dollar store finds: classic red and gold, white and silver, gold and blue.
Be sure to check out the YouTube video we made this year too! And subscribe to our YouTube channel.
By Corey of Sawdust2stitches
How to Decorate a Christmas Tree, Step 1: Lights
I am going to just assume most people already have lights, and will not be including them in the total cost.
There are many ways to put lights on your tree. This is the method that works well for me. I start at the top and work my way down, see the picture below.
Money-Saving Tip: I cheat a little. My tree sits in a corner and I don’t string the lights around the back of the tree, so I don’t waste any lights where no one will see them.
If this was in front of a window, or in anyway visible, I would use the lights on the back. But, it’s not!
Decorating Tip: Plug the lights in while you arrange them on the tree. It will help you see any gaps or crowded places.
(Optional) How to Decorate a Christmas Tree, Step 1.5. Let the kids “help”
(If you don’t have little helpers in your home, skip to step 2)
I let my kids decorate the tree with no input from me as long as they were careful with the items. After a few days they consented to let me “decorate the top half”…. Moving on with a win-win! 
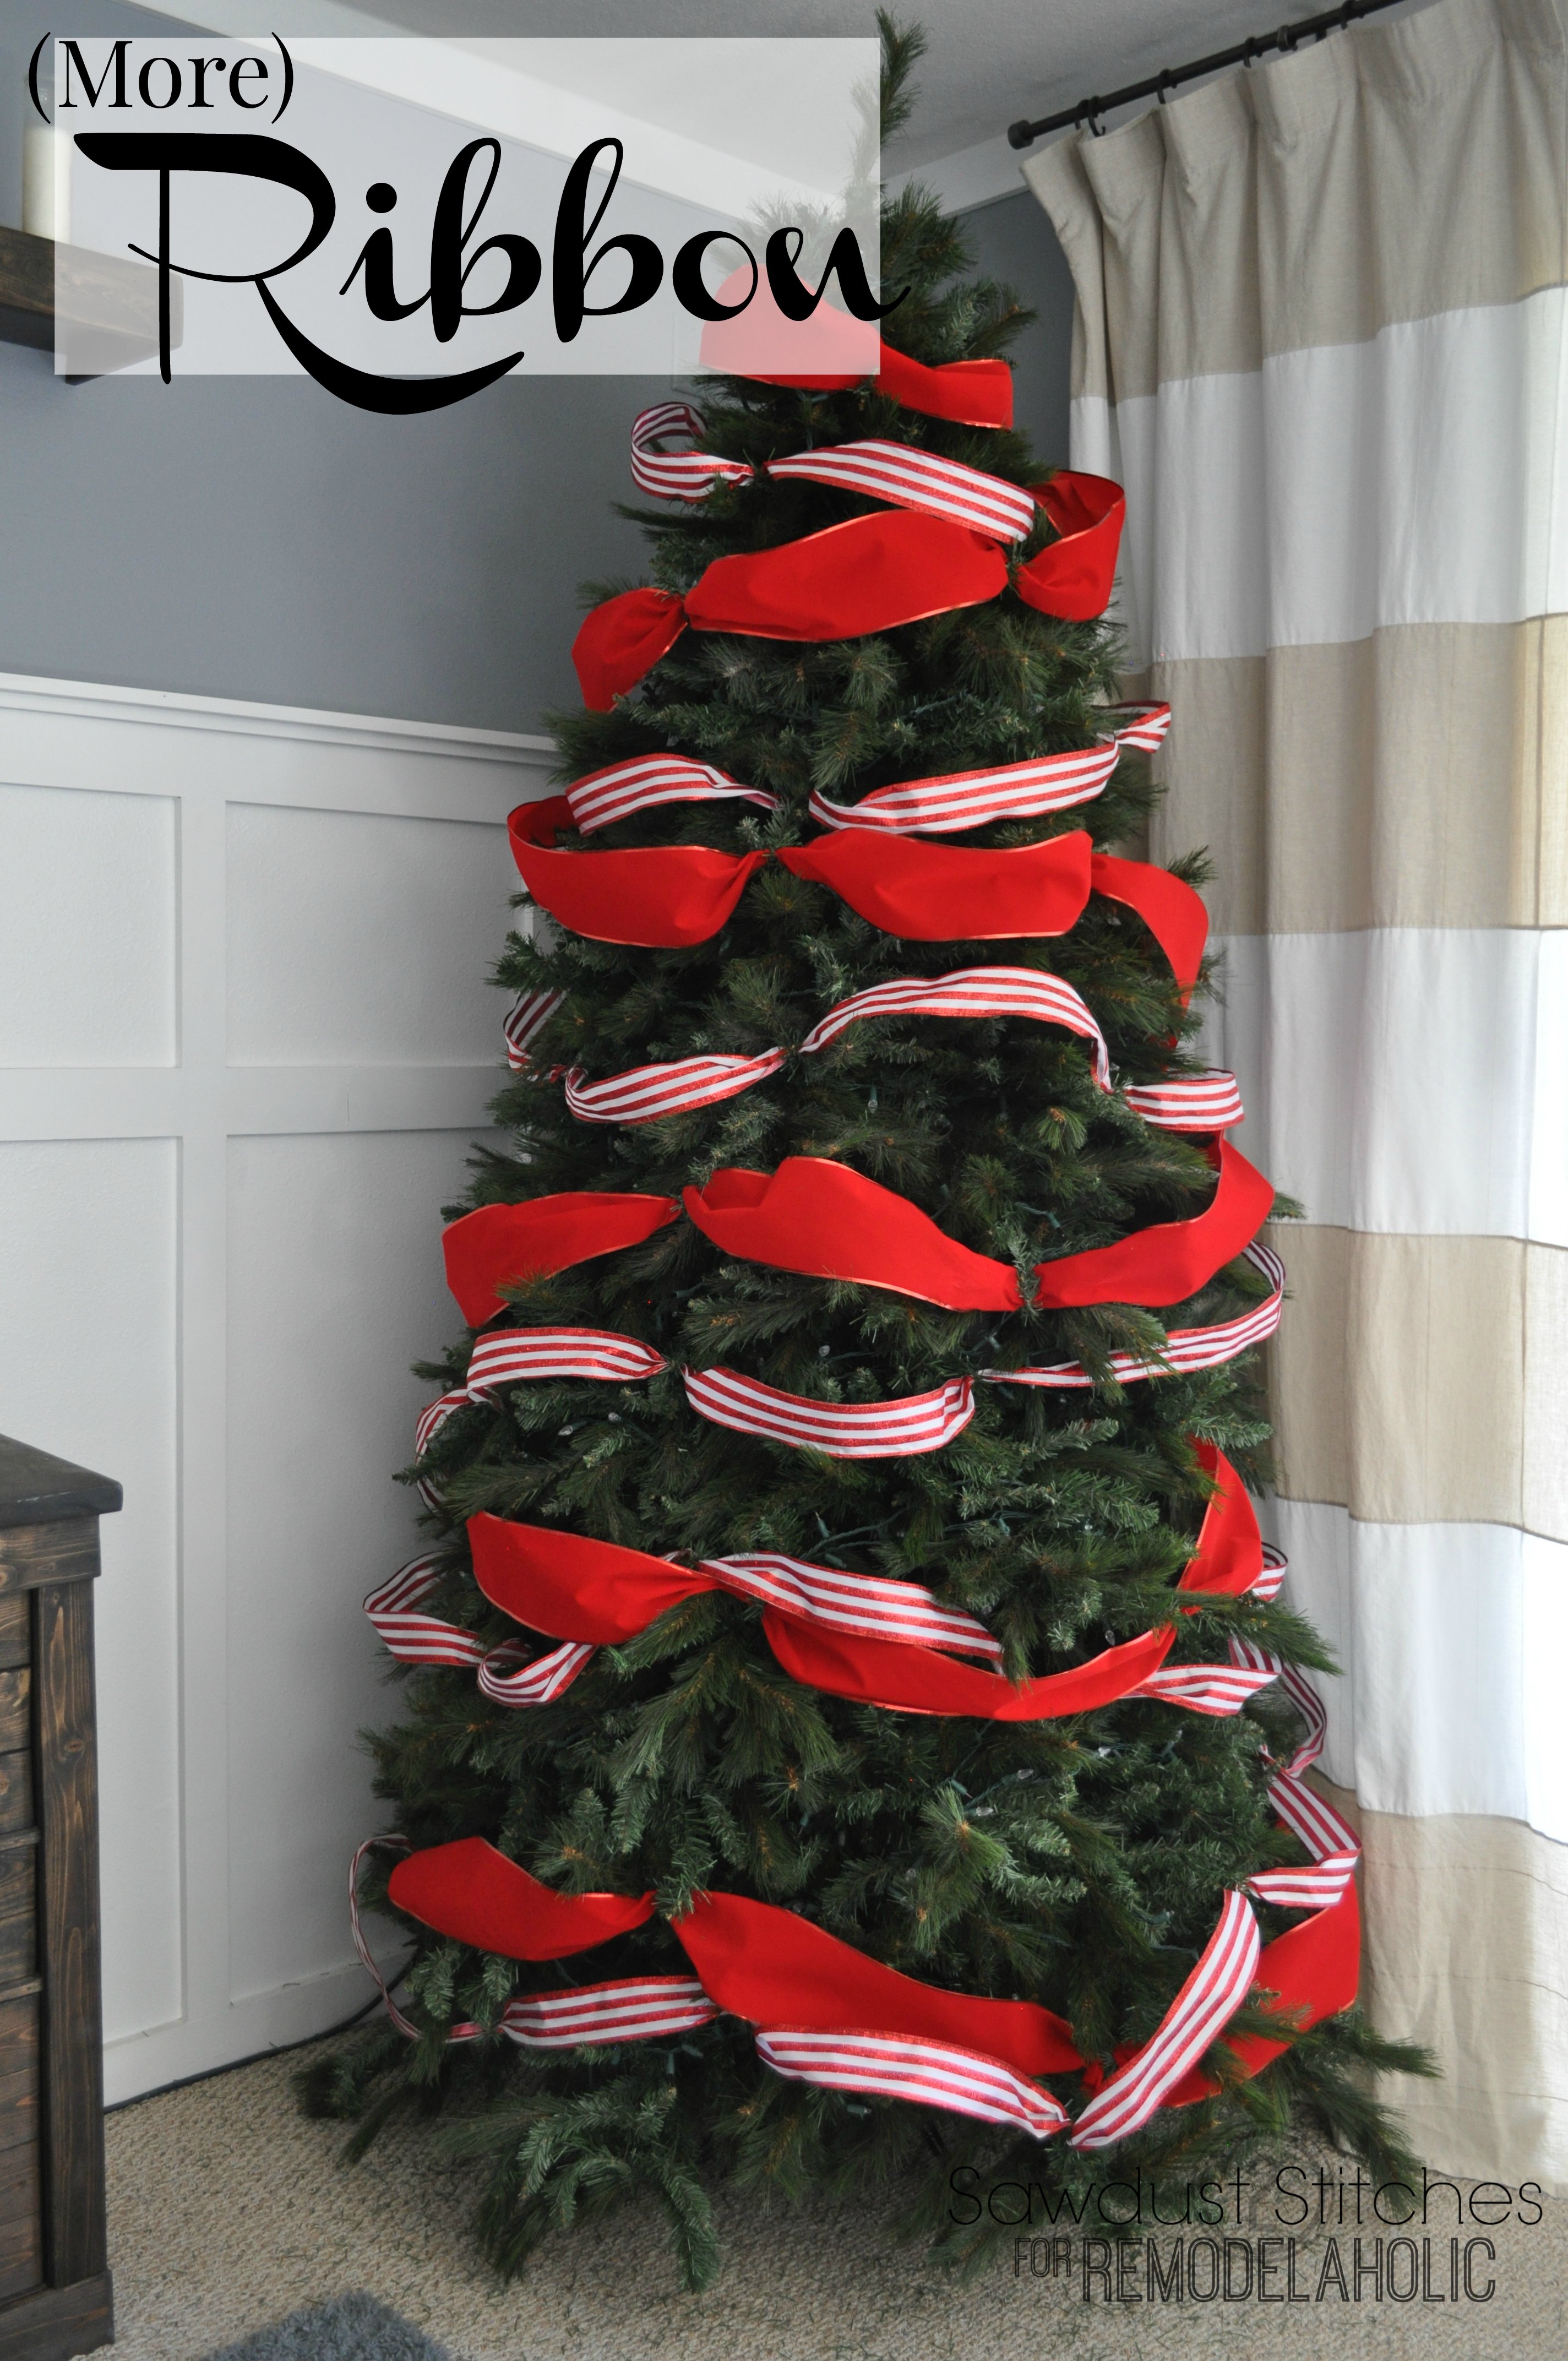
How to decorate a Christmas Tree, Step 2: Ribbon
If I could get you to take away just ONE thing from this tutorial it would be: RIBBON! Seriously, ribbon is awesome! It comes in countless colors and patterns!
 Money-Saving Tip: If you know where to look, ribbon can be CHEAP. I purchased mine from Sam’s Club. It was 5″wide x 25 yards for $6.98 and I only used 15 yards! Check your local dollar store, the craft store sales, etc.
The thing I want you to notice is HOW MUCH space the ribbon takes up! The more space the ribbon takes up, the fewer ornaments you will need.
If you are aiming to spend less on your tree decorating, don’t skip the ribbon! Cost of the Ribbon (Approx.) =$5.00

Decorating Tip: Please, please, please, do not rest the ribbon on the branches, as in the top of the picture. If you have an artificial tree, bend the branch around the ribbon.
If you have a real tree, use a metal ornament hook (use it like a bread twisty-tie). Wrap it around the ribbon and then onto a branch.
This scrunching of the ribbon keeps it in place, adds variation and interest, and also keeps it from masking too much of the tree.
How to decorate a Christmas Tree, Step 3: More Ribbon
Money-Saving Tip: Like I said above, ribbon will end up saving you money with how much space it takes up, so don’t hesitate to spend some money on it!
This striped ribbon was 3″ wide and 50 YARDS long, for only $6.98! On this tree I used approximately 15 yards, leaving plenty left over for garlands, gifts, wreaths etc. Cost of the second ribbon (Approx.) = $2.00
Decorating Tip: Pair a patterned ribbon with a solid ribbon.
Attach it to the branches the same as the solid-colored ribbon, running it in the blank spaces.
Don’t be afraid to let it cross over or under the solid ribbon.
Related Reading: Winter Tablescape on a Dollar Store Budget
4. How to decorate a Christmas tree, Step 4: Extra Large Decorations
 Money-Saving Tip: Start at the dollar store! All the ornaments you see here were purchased there.
The snowflakes came in a pack of two and the bells were $1 each. These are AWESOME because they add texture to the tree (we don’t want it to be all bulbs).
Cost of Extra Large Decorations = $9.00
Related Reading: More dollar store Christmas tree decor hacks
Decorating Tip: When placing these extra large ornaments on the tree, try to set them a little ways in to add dimension and depth. I don’t really “hang” these on the tree, but arrange them on a branch or branches.
 Money-Saving and Decorating Tip: Spray paint some of the decorations (like I did for the red snowflakes) to add some variation.
How to Decorate a Christmas Tree, Step 5: Large Ornaments
Money-Saving Tip: At the Dollar Store, these large ornaments were $1 a piece, which is more expensive than buying the smaller ones in a 16 pack for $5, but like the ribbon, you’ll see it is worth it!
Take a look in the photo below. I added $10 worth of ornaments which filled a majority of the blank spaces! Cost of large ornaments: $10.

Decorating Tip: Dollar Store ornament color options can be very limited, so don’t forget that spray paint is your friend! You can read all about how I painted these here.
How to decorate a Christmas Tree, Step 6: Spray Snow
Spray snow is a temporary spray that has a little bit of texture. I love how it adds dimension and fills visual space without the cost of more ornaments.
Money-Saving Tip: Use it in short bursts, and do NOT cover every inch of the tree. Add just enough to make it look like a frosted pine tree, NOT a white fake tree. 🙂
Decorating Tip: Add the snow at this step, instead of directly after the lights. That way it will stay, not get brushed off when you add the ribbon and ornaments.
Cost of the Spray Snow = $1.50

How to decorate a Christmas Tree, Step 8: Small (Traditional-Sized) Ornaments = $2.00
I say “small” but I am really referencing the traditional-sized bulb you can find at most any store. I found these bulbs at the dollar store, 8 ornaments for $1.00! Boom. In the picture below I used 2 packs.
Cost of Small Ornaments = 2.00

Decorating Tip: When decorating a tree, I prefer traditional colors. If you prefer a more elegant look, try cream or gold. For rustic, try brown or deep red. Use the accent color to make your tree suit your style.

How to decorate a Christmas Tree, Step 9: Pop Color
Most of my “pop color” ornaments are the dollar store ornaments that I also used in steps 5 and 8. The only difference? Spray paint!
That’s right! This year I opted for a light turquoise/seafoam. I love it. I love that I don’t need to be married to a color, because it is only a $3.79 can of spray paint.
Money-Saving Tip: When next year comes around, easily change out your accent color using spray paint. For about $4.00 I can change the entire look of my tree every year. I just keep repainting the previous years’ accent bulbs .
 I also added basic clear ornaments with tinsel put inside. (Another easy way to change the pop color from year to year.) You can read all about it here.

Pop Color cost = $13.50
How to Decorate a Christmas Tree, Step 10: The Star
As is tradition, the star goes on last. Mine is another dollar store purchase! I used a $1 star, and a 2/$1 snowflake. $1.50? I will take it!
Decorating Tip: To give it a little more impact, I layered the star and snowflake.

How to Decorate a Christmas Tree, Step 10: A little extra….

I made these odd-looking guys for basically nothing! They consist of dollar store ornaments (small ones, in a 16 pack for $1.00!), white pony beads, a white metal coat hanger, hot glue, and a drill!
Extra something cost = $3.00
GRAND TOTAL=
- 5″ Ribbon $5.00
- 3″ Ribbon $ 2.00
- XL Decorations $9.00
- Large Ornaments $10.00
- Spray Snow $1.50
- Small Ornaments $ 2.00
- Pop Color $13.50
- Star $ 1.50
- Extra Something $ 3.00 =$49.50 To decorate a 10′ tree!
 One of my favorite features of this tree ? This beauty is kid proof! It’s all plastic, without looking “cheap”.
One other great selling point? I can literally throw the ornaments in a bin! When packing up Christmas, it takes no time at all! No more wrapping individual ornaments or worrying over the glass ornaments breaking into a million sharp pieces!
Happy Holidays, and enjoy!
See more affordable Christmas ideas here, and see more Dollar Store Christmas Tree ideas:
- Gold and Blue Nutcracker Dollar Store Christmas Tree Decor
- Winter Wonderland White and Silver Dollar Store Christmas Tree Decor
- Video: Classic Red and Gold Dollar Store Christmas Tree
Plus more Christmas tree decorating tips and themes:
- Silver and Gold Christmas Tree with Faux Fur Tree Skirt
- Pink, Blue, and Gold Nutcracker Christmas Tree
- Woodland Christmas Tree Decor
- Black and Gold Christmas Tree Decorating Tutorial
- Elegant Christmas Tree Decor in 5 Steps
Originally published 11.21.2014 // Updated 09.18.2020
Corey is the voice and grunt labor behind Sawdust 2 Stitches, she freely professes, that she has a problem... She CANNOT leave well enough alone.
She can typically be found hunched over a sewing machine and/or covered in sawdust. All in the effort to create a perfect balance of aesthetics and practicality in her home.


I love this!! Definitly using the ribbon trick, yours looked so nice amd I have been just laying the ribbon on for years and it slides around and doeant give the tree that dimensional look. And spray paint! Duh! Never even thought about that;)
Thanks Britt! You will love not needing to adjust thee ribbon constantly, and spray paint is a serious game changer! Good luck, and thanks for reading!
I wanted to add that if you wanted a specific color of lights and they are hard to find, I found out coloring them Sharpies in whatever color you want, is amazingly effective! Besides, you can put the kids to work coloring them. 😉
Lorrie, What are great idea! The picture doesn’t show it, but there are red lights, and white lights on this tree. I love it! BUT, I love the idea of coloring them! I will have to keep that in mind! Thanks for sharing.
Wow! How gorgeous! Your creativity and thriftiness amaze me! The Dollar Store is our friend, for sure! Thanks for your inspiration! Merry Christmas!
Pat, I am a huge fan of the Dollar Tree as well, especially when it comes to seasonal decorating! Thanks so much for reading and Merry Christmas!
That is one good looking tree! I love that despite of the price tag, it doesn’t look cheap at all. Thanks for the tips.
Thanks Tracy, I always feel a huge sense of satisfaction when I do it on the cheap! “Look what I made! Guess how much it cost!?” hahah It is half the thrill! Thanks for reading!
Corey! This is seriously fantastic. Like… everything about it. I love the retro look with the colours you chose too! I am going to try out the snow spray- how could I not?
The is a absolutely beautiful tree! I definitely will be trying these decoration idea’s this year. Could please let me know how you made those ornaments with the wire hangers & drill bits. I love that idea.
I love this tree! it’s absolutely gorgeous! When you spray the fake snow on your tree, does it eventually come off before next year? Or is there a cleaning process you do before storing it away?
I love this! Great inspiration for me to get off my butt and finish my tree! – J
I absolutely love these ideas!!! So creative & so simple!
Can you give me more details on how you made the coat hanger things at the end of your post? My family and I live in the Middle East so cute Christmas stuff is hard to come by. It has become a tradition for the kids and I to make Christmas ornaments each year. I would love to try our hands at these guys.
Thanks!
This tree is capital-g Gorgeous! Thanks for laying out all the steps. My very favorite is step 1.5, though! I would take a picture of that part every year!!
Omg this tutorial is sooooooooooooo awesome!!!!!!! Thanks!
We’re going to try & get good deal on new tree after Christmas this year! Do you prefer pre lit or unlit trees? We’ve always had unlit but thinking of giving prelit a try
Definitely go Pre-lit! You will save so much time! And if you ever want more lights, you can string more on!
Awesome tree! Thank you for showing what dollar Tree item
Great job on the tree… but where did you find those horizontal striped curtains?!? Just what I need for my beach cottage!
Wow what an awesome tutorial! Beautiful tree! I would have never guessed that it all came from dollar tree and some of it was handcrafted. It looks beautiful enough to have come from a fancy, country Christmas shop! I have totes full of different color ornaments/themes that I use as every year I change my color. I would’ve never thought to paint ornaments to add color pop keeping my expenses down. Thank you for sharing your wonderful ideas and beautiful tree!
Thanks so much for this post Corey! I was glad to learn the trick to hanging burlap effectively for my “toddler friendly” Christmas tree I put together this year. I linked up to this page on my blog post where I wrote about it, hope thats ok? You can read it here https://mylifeinstep.com/how-to-make-a-toddler-friendly-christmas-tree/
Nice job. Didn’t think it was possible to have a designer looking tree for so little.
I love the decorating tutorial – thanks for sharing this information, it will be helpful when decorating our artificial tree. I wanted to ask your opinion. We have lots of sentimental ornaments that always go on the tree without fail. However, this year, I want to do something different with the garland – we’ve done beads, garland, ribbon, tulle. Do you have any suggestions? Should I go with a wide solid ribbon similar to what you showed in the tutorial paired with a striped ribbon? If so, what color? Our lights are multicolored so it will be a challenge to pick one color scheme. I use a red extra large/long tablecloth as my tree skirt so I think I’ll need to stick with red Also, should the tree topper be proportionate to the tree’s girth. I feel like our tree topper gets lost in the tree.Thanks for any advise your can give.