Build a Custom Banquette Corner Bench
Free up space in your kitchen and add seating with a custom banquette corner bench that you can build to fit your space. It can even add storage if you need that!
Other great kitchen ideas that are a great addition to this banquette corner bench: a rustic bench, add a built-in breakfast bar, or add a faux brick backsplash.

Banquette Bench Inspiration
Looking for more banquette inspiration? Check out these banquette benches we love, and scroll down for the details of Chelsea’s banquette corner bench building.
 Built-in Banquette and Shelf | Grey Dog Designs featured on Remodelaholic
 Built-In Breakfast Banquette from Recycled Cabinet | Accessorize and Organize featured on Remodelaholic
 Corner Banquette | via Better Homes and Gardens
 Eclectic Cottage Banquette Nook | via Apartment Therapy
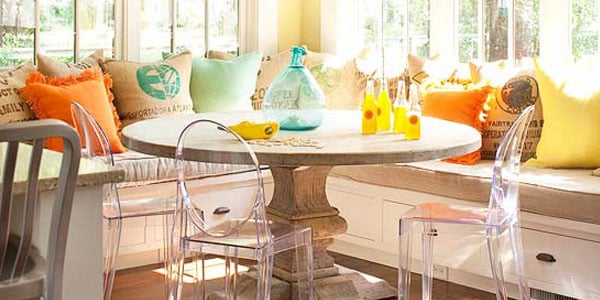
 8 Tips for a Sunny Corner Banquette | Remodelaholic (image via BHG)
(plus 7 more tips for a classic banquette bench from Remodelaholic)
Build a Custom Corner Banquette Bench
by Chelsea the Pinterior Designer

We have a larger kitchen, which I’m not complaining about, there’s just a lot of open space and our hand-me-down table was looking a little lonely. I came up with the genius idea to build our own banquette to fit into our space perfectly.

We went to Lowe’s to gather our supplies. We weren’t 100% sure what all we needed, but decided we’d just keep looking till we figured the project out. I think that’s the secret to this whole DIY thing. We’ve accepted that we’re not experts and that we will most likely run into problems along the way. Keeping that perspective in mind helps us accept the fact that we will mess up and our projects won’t always seem perfect at first, but not to give up. We left Lowe’s with a car full of supplies

List of supplies and tools:

Supplies:
- 2 sheets of plywood (we had Lowe’s rip the boards in half so we could fit it in the car)
- 1 sheet of veneer plywood to use for the front of the bench
- 2 – 1 x 10 x 8 boards (for the top of the bench)
- 10 – 2 x 3 studs for the frame
- 8 – 1 x 3s for the trim and supporting the headboard
- Metal brackets + nuts and bolts to attach the headboard
Tools:
- Power Sander (or just sand paper)
- Miter Saw Nail Gun + Air Compressor (we wish we had a finish nailer for this project though)
- Circular Saw
Building Tutorial
The first step was to remove the baseboard and build the frame. If you can build a box, then congratulations! You can do this project!
Use a miter saw to cut your 2 x 3s to the correct measurements. We cut our boards to a length of 76 inches long and the width of the support pieces were 17.5 inches. If we could redo the banquette, I would have done this part differently! I am the literal worst at measuring. We should have made the support pieces only 15 inches long because our banquette is a little too tall once you add the 1 x 10s and the cushion. You win some, you lose some.
Because we didn’t have the correct tools, we made way more work for ourselves. So frustrating. Every time we attached 2 x 3s together, we held them in place with a brad nail, then went back with the drill and secured them with 3.5 inch wood screws. We had a finish nailer in our cart at Lowe’s but decided not to pull the trigger (pun intended) on the purchase. After hours of drilling, we were kicking ourselves for not biting the bullet and just buying it.

Once the first frame was built, we repeated it for the other side of the banquette, but only made the length 70 inches long to fit in the space we had. The next step was attach the 2 frames together with the wood screws.

From there, we added the front of the bench which was a veneer board. Cut the board using a circular saw and attach it to the front using a brad nail gun. Since the veneer is so thin, that’s all it needs to stay in place. We decided not to finish the back side of the banquette because no one would ever see it. Why do extra work for no reason?!

Next up was adding the trim. I wanted to keep the trim modern and coordinate with the board and batten we have in our dining room. We cut the 1 x 3’s using the miter saw and attached using the nail gun only. First, we added the outside border of the trim, then we went back and added the vertical pieces which were 12 and 6/8 long. The end pieces were 14 inches across by 18 inches long.

Next up, we attached the headboards which were also custom-made. I scoured Pinterest for inspiration and ended up with a belgrave shaped design. I drew my design on a piece of poster board and traced it on each side. Using the circular saw, we cut out the pattern. The headboards sizes are 76 x 25 and 70 x 25.
Then, I adhered 1.5 inch foam from Joann’s with spray adhesive. Cover the entire headboard with batting and attach with a staple gun.
Then, upholster the headboard with fabric. I used a faux vinyl-like clearance fabric from Joann’s that cost about $12 per yard. I bought 4 yards just to be safe and I have plenty left over. This was one of my first times trying to upholster anything and there was a ton of trial and error involved. Brooke, from All Things Thrifty, has a ton of great tutorials so I wouldn’t have been able to complete this project if it wasn’t for her great instructions.
To attach the headboard we used two different methods. For the left bench, we used metal brackets that we bought from Lowe’s. We chose the brackets because the bench needed to sit flush against the wall and this allowed there to be almost no gap between the bench and the wall.
Before upholstering the headboard, Nate drilled a hole for the bolt, stuck it through, and screwed the nut on to keep it in place. Once it was time to attach the headboard, we simply removed the nut, slide the bolt into the metal bracket which we attached to the bench, and screwed the nut back on. Sorry I don’t have any pictures of this part.

For the right bench, we worried about the window right behind the headboard. We didn’t want anyone to accidentally break the window by leaning too hard into it. To add more stability, we attached 3 1 x 3s to the bottom of the bench. We then screwed the 2 x 3s into the headboard using the same wood screws as the frame.

Next, cut and attach the 1 x 10s to the top of the bench frame with wood screws.
From there, it was just finishing work! We sanded down all of the trim pieces to make them look connected. I caulked all of the seams, spackled then sanded nail and screw holes, and then prepared to paint.
I painted the bench Ultra White by Valspar in semi-gloss which is what I use on all the trim in our house. I had to be super careful around the headboard and I really wished I would have painted it before I attached the whiteboards.

To create the bench, I used the same process as the headboard. I cut a piece of plywood using the circular saw, attached 3 inch foam using spray adhesive, covered the whole thing with batting and stapled it down using a staple gun, and finally covered it with black fabric. I can’t remember the name of the fabric, but it was just a basic black cotton that cost less than $5 a yard. I chose simple black and white colors because I wanted to have a clean backdrop to pair with holiday table settings and patterned pillows. I wanted to be able to accessorize the table any way I wanted without having to worry about matching the banquette.

The project took us one weekend to complete with plenty of breaks in between. There was definitely a learning curve involved + WAY too many trips back to Lowe’s, Joann’s, and A.C. Moore to pick up extra supplies. Hopefully this tutorial will help spare you some of the problems we encountered along the way.
The total cost was about $250, which we were pretty pleased with because when you think about it, we now have a piece of furniture that fits perfectly, maximizes the space we have, and works perfectly with our design style. I’d call that a win!


After you build a banquette corner bench, you might want a new dining table to build or buy. Not sure what height to build your bench, we’ve got tips for getting the right height.
Please be sure to pin this project for later reference:


————————————————–
Thanks for being our guest, Chelsea! Love the banquette!
Hi. I’m Chelsea and I’m addicted to DIY. Right now, I’m imagining you all responding with the cliché choral response of “Hi, Chelsea.” It’s true, though. I am addicted to DIY and I’m not afraid to say it. I write a fairly new blog called Pinterior Designer where I share how to’s and stories about how I’m slowly upgrading my builder basic house one project at a time. Unfortunately for my husband, Nate, I DIY on a whim so he’ll often come home from a trip or a long day of work to coated counter tops or a repainted guest room with a faux picture frame design. I’ve learned that I can’t control the crazy, so I’m just embracing it. I’m not quite sure if he feels the same way…
Originally published 1.3.2014 // Updated 3.25.2020
Lorene has been behind the scenes here at Remodelaholic for more than a decade! She believes that planning projects and actually completing them are two different hobbies, but that doesn't stop her from planning at least a dozen projects at any given time. She spends her free time creating memories with her husband and 5 kids, traveling as far as she can afford, and partaking of books in any form available.


Some great ideas here. Thanks for the images and the guide 🙂 Tempted to try this in the new year!
Adam- go for it! The project is pretty straight forward and you end up with a totally custom piece. Definitely worth the time.
Thank you so much for the feature!! So honored. 🙂
You are very welcome!
This is soo helpful as I will soon be doing this very idea in my kitchen!
After painting the cabinets, and walls, and maybe finishing the trim work on the floors…
I guess I better get moving! Thanks for the inspiration!
Awesome idea! Perfect way to maximize our nook area, definitely trying this project…exciting.
If I wasn’t going to add the back support would it just be one sheet of plywood?
Great work Chelsea !! I am a novice to any kind of woodwork but i was so inspired by this banquette that i dived head on into this idea for my dining. Instruction are very helpful but i wanna know how did you connect 2x3s.I am having trouble doing this.what are the dimentions of screws and drill bit?
I used 3.5 inch screws.individually screwing in each screw was so much work. My husband and I were wishing we would’ve bought a finish nailer and used that.
Ha! You can stop beating yourselves up for not buying a finish nailer. Most use staples and brads that are long enough for 2×3’s. You likely would have needed a framing nailer. I discovered this when I was planning my banquette project. (I am relying heavily on your excellent information. I looked at many sites but your photos were the best. Thanks)
Thanks, Donna!
Hi Chelsea, i finished building my banquet.It sits in the dining area of our small townhous, makes it brighter and lively. I sew the cushions and most of cushion covers and painted most of them. I have to figure out way to post a pic!
You can send us a picture over on Facebook! https://www.facebook.com/Remodelaholic 🙂
Hi, excellent job!
What would the cost of the wood be roughly to do this?
Hi Sam! It will really depend on what grade of plywood and lumber you choose, since the cost varies so much. You can use Chelsea’s supply list (above) and price-check online at Home Depot to get an idea of the different price options. Thanks!
The build looks great, good job on the project guys.
Just one question. What did you do with the vent that’s in the floor? Did you redirect it at all under your bench? Thanks.
Hi Matt,
That detail isn’t in the post, so I’m not certain what Chelse did, but the vent should definitely be redirected for adequate ventilation and air flow. I’m not sure how often Chelsea (the author of this guest post) is able to check back on the comments here, but you can also click over to her site (linked toward the top of the post) and ask there. Thanks!
For air flow, instead of enclosing the front of the bench with veneer, you can buy sheets of tin or aluminum that are vented or slotted. Glue or nail these directly to the frame of the bench and then paint them the desired color (or paint first). You can then add trim on top of the sheets. You can read about it here…
https://www.impatientlycrafty.com/2014/02/15/kitchen-nook-storage-benches/
Good luck!
Thanks for the information, Scott!
We have some old restaurant booths that we use in our 400 sq ft house and they work great! The vinyl has some tears so I’m looking for some replacement ideas. These look beautiful, but honestly, how practical is cloth covered seating and loose pillows in the dining room? MAYBE if you don’t have kids, but still seems like they’d be covered in crumbs and food stains after awhile.
You did an amazing job well done. It all Looks so much more glamorous and classy now!
The result looks amazing! I especially liked your ‘headboard’ idea. I’ve been wanting to build a banquette in my kitchen FOREVER! Maybe this will be the year 😉
Thanks for the honest tips!
Id love to do this but I’ll definitely need help. This would be a first project for me @chelsea.I’ll need a total list of what to buy
Hey there, what kind of caulk did you use prior to painting? I wouldn’t think paint would stick to silicone caulk. I love the idea of filling in the cracks before painting. You did an amazing Job, it turned out very nice!!!!
Muy buen artículo, he aprendido mucho, aunque me ha costado porque mi inglés es bajo.
gracias
You are welcome! De nada!
Just came across this post and this is the most detailed I’ve seen so far. Gonna try to out during the summer! You should include some nice cushions too!
So glad it was helpful. Let us know how it turns out with photos. Good luck!
Hi, where did you get the cushions? Or did you make them? Thanks for the inspiration, this looks so lovely! We are buying a lake house/cabin and the kitchen-dining space is small, so this is exactly what we are going to do!