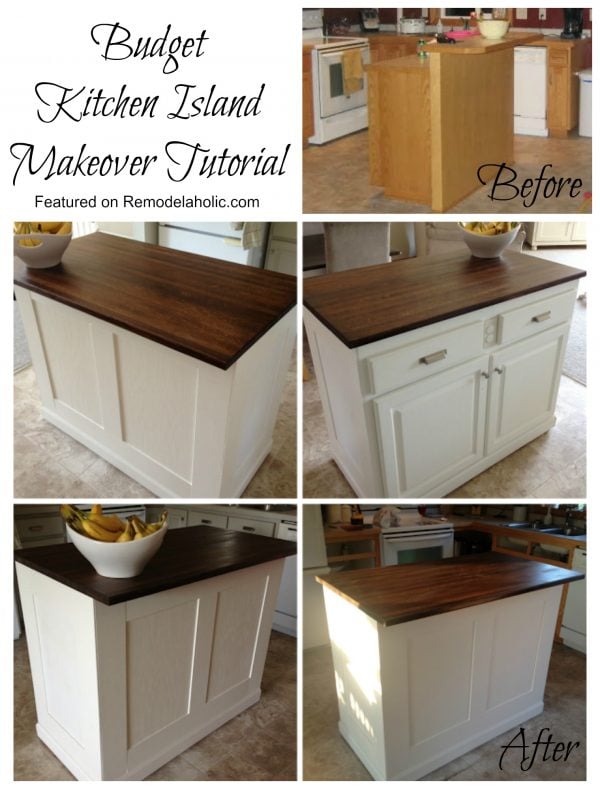
Budget-Friendly Board and Batten Kitchen Island Makeover

 Welcome to Heardmont featured on Remodelaholic
 New Green Mama featured on Remodelaholic
 My Uncommon Slice of Suburbia featured on Remodelaholic
 House Four featured on Remodelaholic

$20 Butcherblock Board and Batten Kitchen Island Makeover
by Stacy of The Serene Swede
Hello everyone! I’m Stacy from The Serene Swede where I blog about all types of DIY projects that can be done on a limited budget. I am SO thrilled to be a guest today on Remodelaholic! I stalk this blog daily so imagine my surprise when they asked little ol’ me to be featured! EEEK!!

Most days you can find me in a pair of paint splattered jeans with a cup of coffee in my hand and a dazed look on my face -more than likely contemplating what I can rip apart next. My husband is pretty used to this look and somehow still manages to stick around and help me with all of my spur of the moment projects. He’s cool like that 🙂
We purchased our builder basic home in 2008 and have been slowly making things more “us” ever since. We are located in a wonderful neighborhood but unfortunately all the houses are built with pretty much the same interior design and style. Armed with an eager imagination and a few tools, we set out to change that. From our board and batten master bedroom to our staircase makeover, our home is starting to look much more custom than we ever even dreamed possible.
One of the first major changes we made was in the kitchen. The kitchen is definitely the heart of the home for us. We are always gathered around the kitchen island for conversations and it seems to be the most used piece of “furniture” in our home. That being said, our island was built with breakfast bar area that served absolutely no purpose. Our dining room is connected to the kitchen through an open floor plan and with the breakfast bar attached, there wasn’t enough room for the dining chairs to slide back let alone ever have actual bar stools there. The picture quality is terrible and you can’t see the table- but you get the idea.

One day while lurking about in the Habitat for Humanity Restore, I stumbled upon all of the materials that I would need to create a board and batten looking island. If you haven’t check to see if there is a Restore in your area, please do. They are awesome!
Their wood section can look a little intimidating but if you’re willing to dig, you can usually find exactly what you are looking for.

I snatched up the batten pieces (plywood), already ripped to identical widths (each at 6″) and over 8′ long for only $1 per piece! I bought all the pieces they had (5 of them) just in case I made any mistakes with my cuts. The base board trim was also there for only $1 per piece so I grabbed that too.
I initially thought that I would have to head to IKEA and purchase the butcher block.
An employee came wheeling a cart full of items to be put away and left it right by me, and I spotted it. The glorious butcher block!! I painstakingly hauled it to the counter to ask how much it was. When the store clerk said, “um, how’s $5?” I don’t think I could have pulled my money out fast enough. And if that wasn’t good enough, the cart also had a large oak piece of wood that was perfect to cover the back of the island -once the bar was removed- for another $5!!!
Then one day when the hubs was away and the kids were out of town, I took it upon myself to rip the island down to a basic cabinet and build it back up the way I had envisioned it to look in my head. I didn’t really know what I was up against because I couldn’t for the life of me find anyone who had ever removed a breakfast bar, only people who added one.
Armed with a drill, I started by removing the counter top. There were only four screws holding it together so it came off real quick! Having the counter gone provided me a lot more light to be able to spot what was holding the back of the island on.

I found 6 screw holes that I assumed were holding the bar part up and I just started removing them- hoping for the best! Sure enough, that puppy came crashing down and I caught it! Right before it would have smashed into my dining table-whew!

In case your wondering, yes, I always start project without any regard to the cleanliness of my house.
Things were looking up!
After assessing the new shape of the island, I decide that it wasn’t necessary to use the large piece of oak that I bought for the area where the breakfast bar was attached but I was going use it anyway. There was a solid backing there but it was laminate, not wood. I was concerned that leaving it that way wouldn’t go over so well when it came to painting time.
I attached the solid oak piece to the frame with liquid nails. You’ll notice a theme here with the liquid nails bit.
The island had a toe kick space underneath the cabinet area as well as on two sides that needed to be filled in before I could attach my base board molding. To build out this area and have a solid surface for attaching, I cut out nine, 1″ pieces of 2×4 and used these as spacers. (2 on each side and 3 underneath the cabinet area). I then cut a 2×4 to the length of the island with mitered corners and glued it to the spacers. This allowed for the base board molding to be attached to the island, look built in, and not have any risk of being to flimsy if it ever got kicked in.
I tried to create a small diagram to illustrate exactly what is going on underneath the molding because I may have gotten a little carried away and forgot to take pictures of this step!
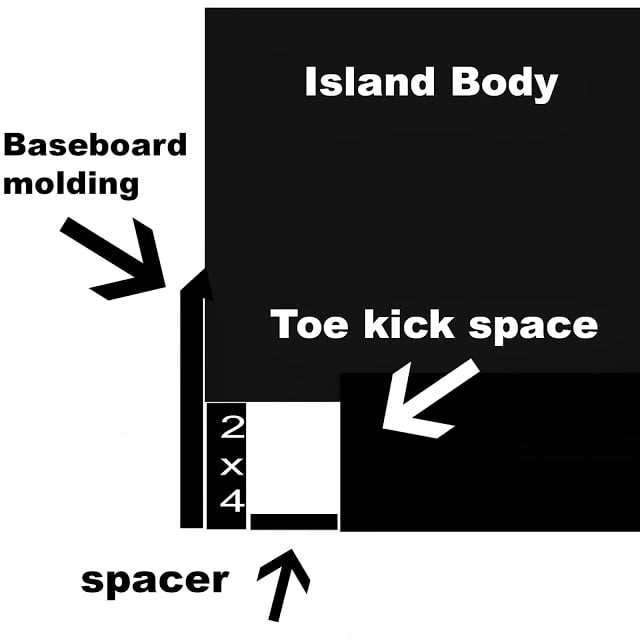
You can see in the picture below that I left a small 1/2″ gap between the floor and the molding because I knew that we will be replacing the flooring in our kitchen and will eventually be putting down some quarter round in that spot.

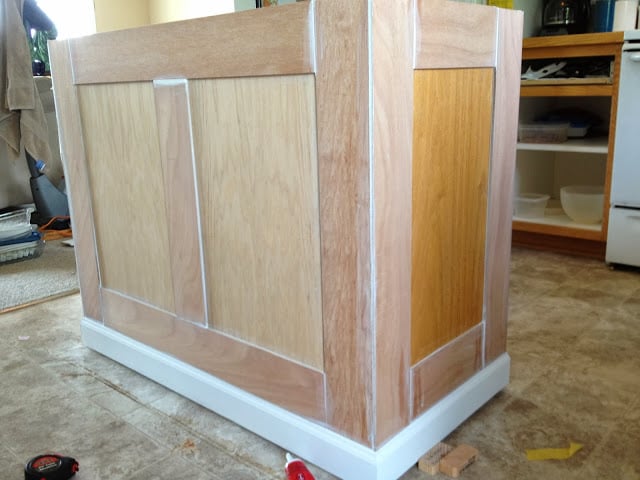
I carefully measured out the sizes needed for the vertical batten strips and I ran out to my garage to make my cuts. Each side of the island had two vertical strips and two smaller horizontal strips while the back of the island (the area where the breakfast bar was removed) had three vertical strips (two long and one short) and two horizontal strips. I choice this style to give it a little bit more dimension and character.
I attached the vertical pieces first with liquid nails and held it to the island with painters tape so it wouldn’t slide. Once those strips were in place, I carefully measured the gap in between them and cut the horizontal strips to fit in between. Those babies were also attached with liquid nails.

When you have them all attached, you can get to the funner stuff!
I used white paintable caulk to cover up any mistakes that I made while cutting and also to give it a real seamless look. Caulk is pretty amazing at making anything look professional.
Once the caulk had dried, I started painting. I used Behr Premium Plus Paint which has primer in it already so I could skip the step of priming it first. I don’t usually take shortcuts with this kind of stuff, but I have to be honest. We were also in the middle of painting trim, kitchen cabinets and over 2,000 square feet of wall so I was feeling a bit defeated and just wanted to get it done. We had this color of paint laying around from an old project and it was just what I wanted. Not too white, not too cream, just the right balance of both.
 |
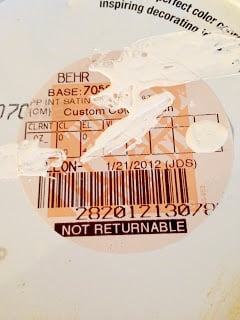 |
Apparently, I’m a very messy painter so I’m not sure that you could really benefit from the color match picture but hey—maybe you know something about these labels that I don’t and can still figure out the color!
While the new island was drying, I ran out to the garage to throw a coat of stain on the newly cut and sanded down butcher block. I should probably mention that I also applied wood conditioner to it before staining to ensure even coverage. I definitely didn’t want a blotchy stain job! I wanted to have a nice dark finish to match with the flooring that we will be putting in the kitchen so I used Minwax in Dark Walnut. I absolutely LOVE the way it turned out. It’s so warm and inviting.

We hauled the butcher block in once it had dried and set it on top of the island. While I sat on it to keep it exactly where we wanted it, Mr. Serene screw the counter top in. We left a small overhang on the back side so that I can eventually add corbels. I just haven’t found the perfect ones yet. Anyone else like that? Plan for something and then never finish it?
We attached the hardware and we had a brand new island!!
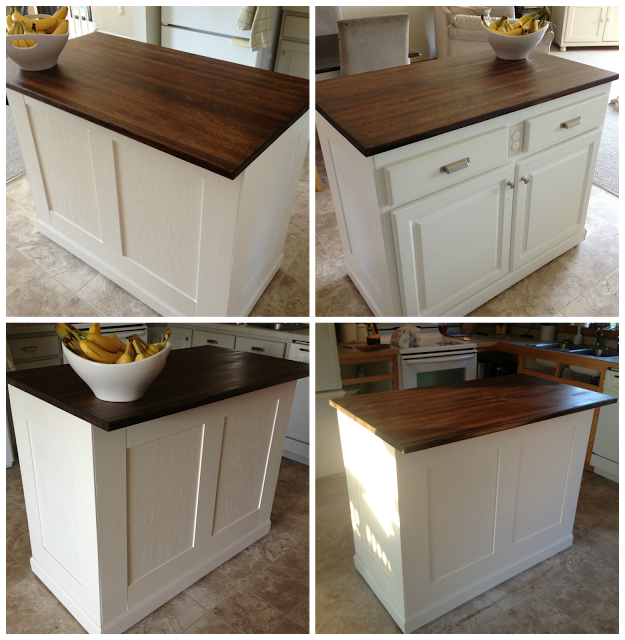

Isn’t she beautiful?!
Total time and cost breakdown for this project?
TIME: 2 days
- batten strips (5 @ $1ea.) = $5
- trim (2 @$1ea) = $2
- oak board = $5
- butcher block =$5
- caulk (already owned) = $0
- paint (already owned) = $0
- 3 tubes liquid nails (already owned) = $0
- Minwax Dark Walnut Stain (leftover from stair makeover) = $0
- Wood Conditioner (leftover from stair makeover) = $0
GRAND TOTAL: $17!!! (or $18.25 after tax if you want to be picky 🙂 )
I had a great time being a guest today and I hoped you all enjoyed it too! A big thank you to Cassity and Justin for inviting me to be a part of Remodelaholic !! And if your feelin’ frisky, stop on by my blog and check out what else I’ve been up too. I love new friends!!!
Love it, Stacy! It’s so amazing when you can find the exact materials you need at such a bargain. That’s good DIYing karma at work! Be sure to stop by The Serene Swede to see the other great projects that Stacy is doing in her home.
Lorene has been behind the scenes here at Remodelaholic for more than a decade! She believes that planning projects and actually completing them are two different hobbies, but that doesn't stop her from planning at least a dozen projects at any given time. She spends her free time creating memories with her husband and 5 kids, traveling as far as she can afford, and partaking of books in any form available.


Thank you so much for inviting me to be a guest today!
You are very welcome!
Stacy, this is such an unbelievably gorgeous piece! And it goes to show that we can do it ourselves… and make it look like we’ve spent hundreds!
Amazing. Love this, so pretty. I would love to have you link up to my Inspire Me party that goes live on Monday at 2:30 PT. http://www.astrollthrulife.net Hope to see you there. Hugs, Marty
Thank you for the inspiration! I love what you did with it! And I’m always forgetting about the Restore store in the next town over. I’ll have to go check it out soon. It’s my father’s favorite place to shop!
Wow, that looks amazing! I always wish I had an island in my kitchen but it’s way too narrow. I can dream though =).
Fantastic!!!
You go girl! Looks great! I needed to see your post. I have a terribly ugly island. I have been wanting to redo for awhile. Just an FYI… when you get a nail gun…. try Ryobi 18Volt Cordless. I have one and its awesome. Keep up the great work.
Tina
Thanks Tina, that is good to know.
Nice! Way to be resourceful with materials. Looks amazing!
Looks amazing I’m wanting to do board and batten in our living room can you specify the sizes of what you used and type of material? So I know what to look for?thanks!
This is perfect! I am in the process of renovating my kitchen and was trying to figure out how to “ground” my island. I took a few minutes to browse through my pins to see if I had pinned anything useful and lo and behold – there was your pin I saved!! Thank you for sharing with us!
You’re welcome! Thanks for pinning 🙂
May I ask where you found butcher block for $5?
I love how this turned out! I have a habitat for humanity store near me that I haven’t been to, and this gives me lots motivation to get there!
Your island turned out beautifully! Can I ask how many coats of stain were applied and did you use any kind of topcoat or finish to the butcher block?
Thanks!
LOVE my re-Store! FYI, you can save the barcode (a pic on your phone will do) from any HD paint label and they will scan it or punch it in manually and it pops up the formula on their computer. I have a base cabinet in my shop/garage that I want to do something very similar with, with our leftover beadboard scraps! Thanks for the post!