Sometimes there are homes and rooms that need a total renovation: gut it and start from scratch. More often, you can work with what you’ve got to make something that works — which might still take knocking out a wall or two 🙂 But no matter where you start from, there are some details and finishing touches that can really turn a good-looking room into a beautiful room. Things like fresh paint, some added trim or finish work, and personalized homey decorating.
One of our readers, Jenny, sent in these before and afters of her home and she nailed it! The befores are nice, but the afters and the small touches that Jenny added (on her own, self-taught DIYing, I might add) really just take her kitchen from nice to amazing! Jenny is here today to share her gorgeous kitchen makeover and some tips for making a home facelift successful. And Jenny paid us the highest compliment: “Yours was the first DIY home improvement site I ever came across and the inspiration for me believing that maybe, just maybe, I could do a little DIY, too.” We’re blushing and so thrilled to have been part of your story, Jenny! Remodelaholics, be sure to leave her a comment to let her know what a great job she did!
UPDATE: Paint colors and decor sources at the bottom of the post!
4 Steps to a Successful Kitchen Makeover
from reader Jenny
In the two years I’ve lived in my current home, I have undertaken dozens of home improvement projects, doing nearly all of the work myself, even while pregnant with my 4th child. In the process, I have learned two things: 1) “Yes, I can!” With hard work and determination, I can transform my space all on my own, in true DIY style; and 2) Small and simple changes can have a significant impact on the look and feel of a space.
My kitchen facelift is the perfect example of how a “can do” attitude joined with thoughtful improvements can transform a space. I didn’t have what I would call a ‘bad’ kitchen, but it lacked personality. When I moved in, I could see where, with a little care, I could make it more to my liking without a major renovation and without significant expense. So that’s what I did! Here’s how:
1) Catch the Vision
I first had to come up with a plan. To see the picture in my head of how the kitchen could be better. I started by considering how I and my family use the kitchen space and what we needed to make it function well for us. Immediately, I knew we had to have more light! The kitchen was dimly lit and felt dark and unwelcoming in the evenings. I hired an electrician to install several additional pot lights in the ceiling, as well as two pendant lights over the island. This was the most expensive part of the makeover, but one I wasn’t comfortable doing myself. It cost about $1,000. Well worth the expense!
I also identified that the minimal wire shelving in the pantry was insufficient, so I ripped it out and installed custom wood shelves and converted a coat closet in to a second pantry so that we’d have enough space for food storage. I then built a custom spice rack and attached it to the pantry door to maximize the space even more!
pantry makeover
There were other, smaller updates that improved the efficiency of the space, as well, such as relocating an under-cabinet-mounted microwave to a spot where it would take up less space and adding a towel bar across from the kitchen sink. And, because I have kids, I even added a giant magnetic chalkboard to the exposed side of the cabinets housing the double ovens. A custom chalkboard was too expensive, so I had a local sheet metal shop cut a piece of metal to size. I used construction adhesive to mount it to the cabinets and then painted it with chalkboard paint.
I spent time browsing Pinterest and home decorating sites to get ideas. Most of the kitchens on these sites were brand new and professionally designed. I knew that without spending a ton of money, my kitchen wasn’t going to look like those, but I also knew that I could identify elements of design and customization in these kitchens that I liked and then translate that in to something I could re-create in my own kitchen.
2) Plan and Prepare: Once I had a bunch of ideas in mind, I had to sift through them and decide what I could make happen with a little DIY magic. There were several things I would love to have done, but decided against either because of the time it would have required or the expense. I’m a mom of 4 kids ages 10 and under. I had to be realistic about how long I could disrupt our family’s living space while I made the improvements and how it would effect my family for my time to be swallowed up by this project.
Once I determined the ‘what,’ I had to figure out the ‘how.’ I am entirely self taught. Anything and everything I learned about DIY home improvement, I learned from watching a YouTube video or reading an online tutorial. So if there was something I wanted to do, I Googled it to learn how!
3) Don’t Forget the Little Stuff: Most of the improvements I made to my kitchen were on a small scale. I didn’t paint or replace the cabinets. I didn’t re-do the floors or install new appliances. But when you add up all the little stuff—-custom shelves above the windows, a new coat of paint, crown molding and wainscoting, and decorative touches—-it equals big impact. And I saved a lot of money by doing the work myself.
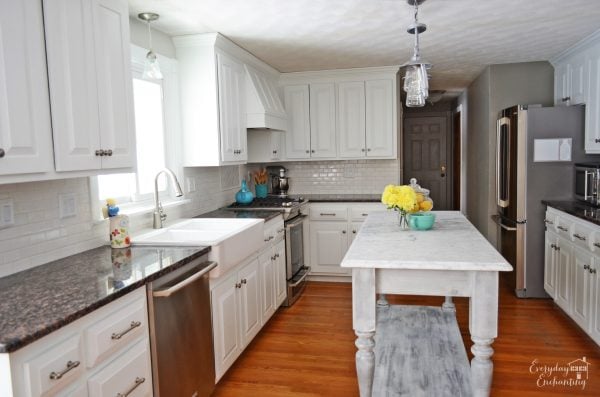
I spent less than $200 on the trim wood for the crown molding, chair rail, and shadow boxes. The shelf above the kitchen eating area was made mostly of scrap wood, so the biggest expense was the hooks, which cost around $30. The shelf above the kitchen sink is just corbels, a board, and a piece of trim. About $30 to build. Several of the signs hanging in my kitchen, I made using scrapwood and paint I already had on hand. The bar stools and desk chair I picked up at a garage sale for $23 total. All I had to do was paint them. I used sheets of beadboard to finish off the ends of all the cabinets, to make a backsplash, and to improve the kitchen island. The beadboard cost about $100.
I even made my own kitchen table! I banded a piece of plywood with trim for the tabletop and attached it to 4 table legs I recycled from an old table and painted it to match my kitchen. Now I have a table that seats 8 and it cost me less than $50 to build.
4) Get to Work!: This is the fun part, but also the hard part! Take the time to be prepared and to think things through before starting. Start small and work from there as you gain confidence in your skills. If you’re anything like me, it’s going to take you longer than you think it will and there will be all kinds of hiccups along the way, but hold on to your vision. Don’t give up! It will be worth it in the end!
The pictures to prove it . . .
SOURCES
Paint colors Beadboard: I had Home Depot custom color match the color of my cabinets using Behr paint.
Crown molding, chair rail, and shadow boxes: White Dove by Benjamin Moore
Kitchen walls: Restoration Hardware Silver Sage
Bird plates: Birch Lane
White plates (above the doorway): Home Goods.
Large Bakery sign: AntiqueFarmhouse.com
—————————————-
Jenny, thank you so much for sharing this with us! I love how all the small changes you made added up to such a wonderful finished kitchen!
Want to show off your amazing skills? Submit a brag post here!
See more beautiful white kitchen inspiration here (click each photo):
Jenny enjoys making life more beautiful in the details. For her, there's nothing more satisfying than figuring out how to get it done DIY-style! She dabbles in a little bit of everything . . . home renovation and decorating, graphic design, cake decorating and baking . . . whatever strikes her fancy at the moment. You're welcome to follow along with her DIY adventures on her Instagram account @turnip_greens_sweet_tea
Jenny, I found this post after seeing the wainscoting post…I would love for you to start a blog!!!! I would be following for sure! Your home is beautiful!
wow this is amazing! It all looked nice before but the things you added really make it look like a home that a lot of thought went in to. It’s very impressive!!
Love the kitchen and the dinning room . What is on the other side of the window in the dinning room ? Love the bakery sign . I want to make the shelf with the hooks , super cute . Great job on everything.
Thanks, Nancy
Hi there, Nancy! Thank you! On the other side of the window, opposite the bakery sign, are 4 bird plates. You can see a narrow shot of them with the collage of pictures featuring kitchen decor. Thanks again!
Thank you! I purchased the roman shades at a Pottery Barn clearance sale about 2 years ago. Unsure if PB still carries them. The color on the walls in the kitchen is Restoration Hardware Silver Sage.
Such a beautiful kitchen! I am in the market for new dining room chairs. I headed to Pinterest for some inspiration and found this post. Can you tell me where you got your white side chairs? They are exactly what I am looking for!
Thank you! I wish I had better news, but all of the chairs are rather old and probably no longer being sold, but I’m happy to tell you where I got them just in case. The 2 end chairs were purchased from K-Mart about 9 years ago. I remember that they were from a “Martha Stewart” collection. The 6 side chairs were originally brown (I painted them white to match the table I built) and were purchased 7 years ago from JCPenney. I did a quick search and found that “Wayfair.com” has several chairs that have a similar look and that are very reasonably priced (I did a search on Wayfair for “white kitchen chair”). Best of luck to you!
Hi!
Your kitchen is beautiful! It started out nice enough, but it’s great to see without a major overhaul, you could make it so custom-looking! I too, have learned to do so many things with Google and You Tube (built a bed for my son and took apart my car’s dashboard for a repair–and have always considered myself a “girly-girl”–lol!). It makes me very proud–you should be too–and I enjoy the results so much more when I saved money AND did it myself.
Could you tell us where you got your pendant lights over the island? I need to update mine and love yours! Great job. You need a blog:)
Thank you, Melissa! You’re so very kind. I agree with you about what a sense of empowerment it gives you to be able to take care of “house” stuff on your own. And bless all those dear souls in internet land who take the time to share their expertise on YouTube! The pendant lights are the PB Classic Pendants from PotteryBarn. (I just checked and they happen to be on sale for $20 off the full retail price right now).
Thanks, Jen! You can buy the flooring at Home Depot. It’s “Home Legend” hand-scraped engineered hardwood flooring in Walnut Java. Our floors were installed by the previous owners and I have to say that while I love the look of them, they are very, very hard to keep clean. The smallest crumb and ittiest bit of dust is readily visible. And because of the hand scraping finish, which, again, I adore the look of, I run in to this problem where the raised portion of the boards get a lot more wear and tear than the recessed portion of the boards which gives the floors this visually uneven appearance. That’s mostly an issue in the kitchen and hallway, though, which are high traffic areas. Our upstairs hallway and living room and dining room don’t do that. Anyway, just my 2 cents. Good luck with your new floors!
WOW! I love everything here! I am thinking of making my own kitchen table. Do you have a tutorial? Also, what kind of paint did you use and how has it held up to multiple cleanings? 🙂
Thanks! I’m sorry, but I haven’t made a tutorial on how to build the kitchen table. There are lots and lots of tutorials out there, though! Google! Google! I used “Cabinet Coat” paint for painting my kitchen table and chairs. I would say it’s held up well, but it does stain easily (if something like pickle juice or Kool-aid gets spilled on it). That may mean that my polyurethane topcoat isn’t doing its job, though, so I’m hesitant to attribute the problem entirely to the paint. Good luck with your table project!
Hi Mary! We have a couple of tutorials for tables here on Remodelaholic — this one is the most comprehensive: https://www.remodelaholic.com/build-farmhouse-table/ but there are a couple more if you search “farmhouse table” too. To get a look more like Jenny’s, you’ll just want to use turned legs instead of straight lumber. Good luck!
Wow! This is amazing! The attention to detail, the craftsmanship, the design – everything is absolutely stunning and so inspiring! I have seen many DIY projects to-date but your work is by far my favorite, especially knowing you have 4 small kids to take care of at the same time (I have 3 and can barely keep my head above the water sometimes, even without any major projects going on).
My house has almost the same (beautiful) bones but lacks finishing touches and your work gave me so many ideas on how I can make its features stand out (and the courage to try to do it myself), so – thank you for sharing this!
Best,
Sonya
p.s. could you please share where did you re position your microwave? I have no idea where to move mine other than place it on the counter or have a custom box made for it. Thanks again!
Love your touches! Can you tell me more about how you replaced your stair risers and treads? I have a center foyer stair that is carpeted. I’d love to replace them with wood but have been told it’s very expensive (by a flooring company). I’m thinking about replacing my wall-to-wall carpeting with bamboo flooring and would like the stairs to match. Any advice?
Sure! I had 3 different contractors give me quotes on re-doing my stairs and everybody came in at well over $1,000, which is when I decided to do the job myself. I’m going to be honest here—it was time consuming. It took me 12 hours just to rip up the carpet and pull out 20 years of carpet tacks and nail strips (the stairs had been re-carpeted a couple of times by previous owners). It took about another 10 hours to paint, stain, cut-to-size, and install new oak treads and risers. I used unfinished oak “Stairtek” retreads and risers that I purchased through Home Depot. I had to place several different orders as each time a shipment came, a handful of the boards arrived damaged or split. Frustrating. Not sure if I attribute that all to shipping or if it’s a “Stairtek” quality control issue. I was otherwise pleased with the product. It cost me about $500 for the supplies to do the entire staircase. I know there are tutorials out there (including on Remodelaholic.com) on how to do it even cheaper. Be sure to consider all your options before moving forward. Good luck!
Hi, there, Peggy! Light fixtures are an easy fix. You can find any number of great DIY tutorials on YouTube on how to remove a light fixture and install a new one. (Just make sure you turn off the electricity at your circuit breaker before you start!) I picked up a chrome chandelier from my local Home Depot to replace the iron and beaded light fixture that was in my home when I purchased it. I actually had the electrician who installed the new pot lights in my kitchen install the new light fixture over the kitchen table while he was here, but I’ve removed and installed several other light fixtures in my home (and other houses I’ve lived in) all on my own. Good luck!
The shades on the window above the kitchen sink were purchased from Pottery Barn several years ago on clearance. I’m sorry to say, they were discontinuing them at the time that I bought them. It made for a great deal at the time, but sadly, they’re no longer available!
Thank you! The lighting in the different pictures makes the paint look a different color, but the blue-gray color of paint throughout the kitchen is Restoration Hardware Silver Sage. The white is Benjamin Moore White Dove.
Jenny, love the kitchen. I have the same countertop and never thought to paint the walls a gray/blue color and white cabinets. I’ve always stuck with the beiges and it makes my kitchen so boring. Thanks for the inspirations. Love how much it brightens up the room.


Jenny, I found this post after seeing the wainscoting post…I would love for you to start a blog!!!! I would be following for sure! Your home is beautiful!
Kathy, you made my day! Thank you!
wow this is amazing! It all looked nice before but the things you added really make it look like a home that a lot of thought went in to. It’s very impressive!!
Thank you for taking the time to say such nice things! I’m glad you like it! 🙂
Love the kitchen and the dinning room . What is on the other side of the window in the dinning room ? Love the bakery sign . I want to make the shelf with the hooks , super cute . Great job on everything.
Thanks, Nancy
Hi there, Nancy! Thank you! On the other side of the window, opposite the bakery sign, are 4 bird plates. You can see a narrow shot of them with the collage of pictures featuring kitchen decor. Thanks again!
Where did you get the roman shades and what color did you use in the kitchen. I love them!
Thank you! I purchased the roman shades at a Pottery Barn clearance sale about 2 years ago. Unsure if PB still carries them. The color on the walls in the kitchen is Restoration Hardware Silver Sage.
Gorgeous job Jenny, you’ve made your home so beautiful!
Thank you for the kind words, Amy!
Such a beautiful kitchen! I am in the market for new dining room chairs. I headed to Pinterest for some inspiration and found this post. Can you tell me where you got your white side chairs? They are exactly what I am looking for!
Thank you! I wish I had better news, but all of the chairs are rather old and probably no longer being sold, but I’m happy to tell you where I got them just in case. The 2 end chairs were purchased from K-Mart about 9 years ago. I remember that they were from a “Martha Stewart” collection. The 6 side chairs were originally brown (I painted them white to match the table I built) and were purchased 7 years ago from JCPenney. I did a quick search and found that “Wayfair.com” has several chairs that have a similar look and that are very reasonably priced (I did a search on Wayfair for “white kitchen chair”). Best of luck to you!
Hi!
Your kitchen is beautiful! It started out nice enough, but it’s great to see without a major overhaul, you could make it so custom-looking! I too, have learned to do so many things with Google and You Tube (built a bed for my son and took apart my car’s dashboard for a repair–and have always considered myself a “girly-girl”–lol!). It makes me very proud–you should be too–and I enjoy the results so much more when I saved money AND did it myself.
Could you tell us where you got your pendant lights over the island? I need to update mine and love yours! Great job. You need a blog:)
Thank you, Melissa! You’re so very kind. I agree with you about what a sense of empowerment it gives you to be able to take care of “house” stuff on your own. And bless all those dear souls in internet land who take the time to share their expertise on YouTube! The pendant lights are the PB Classic Pendants from PotteryBarn. (I just checked and they happen to be on sale for $20 off the full retail price right now).
Do you happen to know what type/stain of wood floor you have? I’m looking at replacing my carpet for wood and there are so many choices!! Love yours!!
Thanks, Jen! You can buy the flooring at Home Depot. It’s “Home Legend” hand-scraped engineered hardwood flooring in Walnut Java. Our floors were installed by the previous owners and I have to say that while I love the look of them, they are very, very hard to keep clean. The smallest crumb and ittiest bit of dust is readily visible. And because of the hand scraping finish, which, again, I adore the look of, I run in to this problem where the raised portion of the boards get a lot more wear and tear than the recessed portion of the boards which gives the floors this visually uneven appearance. That’s mostly an issue in the kitchen and hallway, though, which are high traffic areas. Our upstairs hallway and living room and dining room don’t do that. Anyway, just my 2 cents. Good luck with your new floors!
WOW! I love everything here! I am thinking of making my own kitchen table. Do you have a tutorial? Also, what kind of paint did you use and how has it held up to multiple cleanings? 🙂
Thanks! I’m sorry, but I haven’t made a tutorial on how to build the kitchen table. There are lots and lots of tutorials out there, though! Google! Google! I used “Cabinet Coat” paint for painting my kitchen table and chairs. I would say it’s held up well, but it does stain easily (if something like pickle juice or Kool-aid gets spilled on it). That may mean that my polyurethane topcoat isn’t doing its job, though, so I’m hesitant to attribute the problem entirely to the paint. Good luck with your table project!
Hi Mary! We have a couple of tutorials for tables here on Remodelaholic — this one is the most comprehensive: https://www.remodelaholic.com/build-farmhouse-table/ but there are a couple more if you search “farmhouse table” too. To get a look more like Jenny’s, you’ll just want to use turned legs instead of straight lumber. Good luck!
Wow! This is amazing! The attention to detail, the craftsmanship, the design – everything is absolutely stunning and so inspiring! I have seen many DIY projects to-date but your work is by far my favorite, especially knowing you have 4 small kids to take care of at the same time (I have 3 and can barely keep my head above the water sometimes, even without any major projects going on).
My house has almost the same (beautiful) bones but lacks finishing touches and your work gave me so many ideas on how I can make its features stand out (and the courage to try to do it myself), so – thank you for sharing this!
Best,
Sonya
p.s. could you please share where did you re position your microwave? I have no idea where to move mine other than place it on the counter or have a custom box made for it. Thanks again!
Love your touches! Can you tell me more about how you replaced your stair risers and treads? I have a center foyer stair that is carpeted. I’d love to replace them with wood but have been told it’s very expensive (by a flooring company). I’m thinking about replacing my wall-to-wall carpeting with bamboo flooring and would like the stairs to match. Any advice?
Sure! I had 3 different contractors give me quotes on re-doing my stairs and everybody came in at well over $1,000, which is when I decided to do the job myself. I’m going to be honest here—it was time consuming. It took me 12 hours just to rip up the carpet and pull out 20 years of carpet tacks and nail strips (the stairs had been re-carpeted a couple of times by previous owners). It took about another 10 hours to paint, stain, cut-to-size, and install new oak treads and risers. I used unfinished oak “Stairtek” retreads and risers that I purchased through Home Depot. I had to place several different orders as each time a shipment came, a handful of the boards arrived damaged or split. Frustrating. Not sure if I attribute that all to shipping or if it’s a “Stairtek” quality control issue. I was otherwise pleased with the product. It cost me about $500 for the supplies to do the entire staircase. I know there are tutorials out there (including on Remodelaholic.com) on how to do it even cheaper. Be sure to consider all your options before moving forward. Good luck!
What did you do to the dining room light fixture to change it? I need to update ours.
Hi, there, Peggy! Light fixtures are an easy fix. You can find any number of great DIY tutorials on YouTube on how to remove a light fixture and install a new one. (Just make sure you turn off the electricity at your circuit breaker before you start!) I picked up a chrome chandelier from my local Home Depot to replace the iron and beaded light fixture that was in my home when I purchased it. I actually had the electrician who installed the new pot lights in my kitchen install the new light fixture over the kitchen table while he was here, but I’ve removed and installed several other light fixtures in my home (and other houses I’ve lived in) all on my own. Good luck!
Where the curtains made or bought and if so where?
The shades on the window above the kitchen sink were purchased from Pottery Barn several years ago on clearance. I’m sorry to say, they were discontinuing them at the time that I bought them. It made for a great deal at the time, but sadly, they’re no longer available!
Beautiful redo. You did a great job. Do you use grey paint in the kitchen, it looks grey where the plates are hanging over the door.
Thank you! The lighting in the different pictures makes the paint look a different color, but the blue-gray color of paint throughout the kitchen is Restoration Hardware Silver Sage. The white is Benjamin Moore White Dove.
Jenny, love the kitchen. I have the same countertop and never thought to paint the walls a gray/blue color and white cabinets. I’ve always stuck with the beiges and it makes my kitchen so boring. Thanks for the inspirations. Love how much it brightens up the room.
Thanks, Krissy!