DIY Ornament Display Tree Woodworking Plans

Learn how to build an ornament display tree to hold your favorite Christmas ornaments, following our simple woodworking plan. This easy triangle Christmas tree ornament holder looks great on a mantel or shelf.
Whether you display sentimental ornaments, vintage ornaments, or just a few of your favorite ornaments, this DIY ornament display tree is a simple Christmas decoration to make for yourself or as a gift for friends or neighbors.

DIY Ornament Display Tree
When we first teamed up with HerToolbelt in 2014 to design and build this DIY ornament tree, we knew you’d like it, but now we know that you LOVE it as much as we do!
We put together a video showing the assembly process the simple triangle trees we built, which follow a very similar build process.
The video also shows how to use a jig to make irregular angled cuts, so watch that here and then scroll down to get the printable building plan to make your own ornament display tree (or two).
How to Make an Ornament Display Tree
(and how to cut a wide angle on a miter saw)
Subscribe to the Remodelaholic YouTube channel for more great DIY projects
Click here to get the ornament tree woodworking plan PDF
Bundle and save! This plan is also available in the Wooden Christmas Tree Woodworking Plan Bundle. 4 plans, save 30% over buying individually!
Hello Remodelaholics! I am Lorene, and I am thrilled to be making my first official appearance here at Remodelaholic. I work here with Cassity and Justin behind the scenes and in the shop.
Between crafting spurts (like the Doctor Who themed Christmas tree I made, yes I’m a bit of a geek!) and keeping busy with my 5 little ones (with easy creative projects like this super easy Christmas ornament advent) — I do make time for an occasional weekend project — like today’s gorgeous (if I do say so myself) ornament display tree.
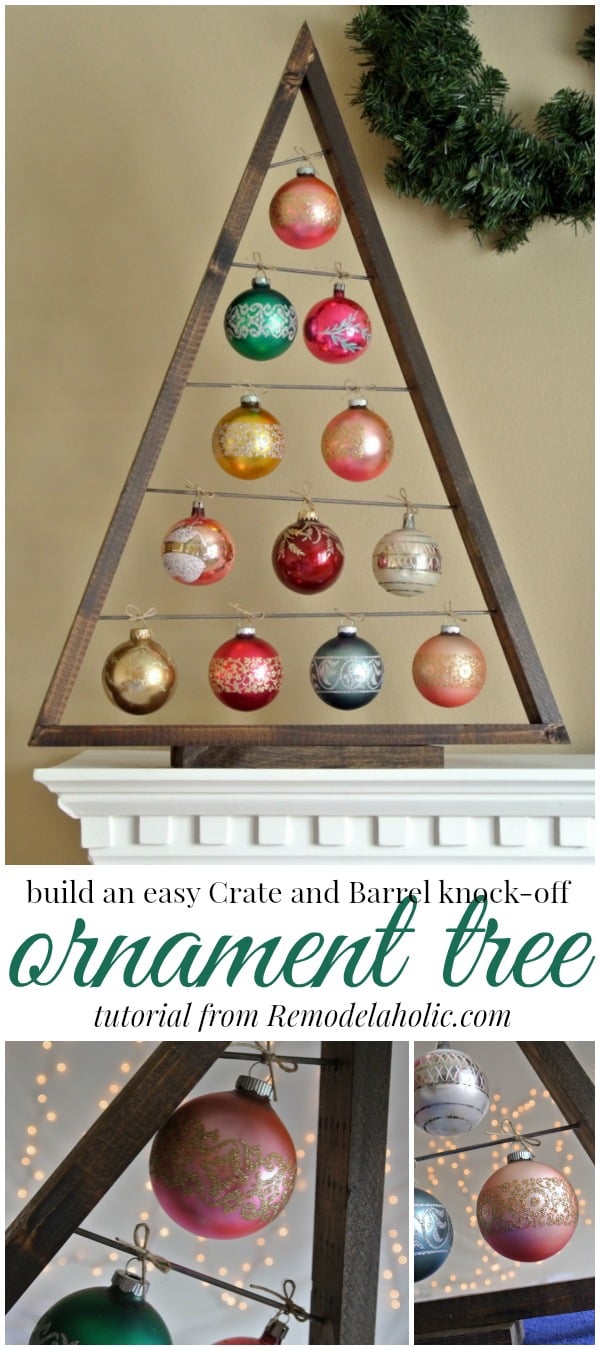
DIY Ornament Tree for Vintage Glass Ornaments
This post may contain some affiliate links. Please see our full privacy policy and disclosure here.

When my husband’s grandmother passed away, we were fortunate enough to inherit some of her beautiful and authentically vintage glass ornaments.
Besides being lovely, they hold many family memories, so they are cherished and priceless — and NOT going on my regular Christmas tree with my littles around!
I had been looking for a safe way to display my vintage glass ornament collection when I ran across this ornament tree from Crate and Barrel —

BUT… it’s no longer available in wood, only in metal. And I LOVE the rustic feel of the deep stained wood.
So I called up the awesome Amy from Hertoolbelt and she worked up the plans for me and figured out all the tricky angles.
Justin made the cuts for me (see his detailed explanation of cuts and a tutorial for creating a jig to make the non-standard cuts above in the video), and then it was up to me to turn this pile of wood and steel rod into something identifiable:
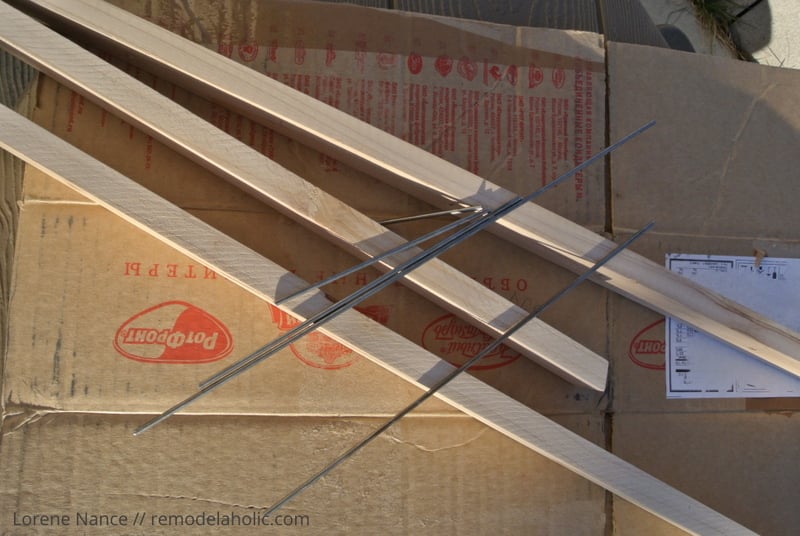
And trust me — if I can do this, anyone can do this! Just find a friend with a miter saw to make the cuts for you, and use a hack saw and vice (or something else to hold it firmly) to cut the steel rod, and then it’s a simple as drilling a few holes and gluing and nailing/screwing/stapling things together.
I opted for glue plus staples at the corners and screws in the base, and it is nice and sturdy! It has even survived 3 moves fully intact and beautiful… with only one ornament injury, and that was at the hands of a curious and well-meaning 2 year old.
I stained mine with one coat of Minwax in Dark Walnut and then tied the ornaments on using thin jute twine.

Paired with our family heirloom angel, Sweet Angie, and one of dear Grandma’s nutcrackers, it makes a lovely festive and memory-filled vignette on my mantel.
Just follow the building plan below for the large or small ornament tree (or both!), and you, too, can have a beautiful ornament display — for MUCH less than buying it at Crate and Barrel! And you could easily leave this up all winter and display photos or other small decor items, too.

How to Build an Ornament Tree
Click here to get the printable woodworking plan in the shop.


The printable building plan contains full instructions and detailed diagrams, including a cut list and materials list, to make a large ornament display tree (standing approximately 27″ tall, 19″ wide) and a small ornament display tree (standing approximately 16″ tall, 11.5″ wide).
The large wood tree features 5 ornament holder rods, for 12+ ornaments (of average sizes). The small wood tree features 4 ornament holder rods, for 10+ ornaments (of averages sizes.) Rod lengths and placement locations are included in the printed plans.
The 11-page printable PDF instructions also include how to make a jig to cut the accurate angle to make the triangle tree frame.
Build more sizes with our triangle tree woodworking plan, too!
DIY Ornament Display Tree Materials
- 1″ x 2″ board (actual ~3/4″ x 1 1/2″)
- 1″ x 4″ board (actual ~3/4″ x 3 1/2″)
- 1/8″ x 48″ steel round rod
- Jump rings or ribbon/twine
- J-B weld
- wood glue
- 1 1/2″ brad nails
- 1 1/4″ screws (2 or 3)
- wood filler
- sand paper
- stain/paint
Note: Plans are provided for a Large Ornament Tree and/or a Small Ornament Tree. If you plan on making both, purchase an extra 1″ x 2″ board and 1/8″ steel rod.
Tools
- miter saw
- (optional) angle jig – building instructions included in the woodworking plan
- brad nailer (or hammer and finish nails, or staple gun)
- drill/driver
How to Use a Wooden Ornament Tree
While we designed this wooden Christmas tree to be an ornament holder, the possibilities are endless! Use it as an advent calendar with a bucket of ornaments for each day, clip Christmas cards or printable art to the rods, or skip the rods and hang some greenery (like mistletoe, mwah!) in the center of the triangle tree for easy DIY Christmas decorating.
More easy Christmas decorations:
- printable Christmas decorations and ornaments
- easy DIY chalkboard signs for Christmas
- dollar store Christmas tree decorating (times FOUR!)

This post was originally published on Dec 8, 2014. Last updated Nov 25, 2019.
Amy is the tool lover at Hertoolbelt. On Hertoolbelt, Amy shares DIY furniture plans, handyman tutorials, and craft patterns. She has three pint sized 'helpers' that help fix things around the house and build fun projects.


oh my! lorene, amy and justin, such a beautiful and stylish tree, and an inspiring team project! =)
i LOVE LOVE it!!!
A gold star for teamwork for sure! 🙂 Thanks, Ananda!
Lorene you did an awesome job! I absolutely love your ornament tree, it is so beautiful.
Thanks, Amy!
This is beautiful! How did you cut the steel rod? (What tools will I need for this whole project?) Thanks!
We just used a hand saw, with the rod in a vise. Have fun and send us a pic when you’re done!
Hello, we love the tree and are currently making one. Would you advise drilling holes at an angle for the rod at 1/4 inch depth? thank you for the detailed plans appreciate all your work!
Love this design! Thank you for the awesome plans! Here is my husband’s finished product: https://www.instagram.com/p/_ievR8jgIy/?taken-by=jshoe84
It looks great! Thanks for sharing your picture!
Do you think I could adapt this pattern to either 5 or 6 foot tree. I do craft shows and think this would make a wonderful display.
Thanks
I bet you could! This would make a really cool display. Maybe using dowels as the cross-pieces? Just make sure that you size up the base as well to make sure it stays sturdy and steady. I would love to see it if you try it!
I’ve made 6 sets of these trees. My friends and family really like them. I’d say the hardest part is assembly. It’s very difficult to get the proper angle to drill the holes by hand. I’ve tape-assembled the triangles first, and used a straight edge to mark a line on the side of the board to show what angle the holes should be drilled. Even so, it’s never exact and getting it all assembled and square is tricky. Helps to have a brad nail gun so you can hold the joint in place while nailing.
Thanks for the tips, Arne. We’d love to see any photos of the ones you’ve made! https://www.remodelaholic.com/share-brag-post/
So how long 1×2 and 1×4 do I need to buy? I could do the math, but I always miscalculate!
This is crazy cute and now I want one. I’m not handy with tools but my son in law is and I’m going to see if I can get hike to help me make one of these.
That’s all it takes, just a couple cuts and you’ll be set! Send us pics when you finish! 🙂 (And thanks for the kind compliment!)
Hi! I came across your great tutorial and am really excited about this project. I was happy to purchase the printable plans, though a bit bummed at the image resolution for the parts where they lay out the cuts (top of page 3 and 4). I can’t read it at all and zooming in doesn’t seem to help. :/
Hi Jessica — I’ll send you an updated graphic! Drop me an email at shop@remodelaholic.com if you don’t see it.