Simple DIY Wall Desk
Hi, it’s Amy from Hertoolbelt back with another build plan. Today’s project is a simple wall desk. It is a great option if you need to add an office area to a small space or create a homework station for the kids. The inspiration for this project comes from this beautiful office nook found on Better Homes and Gardens. 
(Note: the picture is the inspiration for this build plan, not the actual build.)
How to Build a Simple DIY Wall Desk

Materials
- 3/4″ x 16″ x 48″ glued edge panel or 2′ x 4′ plywood
- 3/4″ x 3 1/2″ x 8′ board (1 x 4)
- 3/4″ x 1 1 /2″ x 8′ board (1 x 2)
- 1 1/2″ x 5 1/2″ x 8′ board (2 x 6) or 2 shelf brackets
- wood glue
- 1″ screws
- 2 1/2″ screws
- 1 1/2″ screws
- 1 1/2″ nails or 1 1/4″ screws
- sandpaper
- paint/primer
- Approximate wood cost: $29

You can easily customize the wall desk dimensions for your space and needs. I chose to make the main desk piece 16″ deep and 40″ long.
Step 1
Cut the 3/4″ plywood or panel to 16″ x 40″ (or your dimensions). Cut the 1×2 and 1×4 to the same length as your desk piece.
On the ends of the 1×4, mark over 3 1/2″ on the top of the board. Use a bucket or a round object and trace a curve between the bottom corner and the top 3 1/2″ mark. Use a jig saw, scroll saw or band saw to make the cut. Repeat for the other end.

Step 2
Pre-drill holes approx every 4″ or so along the back edge (3/8″ in from the back) of the desk board to attach the rounded wall board. Use wood glue and 1 1/2″ min screws to attach the desk board to the wall board. (If attaching the front trim with pocket screws drill the holes now.) Offset the front trim about 1/4″ up to create a little lip to keep things from rolling off the desk. Use wood glue and 1 1/2″ min nails to attach the front trim to the desk board (or use pocket holes from underneath). Once all of the glue has dried, remove excess glue and sand the desk smooth.
Step 3
I wasn’t able to find shelf brackets similar to the BHG inspiration desk, however you can DIY your own or purchase shelf brackets.
To DIY curved shelf brackets, print out the following patterns (make sure the printer is on 100%, not ‘fit to page’) Bracket 1 and Bracket 2. Line up the patterns, tape together and cut out. Trace the patterns onto the wood you want to use, such as a 2×6. Cut out the brackets using a band saw, scroll saw or jig saw and sand them smooth. If you want chunky brackets, you’ll need to glue brackets together to get them to the width you desire. In the sketch, the curved brackets are 3″ wide so you would need to glue 2 brackets together made from 2×6 material.
If you don’t want to DIY brackets there are quite a few shelf bracket options out there:
- Simple brackets – cheap
- Heavy duty bracket
- Elegant bracket
- Corbels
- DIY Vintage inspired corbels – another DIY option
Step 4
Locate the studs in the wall where you plan to install the desk. Determine what desk height you want, an average height for a regular chair is about 29″, for a bar stool you’ll want the desk at about 36″. Pre-drill holes through the desk wall board such that it will attach to the wall studs. Level the desk and secure the desk to the wall with 2 1/2″ minimum screws. Attach the brackets to the wall and desk to support the desk. 
Step 5
Remove any excess glue, apply wood filler to holes, cracks and blemishes and allow to dry. Sand the desk until smooth finishing with 120-150 grit sand paper, always finish sanding in the direction of the grain. Stain or paint the desk and allow to dry.
Enjoy your new desk!

For more build plans check out Hertoolbelt:
 |
 |
 |
Octagon Bookshelf // Scroll Console Table // Crate Coffee Table
———————————
More DIY desks:
Build a mid-century modern inspired desk like this:
Use base cabinets to create a built-in desk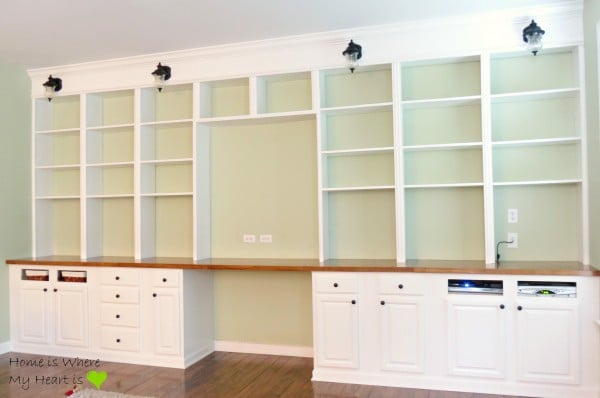
Build a Z-frame two-person desk (plus more pics here)
Use industrial pipe to build a wall shelf and desk unit
Amy is the tool lover at Hertoolbelt. On Hertoolbelt, Amy shares DIY furniture plans, handyman tutorials, and craft patterns. She has three pint sized 'helpers' that help fix things around the house and build fun projects.


Just an FYI,Amy,Those type of brackets that are curved out like in the inspiration pic,Can be found at Lowes in their closet organizer system area.They have a shelving system that comes in either white or espresso with slats of a framed,wooden slat shelf that is held by a keyhole type anchor to attach the curved bracket to the shelf & the bottom to anchor into the wall.Its a very modern,sleek & attractive closet organizer but I looked everywhere online as well as brick & mortar stores looking for those shaped brackets because I have a vintage,curved,sculpted edge piece of carrara marble that must have came off the top of a vintage sofa or entry table that I wanted to mount to the wall using those minimalist brackets but there was not a way to secure such a heavy piece of stone & be assured it wouldn’t come crashing down & break into a bunch of pieces in the process,So I purchased vintage,scrolled cast iron kitchen sink brackets that used to hold up those cast iron enamel sinks with the built in cutting boards & rolled rim.If k in it could hold that up securely,At the turn of the century,I think it could hold My marble securely.But I wouldve prefered these curved,minimalist brackets to be less obtruse instead.
Thank you for the tip!