How To Restore An Old Leather Chair
Modern furniture can be beautiful, but they just don’t make some pieces like they used to. The style, the sturdiness — sometimes you just have to go thrifting to find a great piece of furniture. And then you get the thrill of the hunt, too! Once you find a piece that you love, odds are that it will need a little bit of DIY love. If you score a leather chair (or sofa) that is in great shape, our guest today has an amazing (and easy!) way for you to restore an old leather chair so it can look like this:

Keep reading for Cara’s instructions on restoring leather.
If the piece of furniture you’ve got your heart set on isn’t leather, you can also
slipcover it

reupholster it

or get brave and paint it!

And now, here’s Cara to show you how to use a simple product to restore an old leather chair:
How to Restore a Leather Chair
by Cara of The Project Addict
Hi Everyone, My name is Cara and I am visiting from theProjectAddict . I am honored to be here today and excited to share my latest chair makeover with all of you. I will tell you a little about myself first and then jump right into the good stuff.
I am a happily married, working mom, with an almost 2 year old, busy little girl. My head is constantly swirling with projects and ideas, my husband calls it “scheming”. I call it being creative. I’m very budget conscious and try to figure out the least expensive way to do something without it looking cheap. I love taking what many would think of as junk and transforming it into something beautiful. If you want to see a really crazy before and after check out this rocking chair my grandmother gave me, it is my most dramatic transformation to date. My vintage play kitchen and child’s rocker are at the top of my list too.
It is really hard for me to pass up a great chair, I have quite a few sitting in the basement right now and you can only use so many. Lucky for me, I actually had a specific place in mind for this little leather chair when I scooped it up for $15 at the Habitat ReStore. 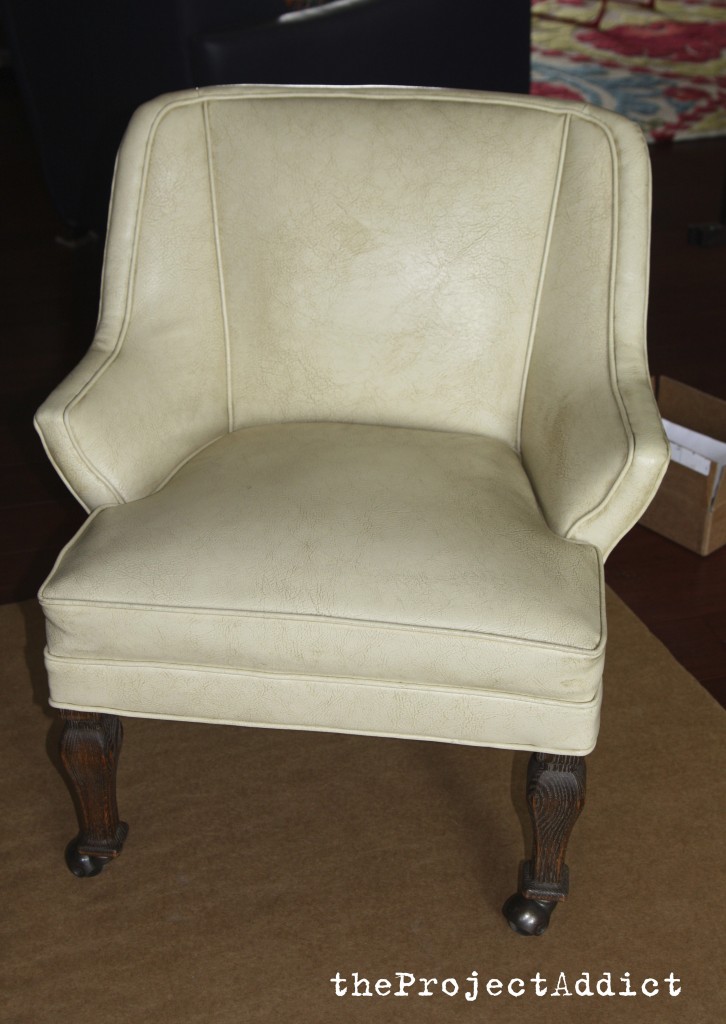
I initially planned to reupholster it but since the leather was in such good shape I started searching for an alternative. I tried to clean it but it still just looked dingy. Then I stumbled across Rub n Restore. The video on youtube was convincing and I decided to go for it. I paid around $47 for the Ivory rub n restore, the protective top coat and shipping.
This product is super easy to use. If you can use a sponge you can successfully use this stuff!
First make sure your chair is clean. You don’t need to get stains off but make sure dirt, grease or anything like that is cleaned up.
Wet down a sponge and pour on a little rub n restore. Then just work it into your chair.
Multiple thin coats work best and you need to let it dry between coats. The company says you can use a hair dryer to speed the process but it dries pretty quickly on its own too. 

I think I did about 5 coats which was probably more than needed. I only used about 1/5 of the bottle so a little goes a very long way. My chair has a lot of piping and nail head trim so it took a lot longer than a chair without these details. 
I used a small paintbrush for all the trim. If you get any on the nail heads don’t worry. The company suggest using fine steel wool to clean them off but I found that nail polish remover on a qtip worked as well The whole chair probably took me about 3 hours but most of the time was spent painting around the nail heads. I tested the protective top coat on a small area but liked the more satin sheen of the chair with just the Rub n Restore. I’m sure I will use the top coat on some future projects though. I think using the topcoat will depend on the color, condition of your leather and look you are after.

I’m really happy with how the chair turned out. The texture and feel of the chair is completely natural. It doesn’t look painted or feel stiff at all. The best part about the product is that you can actually change the color of your chair. They have 18 stock colors or you can send in a swatch and get a custom color. I’m excited this product worked so well because it opened up a whole new group of furniture that I would usually bypass. Now I have a stylish, comfy office chair for much less than it would have cost to buy new!

————————
Wow! What a score, Cara! The chair looks amazing!
See more of what Cara has been restoring and DIYing over at The Project Addict.
Lorene has been behind the scenes here at Remodelaholic for more than a decade! She believes that planning projects and actually completing them are two different hobbies, but that doesn't stop her from planning at least a dozen projects at any given time. She spends her free time creating memories with her husband and 5 kids, traveling as far as she can afford, and partaking of books in any form available.


That is fantastic! Gorgeous!
Wow!! The transformation is stunning!! I’d love to try this product. Thanks for sharing!!!!
Thank you so much for featuring my chair. The Rub n Restore company was really great to work with and I look forward to using the product again soon.
WOW! That stuff is awesome. Definitely pinning this for future reference. Thanks =)
What an awesome tip! Thanks for sharing!
Wow! I’m gonna have to try that on my car seats. The leather is still good but old and dingy looking!
I think it would work great for car seats.
WOW just what I was looking for. Came here by searching for *86
This sounds like a great project, I will have to check it out. I am passing on leather items too. Your new chair looks fabulous.
Thanks
Traci
How does it hold up? I am thinking of doing this for my car seats but they get a lot of use.
This is an unbelievable makeover! I love leather, but can’t afford it new, and would never have considered picking this up at the thrift store for fear of not being able to clean it up properly. Now, like you said, this opens up a whole new world, thanks so much for sharing!!
thank you for the story. Will this rub and restore get out stains?
It will not remove stains but in my experience will cover them. I just recently used it on a stained leather ottoman and it covered the stains very well. You can check it out on my blog http://www.theprojectaddict.com
absolutely GORGEOUS!!!!
will this rub n restore work on pleather couch w a bit of black mark frm moving
Hi Rena,
I”m not sure about pleather — I would contact the manufacturer or head over to our guest’s blog (linked at the top) to ask for sure. Thanks!
It is made to work on vinyl and leather. So I think it would but I would go to the rub n restore site and ask them. They are really nice and can help you out.
Thanks, Cara!
I just read about your leather restoration project. I have a couch and love seat that have faded from sunlight. I received a quote to restore them for 1500. I can’t imagine spending that much on leather restoration. Would you suggest your product will work on them?
Julie
What an amazing transformation. …simply beautiful