DIY Window Privacy Film Using Contact Paper
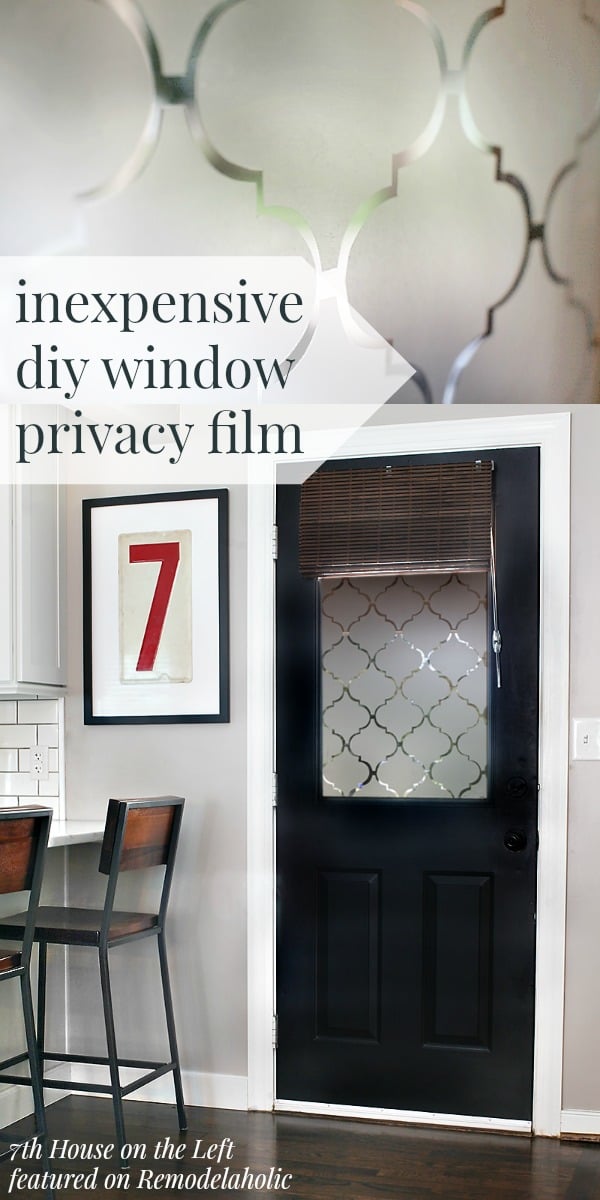
Next up in All Things Windows: a simple and inexpensive way to add some privacy to a window while still letting in light. Look at the gorgeous pattern that our guest used to create this DIY window privacy film!
How to Use Contact Paper as DIY Window Privacy Film
by Ashley from 7th House on the Left
Hey, all! My name is Ashley Brown – 50% of 7th House on the Left, a blog where my husband (Greg, the other 50%) and I share the process of renovating, decorating and living in our first house. I’m a graphic designer who loves decorating and he’s a web developer learning his way around power tools. Our blog isn’t really a DIY blog – we’re more of a “semi-DIY” blog. We’re both super busy people and as much as we’d love (and I mean love) to build our own furniture and install our own kitchen cabinets, there just aren’t enough hours in the day. We’re all about finding the right balance of when to hire a pro, when to get in there and get our hands dirty and putting a special “DIY-touch” on ready-made pieces.
Today, I’m super excited to share with you all one of our favorite, most Pinned, Tweeted and asked about projects to date: our $8 semi-private window fix.

TUTORIAL / The back door in our living room faces our neighbors’ backyard. Even though their deck is a good distance away, sometimes we felt as though we were giving them a front row seat to everything happening in our house. On top of that, the dark nothingness looking into the living room at night really freaked me out. After resorting to kraft paper and, yes, even pages from a magazine, it was high time to do something a little less temporary and a little more aesthetically pleasing.

At the time, we were in the midst of a kitchen renovation and didn’t want to do anything too permanent or expensive until we knew exactly what we wanted. So, we toyed around with a few ideas and ultimately decided on giving the ‘ole contact paper method a try. Rather than covering the entire window with clear contact paper (which is a method I often came across on Pinterest), we wanted to do something a little more graphic and fun.
So, I decided to design and cut out our own contact paper pattern. I played around with a few different designs, all while keeping in mind that I would have to cut each piece out and place it on the window by hand. (I did this project way before I had a handy dandy Silhouette machine. I’m sure this can be done with a Silhouette, but I haven’t tried it out myself.) That being the case, simplicity was key.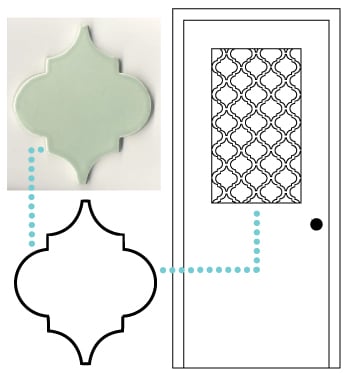
I imported the image over to Illustrator, traced it and laid out my window design. I drew the door and window to scale so I could see how big I wanted each shape to be. This step was also a great help to see how many pieces I would have to cut. (Although, I did end up cutting out a few extras just in case.)

I printed the pattern on a pice of card stock to make a stencil. With my DIY stencil, contact paper, scissors and fine-tip marker in hand, I hunkered down for a long night of tracing, cutting and a Rock Hudson and Doris Day movie marathon. This part of the process was so tedious, but when all of the 76 shapes were perfectly cut, I was feeling pretty good about myself.
Quick Tip: When tracing the stencil onto the contact paper, draw on the paper side, not the contact paper itself. Yeah, that sounds like a rather “duh” thing to point out, but I was obviously having a moment. Another thing to keep in mind is rather than making a lot of little, short cuts when cutting out your design, keep the scissors moving. This will ultimately give you a much cleaner line.

Related: DIY Lace Window Film. It’s easier than you think!
From this point on, the window-covering process was pretty easy and self-explanatory. Just thoroughly clean your window, peal the back of the shape and stick it on the window. When you peel the contact paper backing, do it slowly because if the contact paper creases or wrinkles the slightest bit, you won’t be able to use that piece because it will show up on the window.
Quick Tip: To make sure you’re shapes are lining up correctly and evenly, all you have to do is make sure you keep equal distance between the top and bottom of each “decal” and everything will end up perfectly even. Really, it’s a lot easier than it looks to make everything symmetrical.

Three years later, our “quick fix” is still in place and looks just as good as the day I painstakingly placed each shape on the window. We haven’t had to replace one shape and haven’t had a bit of trouble with bubbling, curled up edges or anything of the sort. Seeing as how our Virginia weather can sometimes be extremely hot and humid, I must say I’m a bit surprised at how well it has held up all this time.
TIME + COST BREAKDOWN / I already had scissors, a fine-tip marker and the Rock Hudson and Doris Day box set on hand, so the cost for the project was only $8 for the contact paper. As far as a time breakdown, that totally depends on how fast/slow you cut OR if you decide to use a cutting machine such as a Silhouette or Cricut.

PRODUCT RESOURCES
- Door paint color (Black Suede by Behr)
- Wall paint color (Cobblestone by Martha Stewart)
- Kitchen Cabinets (KitchenAid)
- Floor stain color (Dark Walnut by Minwax)
- Blind (JCP)
- Barstools (West Elm)
- Artwork (vintage find, framed at Michaels)
- Grass Trough (HomeGoods)
- Glass jars (Crate & Barrel).
In case you have a naked window, and you’re wanting to try this out for yourself, I put together a PDF for you to download – complete with the pattern template and the tips listed above. Click here to download!
—————————————
Thanks for being our guest, Ashley! Love this idea and I love that it has held up so well!
Remodelaholics, go visit 7th House on the Left to see Ashley’s awesome projects, like her lovely floating shelves in her kitchen and this outdoor console table.
Coming up next:
(be sure to subscribe by RSS or email to get updates for every post of All Things Windows)
[inlinkz_linkup id=450403 mode=1]
Lorene has been behind the scenes here at Remodelaholic for more than a decade! She believes that planning projects and actually completing them are two different hobbies, but that doesn't stop her from planning at least a dozen projects at any given time. She spends her free time creating memories with her husband and 5 kids, traveling as far as she can afford, and partaking of books in any form available.


I love Doris Day’s movies!!! She’s one of my favorite actresses!! Love the stencil not the door. It turned out beautiful!!
That PDF is supremely helpful. I doubt I could do it without a full stencil though, the fact that you placed them individually is astounding. The only thing I’d seen in regard to making a frosted glass privacy for the window was to use Rustoleum’s frosted glass spraypaint and a stencil. I’m not terribly keen on the idea however, in case I decide to change it at some point and avoid scratching the glass in the attempt to remove it. This is extremely creative and lends a nice custom touch to ordinary glass that people can just look through.
OK – what kind of contact paper is that? Is it the clear contact paper and it ends up like looking like its glazed? I’d like to do something similar in my bathroom.
Hi Tina! Just plain clear contact paper — it gives the frosted glass look. Good luck and we’d love to see pics when you finish!
This is great! My apartment window faces into the building, so I don’t have much privacy. I just moved in to this apartment and it’s rented, so my question is, will the contact paper still be easy to remove after about a year or so? Mainly to get the paper portion off, the residue hopefully won’t be a problem since there are products out there to help with that.
Hi there, I’m SO excited about this! How do you measure how many you’ll need? Maybe I missed that? Do I just overcut and then decide which need to be trimmed down, etc?
You should be able to get a rough estimate based on the size of the template — but yes, I’d probably overestimate on cutting and then trim them down 🙂
Thank you!!!!
Is this used just for privacy? I’m needing to do something to block a majority of sunlight that is coming through a kitchen window.
Yes, this is mostly just for privacy and won’t block light but filters it a little bit. You could try this with colored contact paper, perhaps, or try something like this: https://www.remodelaholic.com/2014/10/no-sew-magnetic-window-covering/
I am trying to download the template for the stencil, but it won’t allow me to download and the server said I do not have permission to view – is there anyway you can email the template to my account so I can try this design on our daughter’s nursery windows?
Hi Tara,
It looks like Ashley (our guest who shared this tutorial and template) is having some tech troubles lately, so I’d suggest giving it a day or so and then checking back. Thanks!
I am definitely going to make my husband do this to our backdoor!???? Love this it is gorgeous! Love Pinterest????
Just curious, did you stick the contact paper on the side of the window facing you?
Yes 🙂
Hey!
absolutely love this idea, im trying to use my silhouette for the first time for this project, (probably wont go well) lol but im wondering, how big are your shapes? my silhoette has them 12″ x 12″, seems very wrong 🙂 like 4″ x 4″?
Thank you!