Upcycled DIY Chandelier Lamp
Lamps are a dime a dozen at yard sales and thrift stores. But so many of them are so… plain. So how to dress up an inexpensive lamp? Well, you could do like our guests today and add some twine, a new lamp shade, and some fun crystals to make a chandelier lamp (keep reading for the tutorial):

or you could also paint a lampshade,

paint the lamp,

use a vase to make a lamp,

or rescue an old music stand to make a tripod lamp.

So many possibilities! See 10 more great DIY lamp ideas here, and then read on to see what Jodie and Paige did to make an old floor lamp shine (ha, pun intended…) as a fancy new chandelier lamp.
Upcycled Chandelier Lamp Tutorial
by Jodie and Paige of Sypsie Designs
Hi there! We’re Jodie and Paige, sisters and design fanatics from the suburbs of Detroit, Michigan. We started Sypsie Designs while renting a 1,000 sq. ft. ranch together and have had an amazing time updating our home and running a small furniture studio, all within the guidelines of every DIYer’s favorite thing, our rental lease. But, we love the challenge and focus Sypsie on sharing rental tips and our passion for decorating. We’ve also shared project ideas like our easy custom window valance and chalkboard menu chargers, and furniture makeovers like our gray and walnut dresser transformation to name a few. When we’re not at work or school, you will most likely find us holding some kind of power tool, a paint brush and a glass of wine. Sometimes even at the same time. We’ve had the time of our lives blogging on Sypsie and are so excited to share a project today on Remodelaholic! After watching way too much HGTV (is that even possible?) we’ve fallen in love with a popular style of lighting, a normal hanging shade filled with chandelier crystals that sparkles and makes such a statement. They’ve been used mainly in dining room settings and are far too expensive for our rental budget, but we had a different idea…

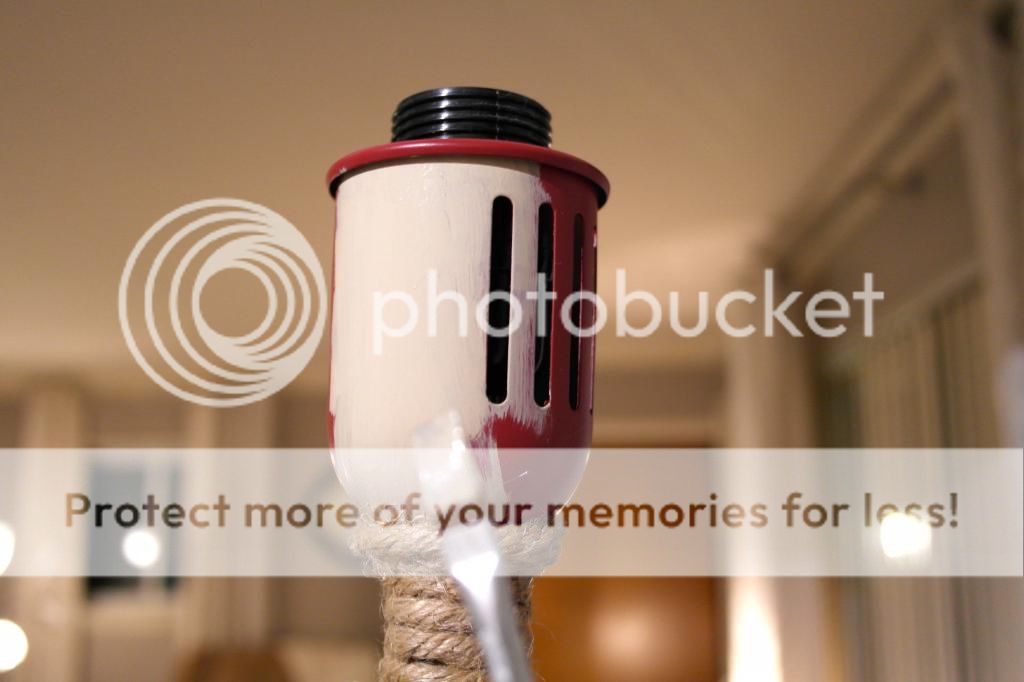
We picked up this old beat up red floor lamp at a garage sale this summer for $6 and it has been sitting in our office untouched ever since. While the industrial look is always in, the red paint was in sad shape, and it was a bit cheap looking no matter what room we put it in. One day, a light bulb went off, pun intended, and we decided to finally transform this old light into a statement piece using just a few items. The unwanted top of the lamp came off in two simple steps. We just unscrewed the old bulb and the black plastic piece acting as a nut to keep the dome on.


Next, we wrapped the base of the lamp in a thin 1/4″ thick rope, also picked up at a garage sale for a steal at $0.50. Using hot glue as our adhesive, we started at the bottom of the lamp…

and wrapped…

and wrapped until we finally reached the top! We secured the rope by covering the end in our hot glue, both on the bottom and top to prevent fraying.

We stopped before the vented portion of the lamp, and finished hiding the red color by painting two coats of a leftover test pot of Behr’s Ocean Pearl with a small craft brush.

While we waited for that to dry, we moved on to the chandelier shade. After trying a few different shades, we ended up loving the size and shape of an 18″ Ikea Jara shade in a light gray color, picked up for $19.99.

For the chandelier crystals, we found two boxes of Christmas ornaments at Marshalls for $7.99 a piece. We decided on two shapes, a round smaller ball and a medium sized tear drop to create some contrast.

Now for the tricky part, attaching the gems to the shade. After wondering the house looking for any type of inspiration, we spotted a stack of tomato cages in the garage that would work perfectly. We simply bent the ends and top off, so in the end we had two attached wire circles, about 8″ and 10″ wide. We debated painting the cage white, but decided the original gray color blended well with the gray shade (plus the -40 degree polar weather we’ve been having and spray paint don’t get along!)

We attached the 8″ side of the tomato cage to the top of the shade using a thick button thread,

and then attached the shade to the lamp reusing the original plastic nut to keep everything sturdy.

Last but not least, we attached the crystal ornaments by hanging one layer from the bottom tomato cage hoop, and another longer layer from the top hoop, again using a thick button thread. (the thread hangs far enough away from the bulb to keep things fire-safe, but definitely make sure there’s adequate space between the thread and bulb, or use a different thread like wire if anyone’s trying this themselves!)


And with that we were done!
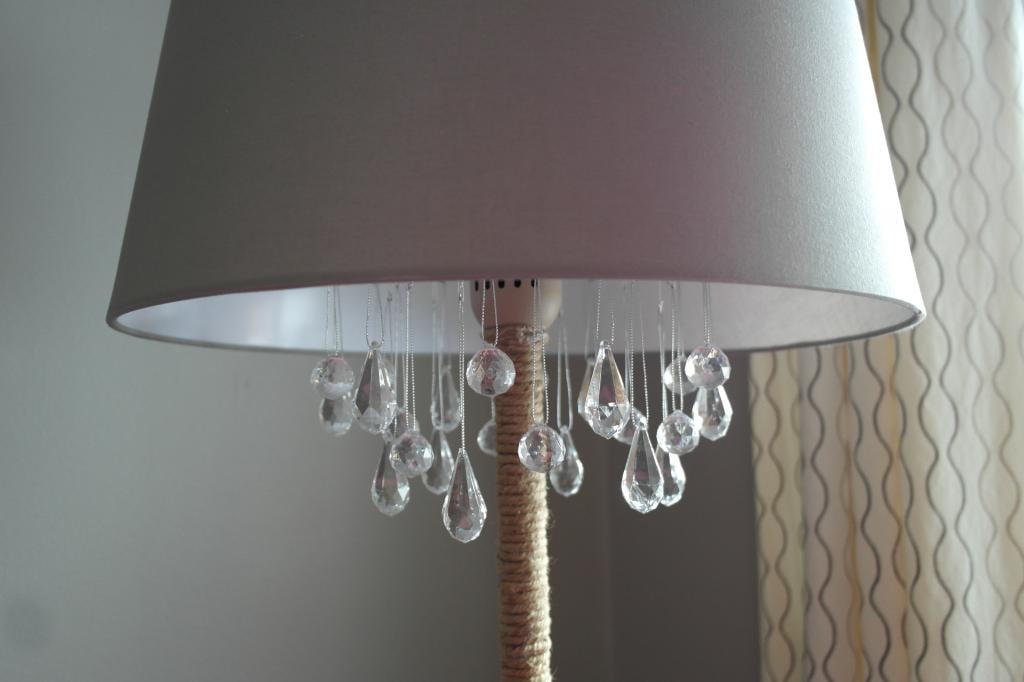
The lamp now lives in our living room and puts off a fun pattern on the walls when the sun hits the crystals during the day.


The total cost of our project breaks down to $6 for the lamp, $0.50 for the rope, $19.99 for the shade, $7.99 X 2 for the crystal ornaments, and $0 for the hot glue, tomato cage and paint since we already had them on hand, for a total of about $42.50. That total falls well under the cost of a nice floor lamp, and definitely under the cost of a fancy HGTV show lighting feature : )

Thanks so much to Remodelaholic for letting us share our latest project, we hope you liked it! Prost!
———————————————
Thanks, Jodie and Paige! I think every lamp needs a little bling now…
Head to Sypsie Designs to see more of Jodie and Paige’s creativity and style, including another creative lamp makeover!
Lorene has been behind the scenes here at Remodelaholic for more than a decade! She believes that planning projects and actually completing them are two different hobbies, but that doesn't stop her from planning at least a dozen projects at any given time. She spends her free time creating memories with her husband and 5 kids, traveling as far as she can afford, and partaking of books in any form available.


Thanks so much for sharing our new lamp makeover! We had so much fun putting it together : )
Thanks for sharing with us, Jodie! Great makeover!
Brilliant! The rope, the ornaments, the new shade – it’s all perfect! And my favorite feeling is the sense of victory when I wander through the house not sure what exactly I think I’m going to find to solve my problem, and then spot the perfect solution! Like a tomato cage 🙂
VERY COOL! Wow, I can’t believe that is the same lamp. I love the twine juxtaposed with the crystals. Pinning!
Very pretty! The lamp looked kinda like a toilet plunger before…so definitely a huge improvement!
Awesome transformation! I did rope on a chandelier once, it’s a challenge!
pinning!
gail
Hey!
Great idea with the rope, I am about to embark on the same mission… I just wonder how much (length) of rope you ended up needing? And how exactly did you glue it? Like did every part of the rope get glued to the lamp or was it just every now and then?
Would appreciate your advice! Will post a picture once mission is complete!
Thanks all the way from Denmark 🙂