Add Molding to Update Closet Doors
Continuing on with Shut The Front Door DIY week… more ways to update plain doors! And stay tuned because there are even MORE to come!
Using molding to add features to a door is such a versatile DIY projects! You can go for a classic panel-style with curved corners like Suzanne shared here on her interior doors, or you can use a more modern geometric style like Kris did on her closet doors here:

Update Plain Doors with Trim
by Kris of Driven by Decor
Hi Remodelaholics! I’m Kris from Driven by Decor where I share simple tips and ideas for adding affordable style and timeless design to your home. Over on my blog you’ll find lots of room makeovers (one of my favorites is our bathroom makeover – you’d never guess that it’s something other than wallpaper on the walls), decorating tips (such as these 20 rule of thumb measurements for decorating your home), and DIY projects (our organized family charging station for corralling all of our electronics is a favorite).
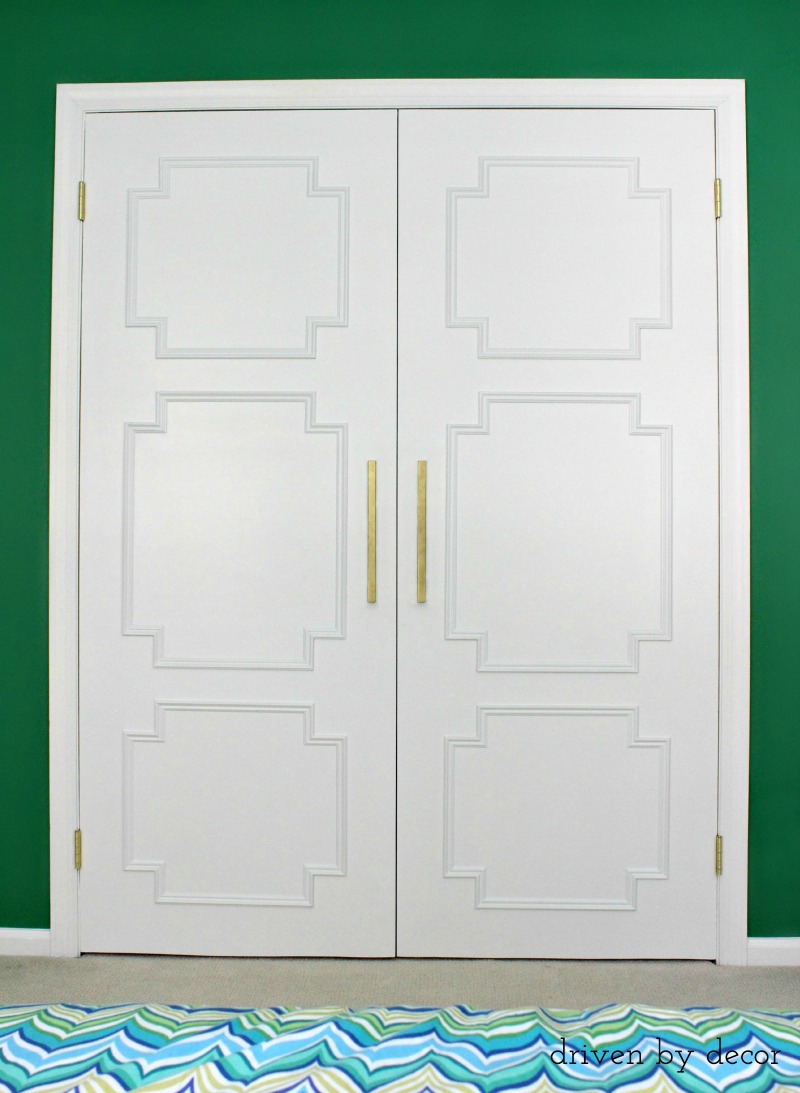
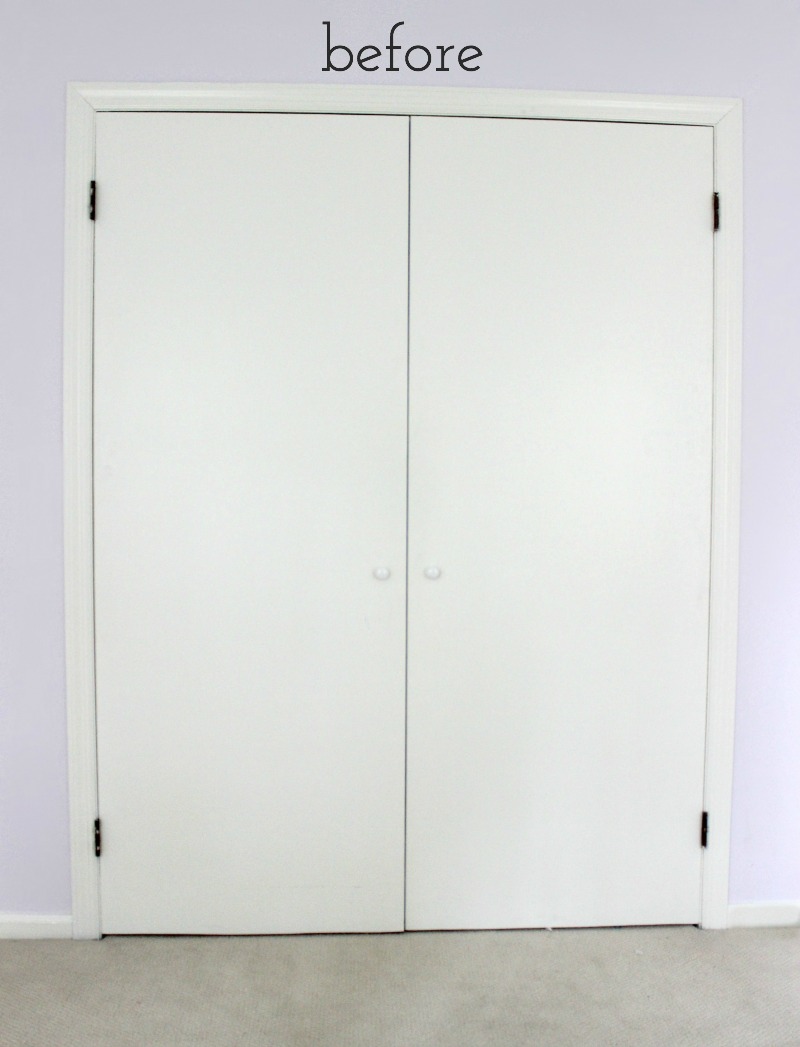
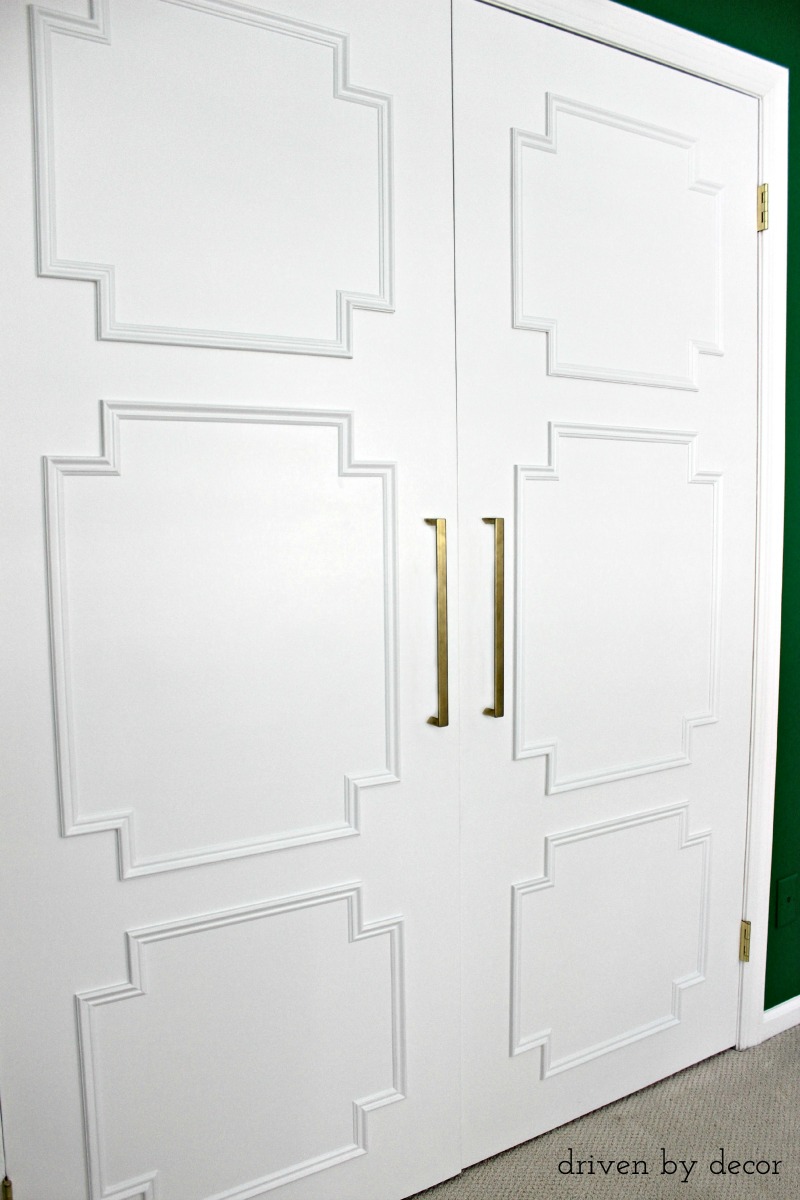
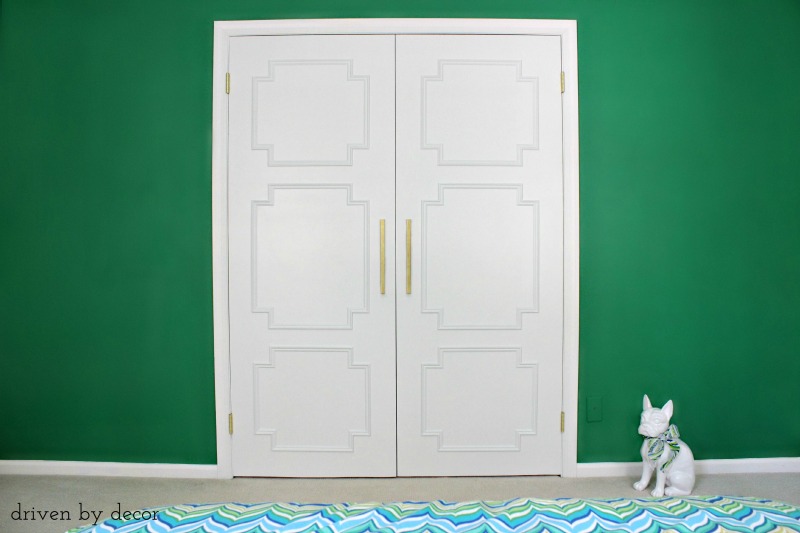
We moved to Connecticut almost two years ago and I’m slowly making my way through our old New England home, updating it room by room. One of the most fun room makeovers I’ve done is my tween daughter’s bedroom. It reflects her bold personality, love of color, and more modern design taste. I didn’t want to pour a lot of money into redoing her room but knew that her ugly, cheap looking flat closet doors had to go. Instead of throwing them in a landfill and buying new doors, I used some inexpensive molding to transform them into these paneled stunners:

Such an improvement from the heinous “before”:

And the best part is that it’s a totally doable project even for a novice DIYer. Here’re the supplies you’ll need to get the job done:
- Low profile panel molding (available at hardware and home improvement stores)
- Miter box and saw or electric miter saw
- Level
- Tape measure
- Fast-drying wood glue
- Painter’s tape
- Small brad nails
- Hammer and drill
- Wood filler, sandpaper, paintable caulk, and paint
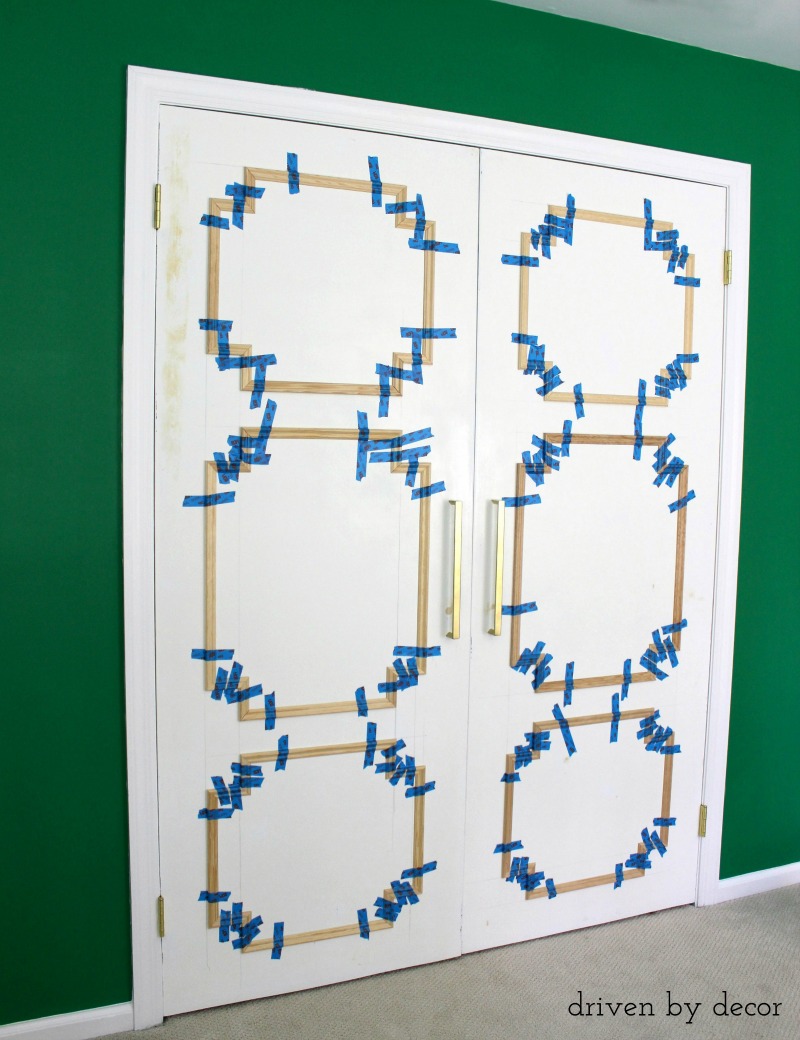
The first step is to decide on the type of paneling pattern to create on your doors. I went with a more modern geometric pattern but you can create any type of look from classic box panels to more intricate patterns with your own unique flair. Once you’ve figured out a design, measure your doors and calculate how long each piece of panel molding needs to be cut in order to create a centered pattern on your doors. Using a pencil, tape measure, and level, mark the spots on your door where your molding pieces will go.
To determine how much panel molding to buy, add up the measurements of the paneling pieces that you’ll need and then add on an additional 15% of material. There are a lot of different options for panel molding but molding that’s about 1” wide and has a flatter profile (between about 1/4” – 3/8”) works best for this project. Something like this is perfect:

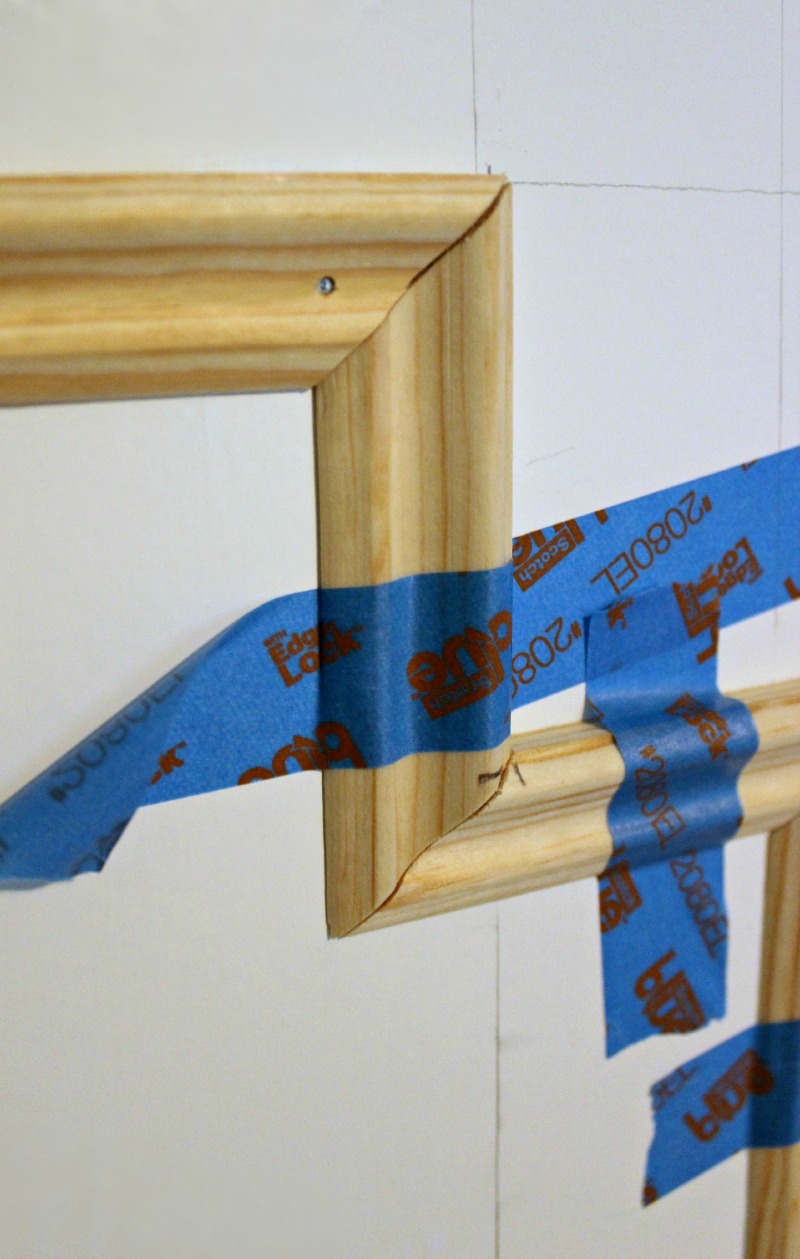
Once you have your panel molding, use a miter box and saw (or an electric miter saw if you have it) to cut all of your molding pieces to size with the end of each piece being cut on the diagonal so it will join seamlessly with the pieces next to it.

Prep your doors by filling any holes or nicks and lightly sanding them. Then use painter’s tape to tape each of the molding pieces into place at the spots that you marked on your doors. Double check that all of your molding pieces are level and aligned.

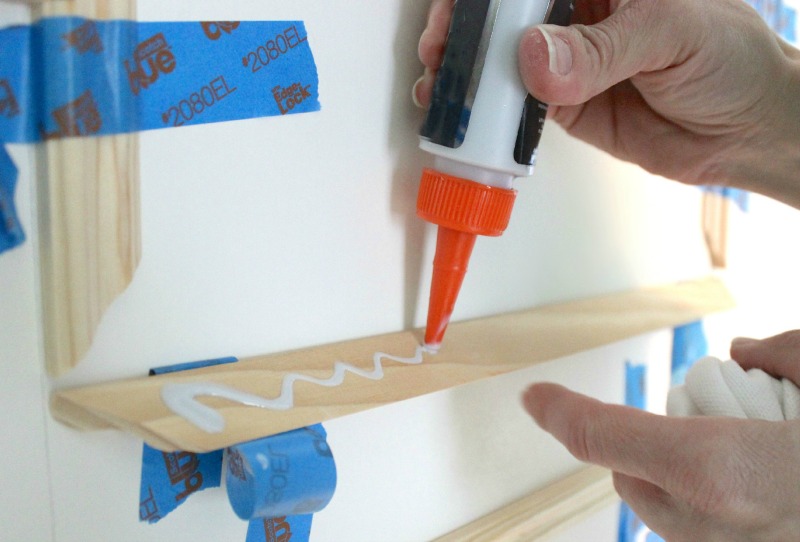
To adhere the molding to the door, add a small line of fast-drying wood glue to the back of each piece of molding, push it into place, hold for a few seconds, and then secure it to the door with painter’s tape. Wipe away any excess glue with a damp rag.

If you have any molding pieces that won’t lay flush on the door after being glued (due to warping of your door or the molding piece), drill a tiny hole into the end of the piece that’s sticking up and lightly hammer a small brad nail into it until it lays flat. Predrilling the hole before driving in the nail keeps the molding from splitting.

Once all of your molding pieces have been glued down and the glue has completely dried, the painter’s tape can be removed. If you needed to use any brad nails, fill those small holes with wood filler and sand them smooth.
The final step is to caulk any gaps between the molding and your door and paint the entire front of your doors. Add new knobs or pulls and you’ve transformed your flat, unattractive doors into decorative paneled beauties!


From start to finish, the project took me about 3-4 hours per door but a lot of that time was spent cutting the molding pieces with the miter box and hand saw. If you have an electric miter saw you can shave a good hour off of the project. The cost for the molding was under $25 per door, so not only is it less expensive than buying a new door but the look is much cooler, don’t you think?
Hope that you guys enjoyed this project and that you’ll come visit me to see more of what’s going on at Driven by Decor!

————————————
Thank you, Kris! Head to Driven by Decor to see more from Kris, like her acrylic and brass curtain rods and this super simple way to update a chair.
Coming up later today in #ShutTheFrontDoorDIY:
(be sure to subscribe by RSS or email to get updates for every post of Shut The Front Door DIY week)

Lorene has been behind the scenes here at Remodelaholic for more than a decade! She believes that planning projects and actually completing them are two different hobbies, but that doesn't stop her from planning at least a dozen projects at any given time. She spends her free time creating memories with her husband and 5 kids, traveling as far as she can afford, and partaking of books in any form available.


Thanks so much for the feature!
Thanks for being our guest, Kris!
I really love the door design. Do you have the measurements you used for the geometric shapes? Thanks!
Love love love! I want to do this to my doors. I agree it would be nice to know the measurements of the trim you used here but I guess I’ll have to figure it out!