Winter Wreath with Burlap and Snowflakes

Hey there Remodelaholics!! I’m Karah and I’m so happy to be here with my first little installment of a contributor post for the year. I met Cassity at the Haven conference last August and just fell in love. We definitely connected over our love of blogging, it was a blogging conference after all … but our true loves run much deeper in the realm of all things house and home. Family first, of course … speaking of, here’s a snap shot of mine.

Yes, I had to go back almost 5 years to find a picture of the four of us. And I’m not sure my husband’s eyes are even open and my wedding dress looks like an inappropriately short mini skirt, but hey, our dogs are cute, right?!?! Even though it doesn’t appear their eyes are open either. 🙂 #FamilyPhotoFail
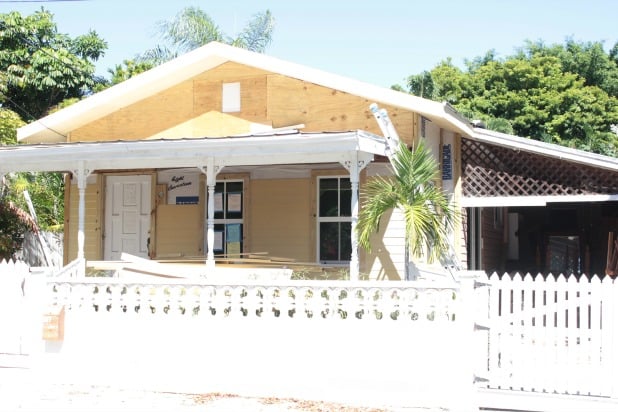
We are in the midst of a full house renovation of our own. In April 2013 we purchased a 1950’s conch style home in Key West, FL and we have been busy updating every single surface since then. Let’s not a judge a book by it’s cover, OK?
It is a true labor of love that I enjoy writing about on my blog the space between. You know the space between, right … that little space between where you’ve been and where you’re going. I am on a journey to make the most of it and am so thrilled to share a few extra peeks over here with you all. So thanks for having me! xo
Now, I am specifically going to be checking in once a month with seasonal ideas from decorating tips to DIY projects and everything in between. And since it’s January you know what that means … yeah, I kind of got stumped on this one, too. Not that I’m not a huge fan of Martin Luther King Jr. Day … but assuming you’ve already got all of your MLK Day decor all planned out I whipped up a simple winter wreath with burlap and snowflakes from a very fancy boutique shop The Dollar Tree.
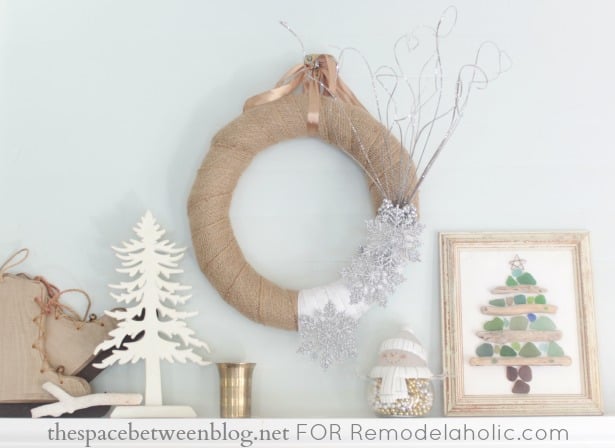
I love how she turned out, and especially that it gives our eternal summer location a bit of a brisk feel when I see her on above recently DIYed board and batten wall in our living room.
Make a Winter Wreath with Burlap and Snowflakes
To make your own, or one similar, here are the supplies you’ll need:
- pool noodle or wreath form
- duct tape (if using a pool noodle)
- serrated knife (to cut pool noodle to desired length)
- 4″ thick burlap ribbon – available here (affiliate link)
- 1″ thick white ribbon of your choice – this option could be fun (affiliate link)
- safety pins
- embellishments of choice, I used silver glittered sticks, balls and snowflakes
- hot glue
And here’s a picture of a smattering of items I may or may not have used. 🙂 You know how it goes when you start a craft project, it doesn’t always end up exactly how you may have envisioned before you started. Luckily I only purchased the items from the dollar store for a total spend of about $5, the ribbons and pool noodle I already had laying around.

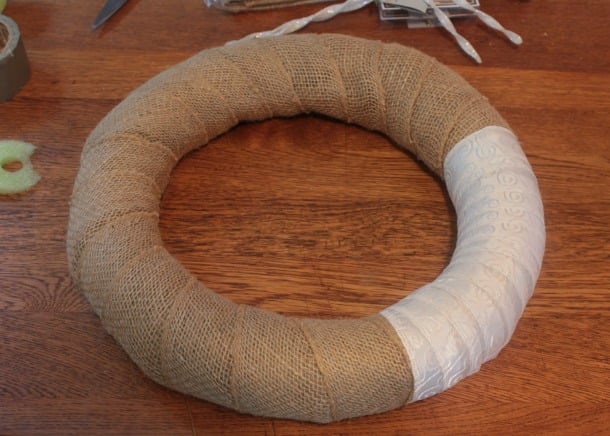
This was my first go ’round with the whole pool noodle as a wreath form, and hey, I recommend it. Just for reference I played around with some sizes and ended up cutting my noodle to a total length of 42 inches with the serrated knife, then just attach the two ends with duct tape.

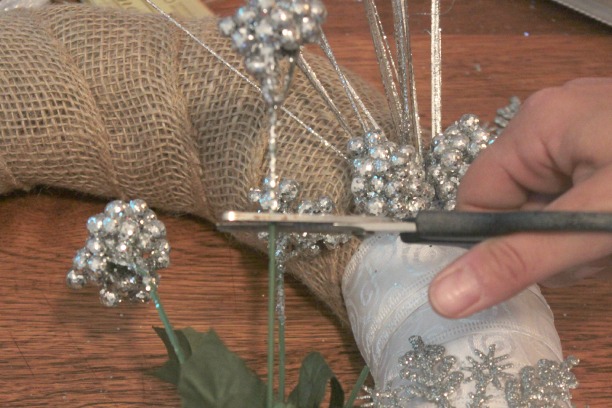
Then just wrap the whole thing with the burlap overlapping enough so the awesome green color doesn’t show through. 🙂 And secure with a couple of safety pins.

My burlap ribbon was thisclose to making it the entire way around, but I think the added white ribbon really does start to give it that winter feel.
Turns out, since the burlap has holes in it anyway, I could just break the glittered sticks to the desired length and stick them right into the noodle. I had thought I would hot glue them under the white ribbon, I think that would work also if you’re using a more solid fabric.
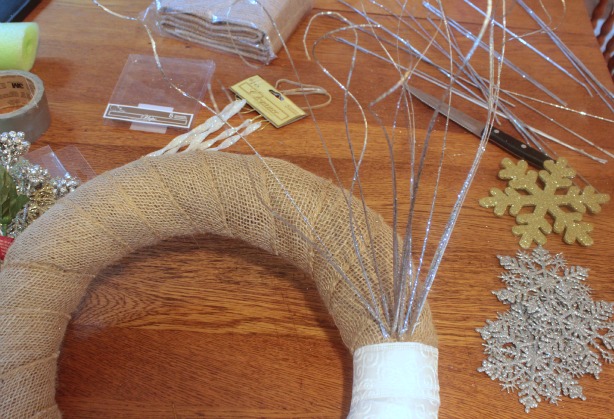
Then the little silver balls really are just meant to cover up the transition area where all of the sticks poke into the noodle. And they start to add some dimension to help balance out the wispy twigs above. I cut those little balls off of longer stems probably meant as an embellishment for floral arrangements, they stuck right in hidden a bit behind the white ribbon.
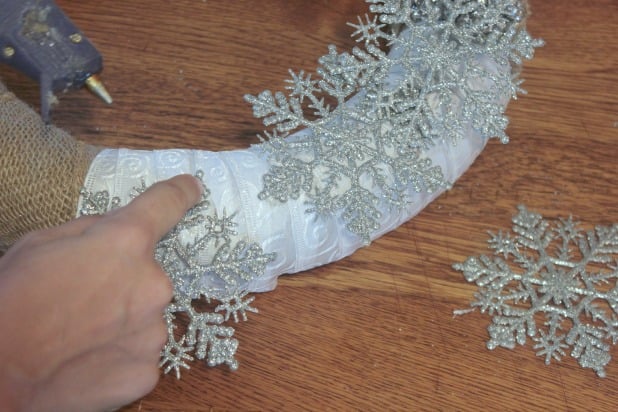
To keep that dimension going I hot glued the first snowflake right onto the balls with the bottom on the wreath, I think it’s nice that they all aren’t just laying flat.
And for one last bit of whimsy the third snowflake is almost “falling” right off.
Overall a super simple wreath to make and customize to your liking. That burlap and white ribbon base could easily carry over to spring … maybe replace the snowflakes with colorful gerber daisies or even eggs for Easter.
Just to mix metallics I chose a gold (or is it brass or copper color?) ribbon to hang her from an old hook, and kept the ribbon long and floppy to keep it casual. Or maybe it’s because I’m too thrifty to cut a long ribbon that may end up working out perfectly for the next project that requires a long gold/brass/copper ribbon. 😉
If you’re looking for other project ideas here are a couple of my favorites, just click on the image to go directly to the post.

Or, if home renovation is your thing, which I’m guessing it is since you’re a Remodelaholic reader like me, you can get caught up on our house renovation project by clicking this image.


——————————————————————–
Wanting more winter decor? 25 more great winter wreaths plus a friendly snowman wreath


Love it! Perfect for winter. Thanks for sharing!
Thank you, Sarah!
It is always so sad to take down the Christmas decorations. Having a fun winter wreath would help you feel like not all of the festivity was drained out once Christmas is over. Too cute!
Yes! I think there’s always a season to decorate for. Thank you so much for the comment, Jamie!
Hi, to all the Remodelaholics! If you aren’t following Karah’s site, The Space Between, hot on now! She has great ideas! She is my favorite blogger! PS…notice the driftwood art framed beside the wreath in the top picture? It’s just another of Karah’s great ideas!
Susan!!! You are the absolute best! Thank you so much for coming over here and checking out my winter wreath tutorial. xo
HI Karah,
What a pretty wreath! I just love those glittery snowflakes, I use them all over this time of year. And I haven’t tried making a wreath with the noodle yet, but will give it a try. Glad to see you at Remodelaholic!
Thanks Jessica! I highly suggest the pool noodle wreath!
Pinned it to my snowflake board. 🙂
Woo Hoo!! Thank you so much, Dan. Glad you like it.
I love, love, love this wreath!! I love the winter look. Super cute!! Thanks for the tutorial!!
Thank you so much, Crystal! It was so simple to make, so happy to be a new contributor here at Remodelaholic!
January to me equals winter/snow. I decorate my mantle with a “winter wonderland” only using silver and white/clear. I use anything that you’d find outdoors like pinecones, birch (candles), snowmen, etc. then I cover the mantle with snow.
Thanks for the comment Tiffany. It’s fun to hear how others decorate.
I love the idea to use what you find outdoors, the perfect way to have your mantel represent the season!
LOVE this! Thanks for the pool noodle idea…I’ll totally be using that 🙂
Thanks Emily! Gotta love an idea that only costs $1. 🙂