Silhouettes, Guest Project
I love what Angel at TaDa Creations does. She has a ton of talent, and has done such a great job at making the perfect silhouettes. And she showed us how to do it! (Sorry this post is SO late, I am trying to catch up on party highlights!!)

I found oval 10″x12″ frames at JoAnn a while back. You can usually find them on sale for 50% off or buy one get one free. Or at the very least use a 40% off coupon (they accept competitors coupons too). I bought a new Exacto knife and 7 sheets of black scrapbook paper. I figured I’d make some mistakes and be thankful for the extra paper. I actually could have gotten away with just 2 sheets. For both the black and the white I bought paper with a mock linen texture to it.
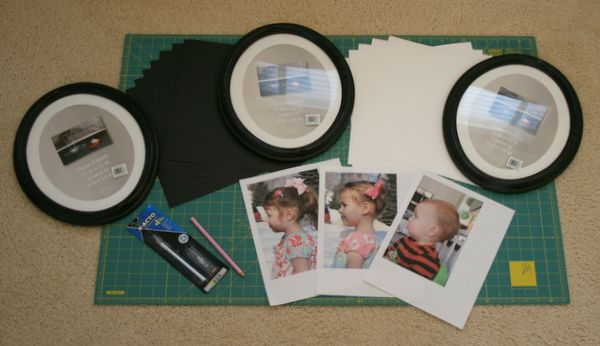
I took pictures of the kiddos earlier, trying to get them all about the same distance away in the photo. Then I copied them into Word and printed them onto regular paper to use for my templates. I later had to print Emily’s a tad bigger to be in scale of Allison and Sam.

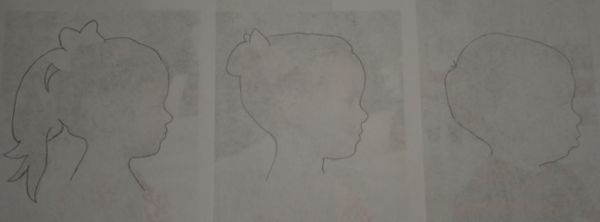
I determined that I wanted the final faces to all be looking to the left to I traced the back of the pint outs. I knew that later they would be traced to the back of the black paper so any ridges from cutting would end up on the backside. Drawing the outline on the backside also helped to be better able to see just the lines I wanted to cut on. Tape it to a window so you can see through from the front.

My initial first drawing. Lots to clean up and more details to add including eyelashes. You don’t really see eyelashes protruding from a sideview, but they add a lot to a silhouette.
Here is where I noticed that the scale of Emily’s face was a little smaller than Allison’s, so I went back to my Word doc and dragged it a little bigger until it seemed right.

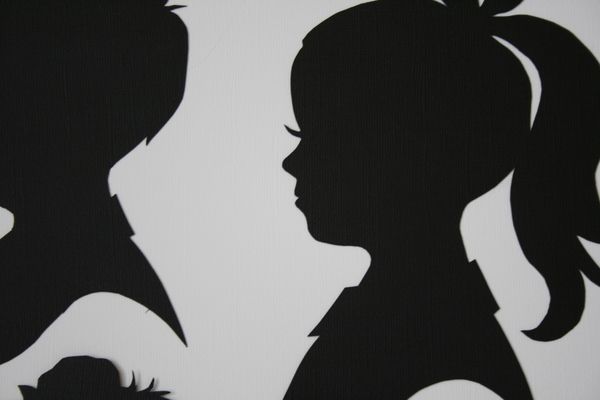
Now to tweak the details. Allison originally had side buns, but I made it look more like one bun in the back and added the little flyaways under it. I also gave a better shape to their bows and to Emily’s ponytail. Sam got a bit more definition to his hair so he didn’t look so bald. And they all got retro looking collars, perhaps my favorite part of all.

Then I was ready to start tracing the lines with my knife (on top of my cutting mat of course). I didn’t tape anything down, I just held the template very tightly with my left hand. I did all of them while kneeling on the floor, which wasn’t fun, but it gave me good leverage.
On the right is the photo I cut out and the left is where the silhouette came out of. It was tough to get it to cut through the whole way around even though I pressed so hard my fingers ached (especially after cutting out all three). Just go back over those spots and when it’s all detached you’ll have a few rough spots to spruce up.

Next I double checked to make sure I liked the overall scale.

Here is all three cut out. It looks like I need to makes Sam’s nose a little more round, it’s pretty pointy here. And Emily’s upper lip got cut a little smaller than it should have. I need to redo hers for sure, but my fingers still ache so that will wait until tomorrow. I would suggest starting with the face so that if you make a mistake you haven’t wasted all your time and energy with the rest of the details. I learned that the hard way.

Close up of her mis-cut lip. Sorry Sweetie!
Next I used the glass from the frames to cut the white background paper out. I just swiped the Exacto knife all the way around the glass. That worked pretty slick. Of course you’ll have to wash the glass and get all the upc label residue off. Why do they always put stickers where they don’t belong?

I used archival double sided tape on the backs to secure them.

Then Ilaid them all in the frames to see what they would look like. I measured to make sure they were centered correctly. I thought I could eyeball them, but I did have to move one down and another over slightly, so I’m glad I measured.

Perfect, now they are ready for hanging!

I am so in love with these on my yellow walls.

You could really have fun with these and use a patterned paper for the background.
Or how fun to cut the images from a different color?
But I really love the classic look for this spot. They are just what this wall needed.
Do you think I hung them too high? I didn’t have the luxury of someone else to hold them up so I could see them from far away.

I love the styling of the silhouettes,
they are perfect and totally classic!
What do you think?
Cassity Kmetzsch started Remodelaholic after graduating from Utah State University with a degree in Interior Design. Remodelaholic is the place to share her love for knocking out walls, and building everything back up again to not only add function but beauty to her home. Together with her husband Justin, they have remodeled 6 homes and are working on a seventh. She is a mother of four amazing girls. Making a house a home is her favorite hobby.


>that is too too too too sweet!! I love it!! and I am so stealing this to do in our bedroom!!!
love this post!!
>I love these! They are so sweet! Now I know what Grandma is getting for Christmas! Thanks for sharing.
>I think they are awesome. You did such a nice job! Love your bedroom with the black and white and touch of red. What color is the wall? It is such a pretty bedroom. Marla
>Following back from new friend Friday..
>This is so cute! Love the idea, my kids are probably too old to want to do this but maybe I can find some older photos of them to try it.
-heather
>Very cool website! Thanks for the comment! I am your newest follower! 🙂
I'm sure I'll find some great projects on here!
>The silhouettes turned out great and look so good over the bed. You did a nice job with them. Thanks for the tips on doing it ourselves. Love & blessings from NC!
>So sweet!
>Very pretty. Thanks for the tip on where to find oval frames. It is not as easy you would think! 🙂
>Darling tutorial. Thanks for sharing!
>Wow, this is so much simpler than my method. i took a picture put in in photo shop and altered the image so I could trace around it, erase the back ground and fill in the fore ground. It took me like ten tries to get it right. Like I said this would be way easier but at least I learned a bit about photo shop. 🙂
Pam
>These turned out gorgeous!!! I totally need to do them one of these days…except I want to try doing the silohette's in black over a turquoise background…hm…maybe I'll have to tackle it sooner because now I can't wait to see how they turn out! Thanks so much for the inspiration!!!
Beautiful job!!!! It really pulls the room together…. Can you do my kids? Lol! It really is beautiful!!!
Haha, thanks for the comment, Linda!