For Vanity’s Sake; Upstairs Bath remodel; Part 4
The continuing story:
In my quest for affordable remodeling, reusing things is a must. The bathroom vanity doors usually match the kitchen cabinets and can therefore be used elsewhere, like we have done before. My other train of thought is, that I am sick of the boring, stock vanity cabinets that are usually used in cookie cutter homes like mine.
While I was drawing up the plan, at first I thought I would find 4 new doors that matched at the Habitat Re-store. Then, I realized that might be impossible. My next option was to remove the base cabinet doors altogether and only have to find one large door, or two smaller doors for the cabinet Justin is building to go over the toilet. This is the option I chose to go with.
But what to do with the vanity? I didn’t want to rebuild it, or have to remove the counter top which is in fine shape for a kid’s bath. Here is what I came up with, and I love it so much, I plan on trying it downstairs as well.


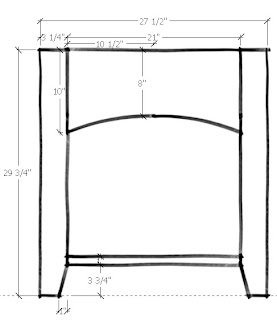 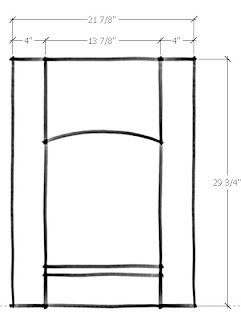 |
Bathroom Vanity Remodel plans!


It is seriously one of the cheapest, easiest updates we have ever done. And, you have my permission to use this awesome idea, but please, if you blog about it, link to my blog, and let me know what you did.
Here is the link to Mirror Mirror on the Wall: Part 5
Cassity Kmetzsch started Remodelaholic after graduating from Utah State University with a degree in Interior Design. Remodelaholic is the place to share her love for knocking out walls, and building everything back up again to not only add function but beauty to her home. Together with her husband Justin, they have remodeled 6 homes and are working on a seventh. She is a mother of four amazing girls. Making a house a home is her favorite hobby.


>fabulous!! it is suchhhh an improvement!
>I am not a fan of the exposed plumbing look, but I do like it! I think that the arch looks kind of plain though, maybe there is some sort of wood applique you could put there? Nothing too gaudy, and of course it would just be painted the same as the rest. Also, I think a basket would look cooler underneath than a box.
I think it is awesome that you are able to do something this nice on a low budget and it is great to recycle…wish more people would!