Build A Swedish Mora Clock: Part One
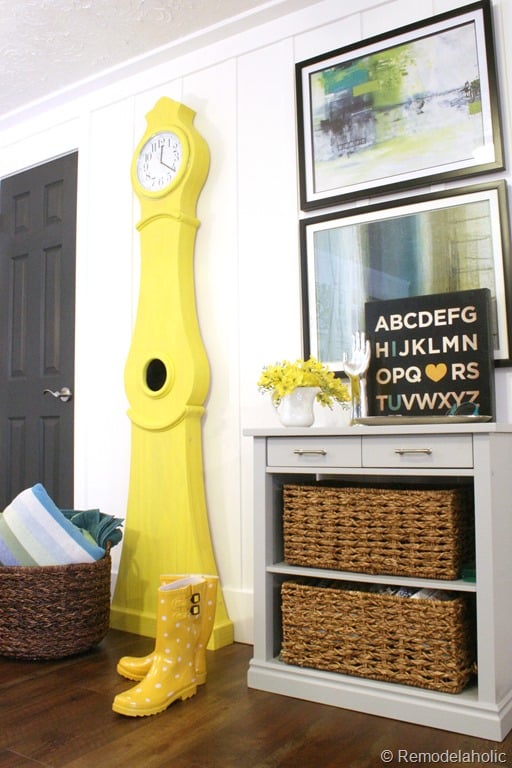
Cassity has wanted a Swedish Mora clock since she saw one online years ago. She had this crazy idea that we could build one using a wall clock as the face. And I guess I just don’t know how to stop her once she gets one of her crazy ideas. We found the perfect opportunity recently to design and make one. Last week with National Painting Week we gave you a little sneak peak of how the clock turned out.
 Now I’ll show you how to make your own Swedish Mora clock for under $75, some affiliate links included in this post.


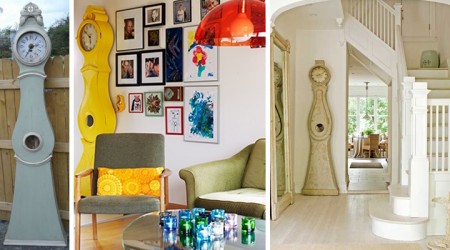
First we looked online and found some inspirational images of Swedish Mora clocks that we liked. We ended up liking the simple shape of the blue clock, on the left and loved the color of the yellow one, in the middle.
Once we found the shape of the clock body that we like, I imported the first image into Adobe Illustrator CS6![]() and traced out the outline to use as a pattern (you could use any program that allows you to trace a shape). For the face of the clock we used an old wall clock we had laying around the house, so that part was easy.
and traced out the outline to use as a pattern (you could use any program that allows you to trace a shape). For the face of the clock we used an old wall clock we had laying around the house, so that part was easy.
To get the proper scale of the clock, I measured the wall clock and used it as a ruler of sorts to scale the drawing up to the size of the clock that we found. However, when we finished scaling we found that we did want the clock to be a little taller, so I stretched out the shape slightly and made it a foot taller. Finally, we simplified the decorative top of the clock for ease of construction.
Here is the pattern that we ended up with. I also designed this clock to be 3 3/4” thick. We really wanted to have some depth to the clock and not just a flat clock (which you could do to simplify the building). You will see how I created the thickness later on in the post.
Here is the Swedish Mora clock pattern that I created.
Skill Level: Moderate to Advanced
Tools Needed
- Safety Glasses
- Ear Protection
- 24” Long Camps (or bigger if you have them)
- Band Saw (optional)
- Jig Saw
- Circular Saw (to Square off the base of the clock)
- Reciprocating Saw & Blades
- Router and Router Bits
- Putty Knife
- Old Brush (for spreading out the glue)
- Pencil
- Carbon Paper (transfer paper to transfer the pattern on the wood)
- Tape Measure
- Orbital Sander
- Handheld Belt Sander (with narrow belt for shaping)
- Drill Bit Sander
- Circular Jig (or large compass)
- KregJig Pocket Hole Jig & Screws
- Drill
- Sponge Paint Roller
- Paint Brush
- Paint Tray
- Drop Cloths
Materials Needed
- (1) Printed Pattern Of Clock (click here to open the image; see the instructions below for details about printing to scale)
- (3) 1×8 Select Pine boards (straight and smooth boards)
- (4) 2×6 boards (straight and smooth)
- (1) 1×4 Select Pine board (for the base of the clock)
- (1) Bottle of Wood Glue
- Paint (we used Sherwin Williams, Pro Classic, Satin paint in #6910 Daisy)
The first thing that you need to do is take this drawing, which is the scale of 1” = 12”, on a 8 1/2” x 11” piece of paper, and print it twelve times the size (1200%), for full size. Print it as a poster so that it tiles the image on 36 pieces of paper. *printing will depend on your computer settings, I probably won’t be able to talk you through it…. sorry!

Layout the pattern and tape it all together. I used my laptop as a light table to match up the pages. I thought that was a genius idea.

Now start getting the all the wood together. Begin building by gluing two pieces of 1×8 select pine together at their edges. It’s best to use black pipe clamps for this- I got the clamp at Harbor freight, and the black pipe and Home Depot, just FYI. Use as many as you have access to. I used 7 in this image.
 |
 |
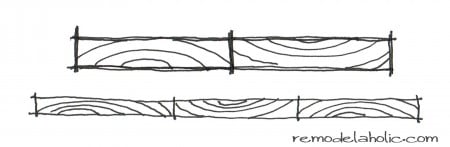
*TIP* Make sure that the end grains of the boards curve the opposite direction when gluing. If the first boards end grains curve up the next boards grains will curve down. This will reduce the amount of warping of the wood after it’s all glued. Also keep the board edges flush along the glued edge.
Once the first two boards are glued together for a couple of hours or more, remove the clamps and glue the third board to the other two. (remembering the wood grain tip from above for the third piece!)
After all the boards are glued, remove the clamps and scrape off all the access dried glue. Then sand it smooth to get ready to trace on the pattern. I ended up making my own carbon paper with some charcoal, to transfer the pattern to the panel, but you could just use carbon paper.
 |
 |
 |

Once the pattern is drawn on, cut out the clock profile with a jig saw. Cut about a 1/4” from the finished pattern edge. You will have to cut it out one more time once the 2×6’s are glued together. Which is why you are leaving a bit of room, leave about a 1/4”.

After the pattern is cut out, start gluing the 2×6’s together. Brush on the glue over the entire wide surface of the board and clamp them together for a couple of hours.
 |
 |
I used a circle jig to get the circles drawn just right before I cut the hole out for the clock face. I cut this hole out before I glued the 2×6’s to the back, because it was going to be easier than cutting it with the 2×6’s in place.

*TIP* If you don’t have a circle jig, just use a paint stick. Drill a hole in the center and then measure out the radius of the circle and drill a second hole. Nail the center hole to the center of your wood. Then hold the pencil into the outer drilled hole and swing around in a circle while drawing the line.
Next glue on the 2×6’s to the back of the clock pattern. Make sure that the 2×6’s are glued on at an angle along the clock profile with enough overlap to cut off when cutting out the final clock profile edge.

*TIP* To keep the clamps from denting up the face of the clock use some scrap wood on top of the face just under the clamp. Then clamp that down tightly. Remove the scraps when you are done gluing.
Because this post is getting so long I will be picking up the rest of the construction tomorrow. I will show you how I had to cut it up in three different parts in order to cut it out. I will also show you how to do the finished sanding of the curves and how to cut out the molding details. Lastly, I will show you the technique Cassity used to do the finished painting. Be sure to come back tomorrow to see the rest!
I am the husband of the amazing Cassity of Remodelaholic. I love to problem solve and to design and build things inside and outside the house to make life better. I am a professional Landscape Architect by trade and love the outdoors.


What an amazing project!
Thanks Korrie!
Wow this is just awesome! Such ingenuity. I’m bookmarking this on the off chance I can convince Hubby or my Father to help me tackle this project.
Amelia, I am glade you like it. I hope that you can find help to build one. You will love it.
That is so cool! I can’t believe you made that! How awesome!
Thanks Ashley!
Totally awesome. I have always wanted one of these clocks but would never spend the usual $$$$. I hope to make one someday now thanks to you.
You are very welcome! We are glad you like it.
this is awesome!! I’m having some shelves made for my dining room with the end pieces in the shape of a Mora clock and was going to have my genius woodworker friend figure out a pattern on his own. I’m going to steal your pattern!! Instead of using real clocks, I’m going to just have him use molding and wood cutouts to approximate the circle where the clock would have been. Love this, thanks!!
Kirsten, Let us know how it turns out. Thanks for your comment!
I want to do this badly, but I don’t know if I’m experienced enough! Do you think I could find antique “mantle clock” from CL and build this base? I LOVE the yellow also! Printed the pattern and now I’m chicken 🙂
Heather, don’t be chicken just give it a try.
Unbelievable cool! Love Mora clocks and now maybe we can make one! Thanks so much and great job!!
Good Luck! Let us know (via another comment) if you need any clarification!
That clock is amazing! I wish my husband could make one. That color is awesome. I had a quick question, and I don’t know if you answer it somewhere else on your blog, but I love the framed art above the console table. Where did you get it? Thanks!
Alyson, the framed art was from Target. They are really cool.
Hi! Awesome project.
Where did you get the console table from?
Tuti, we build it. You can read about it here.
Can you share the pdf? It would help to try and re-create this because I have no clue how to trace and enlarge in any of the programs I have on my computer.
Hi Sam, Sorry this took me awhile. I just updated the post with a link to the larger image. That image is sized to fit an 8.5×11 page, so you can pull it up to print and then enlarge it 12x — or if you’re not sure how to do that (every printer is different, so I can’t really walk you through it, sorry) you can print it at normal 8.5×11 size (make sure it’s not sized down to fit the page, so that the mark is 1″ on the page) and then take it into a copy shop and ask them to enlarge it 12x, so that it prints on several different sheets that you can then tape together. Hopefully that helps, and we’ll add this pdf to our list of things to work on for the site!
I used your small pattern And have a friend that has a sign co. to make me a full size pattern. I think the clock came out great. Would like to send a picture. Don’t know how to send the picture.
Exciting! We would love to see — you can submit a picture here: https://www.remodelaholic.com/share-brag-post/
Did you name the clock? I read somewhere that you are supposed to name them. I named ours Noel because she was a Christmas present, and it just fits her. Yours looks like a Blondie or perhaps a modern name because she is so young. You did a great job capturing the spirit of a Mora clock. Back when they were being produced, the clock was often purchased first (just like yours) and then a local craftsman would make the body.
Thanks for the comment, Kathy! I think our clock does need a name!
Hello,
I would like to know where I can get the clock template for the Swedish Mora clock ? The linked wasn’t available.
Thanks,
Hi Jess,
Technical difficulty on our part, it looks like. Drop me a line at hello@remodelaholic.com and I’ll hook you up 🙂