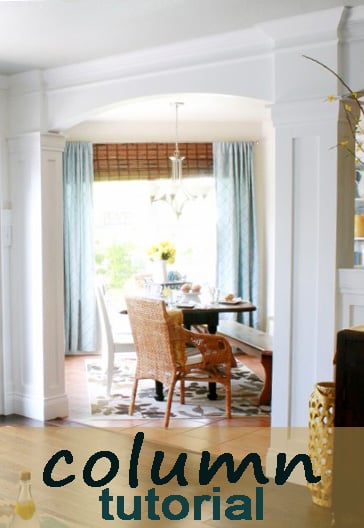
Interior Column Plans
Hear ye, hear ye, we FINALLY have the column plans done! WAHOO! The final interior column plans that we designed for our living room, only ya know three 3 years ago are finally here. Ever since we have been showing you the wrap up of the living room, and the built in’s plans part one and part two we have had a lot of questions on how we built our columns, so, we broke the process down for your building pleasure.
The great news is, that this design can be used for a standalone column or on the corner of a wall. We used it in both ways in our living room.

 |
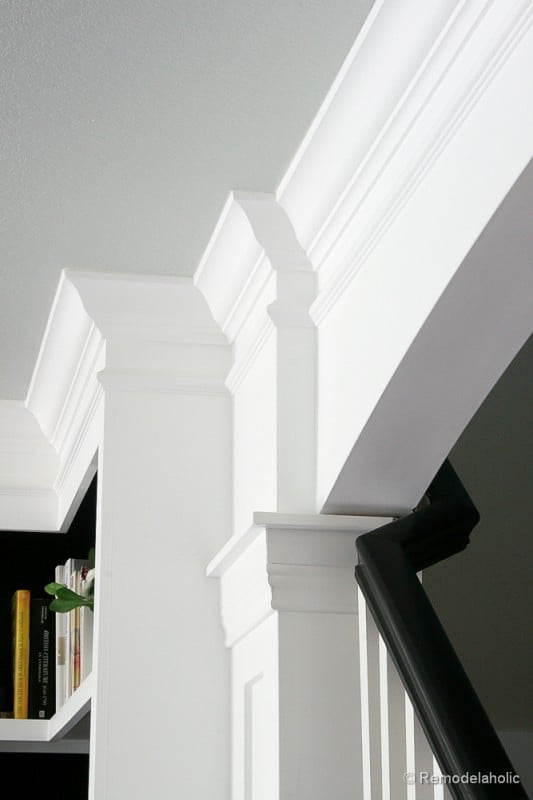 |
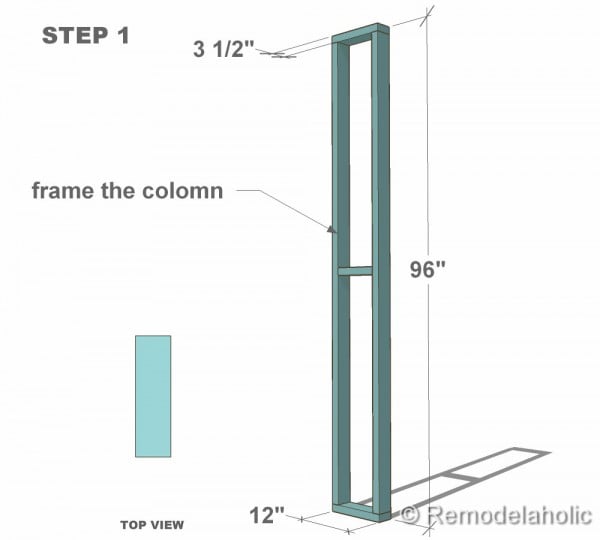
Here is the model of the interior column with some basic dimensions to give you a sense of how big it is. Below I show you a step-by-step plan of how I approached the construction of it. You can always change up the dimensions for your needs.

Notes
- If you wanted to add an interior column/pilaster on the corner of a wall, you would just start at step 3 and not add any sheetrock. Since you would use the sheetrock that is already on the wall.
- Measure as you go. Floor the ceiling heights may vary from mine and even from column to column.
- The sides can be slightly shorter on the bottom because the base molding will cover any gaps to the floor. So if you have any gaps, be sure to hide it at the bottom of the column.
- Nail the mitered edge together first, then nail the rest in place.
- Measure twice or three times then cut once.
- For a great finished look, sand the outside edges to 1/8″ round, even the joints that butt up against each other. This will also help it keep from chipping down the line, ro being a really sharp edge.
Materials Used
- (3) Pine 2×4’s
- (1) MDF Sheets – 4’ x 8’ x 5/8” (for the spacer moldings to match the thickness of the decorative moldings)
- (1) 1×6 MDF – 8′ length (base and cap moldings cut to width on table saw)
- (1) MDF Sheets – 4’ x 8’ x 1/2” (for the sides and corner moldings)
- (1) Sheetrock – 1/2″ thick
- (2) Door Casing Molding – 7′
- (1) Crown Molding – 6′ (buy a little extra in case of a messing up a cut)
- (1) Decorative Half-round Molding – 8′
- (Approximate 200+) Brad Nails – 1 1/2” ( 18 or 16 gauge depending on your nail gun gauge size)
- (100) Sheetrock screws – 1 1/4″ min.
Tools Used
- Table Saw (optional, but best for mitering the corner moldings and the top sides)
- Circular Saw
- Miter Saw
- Nail Gun
- Air Compressor
- Sanding Block
- Tape Measure
- Framing Square
- Pencil
- Level
Cut List (length x width x thickness)
- (2) 2×4’s – 96” x 3 1/2” x 1 1/2″
- (2) 2×4’s – 12” x 3 1/2” x 1 1/2″
- (1) 2×4’s – 9” x 3 1/2” x 1 1/2”
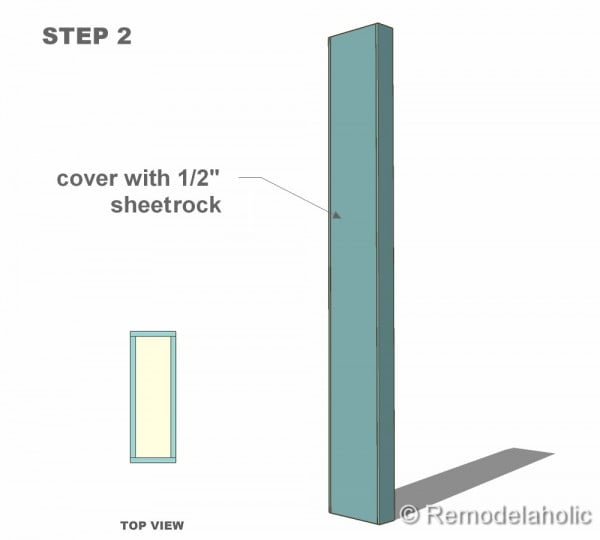
- (2) Sheetrock Sides– 96” x 12” x 1/2”
- (2) Sheetrock Sides– 96” x 4 1/2” x 1/2”
- (4) Spacers – 96” x 1” x 1” (use scraps if you have them or rip strips from the 1/2″ sheet)
- (2) Sides – 79 1/2” x 13” x 1/2”
- (2) Sides – 79 1/2” x 7 1/2” x 1/2”
- (2) Corner Moldings – 79 1/2” x 3 1/2” x 1/2” (outside edge mitered)
- (2) Corner Moldings – 79 1/2” x 2 1/2” x 1/2” (outside edge mitered)
- (8) Spacers – 16 1/2″ x 1″ x 1/2″ (use scraps if you have them or rip strips from the 1/2″ sheet)
- (2) Top Sides – 16 1/2″ x 8 1/2″ x 1/2″ (miter both edges)
- (2) Top Sides – 16 1/2″ x 15″ x 1/2″ (miter both edges)
- (2) Top Spacer Molding – 16 1/4″ x 1 1/2″ x 5/8″ (miter both edges)
- (2) Top Spacer Molding – 9 3/4″ x 1 1/2″ x 5/8″ (miter both edges)
- (2) Bottom spacer Molding – 16 1/4″ x 4″ x 5/8″ (miter both edges)
- (2) Bottom spacer Molding – 9 3/4″ x 4″ x 5/8″ (miter both edges)
- (4) Decorative Molding – 16 1/4″ x 2 1/4″ x 5/8″ (miter both edges)
- (4) Decorative Molding – 9 3/4″ x 2 1/4″ x 5/8″ (miter both edges)
- (4) Middle Molding – 7″ x 4″ x 1/2″
- (4) Middle Molding – 3 1/2″ x 4″ x 1/2″
- (2) Cap Molding – 18 1/2″ x 1 3/4″ x 5/8″ (miter both edges)
- (2) Cap Molding – 12″ x 1 3/4″ x 5/8″ (miter both edges)
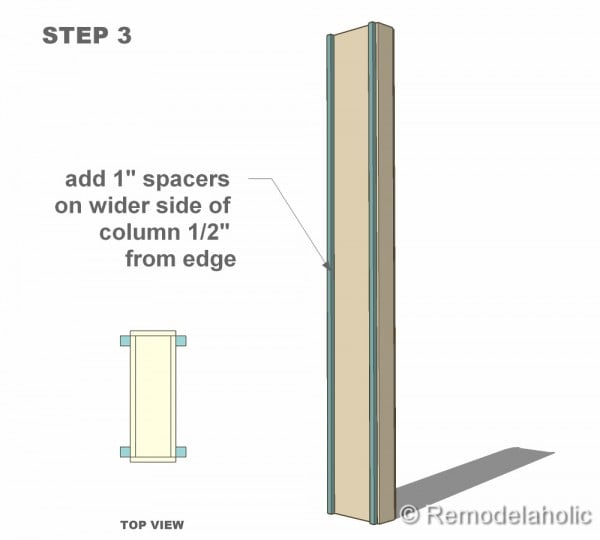
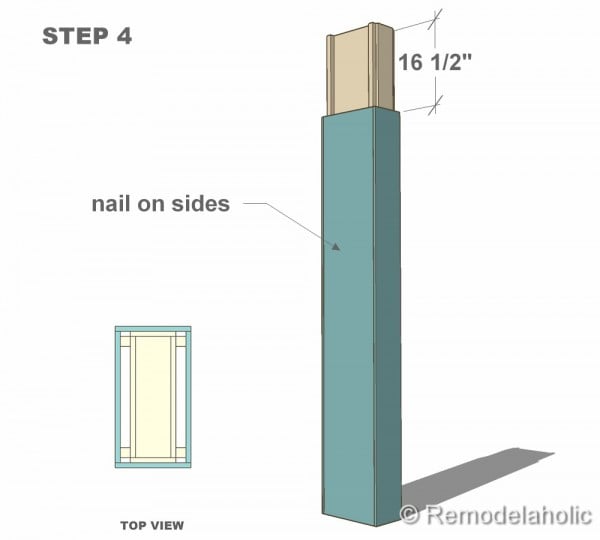
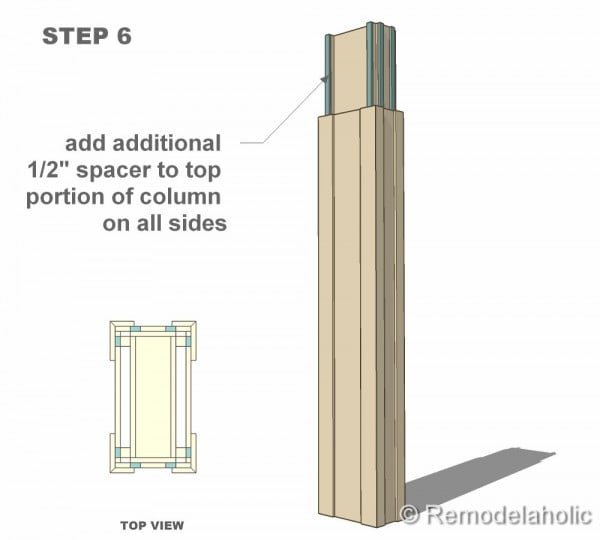
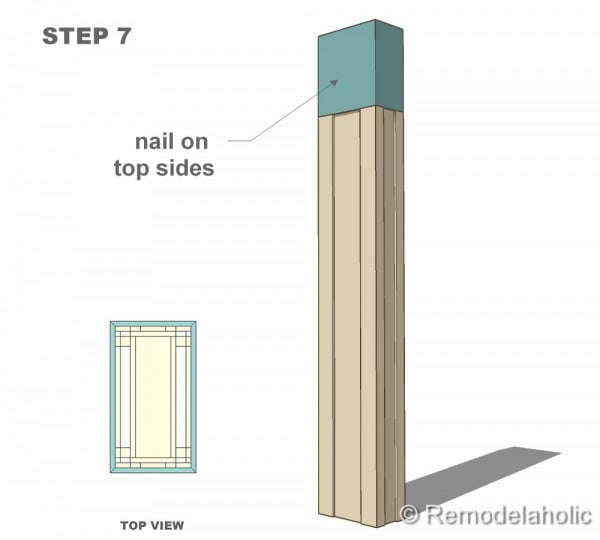
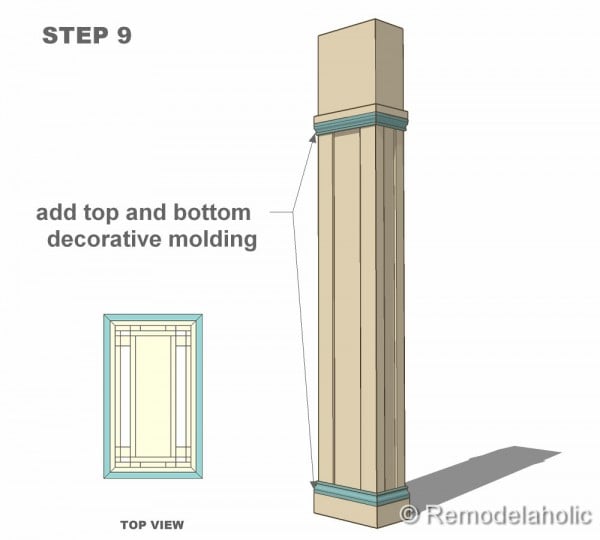
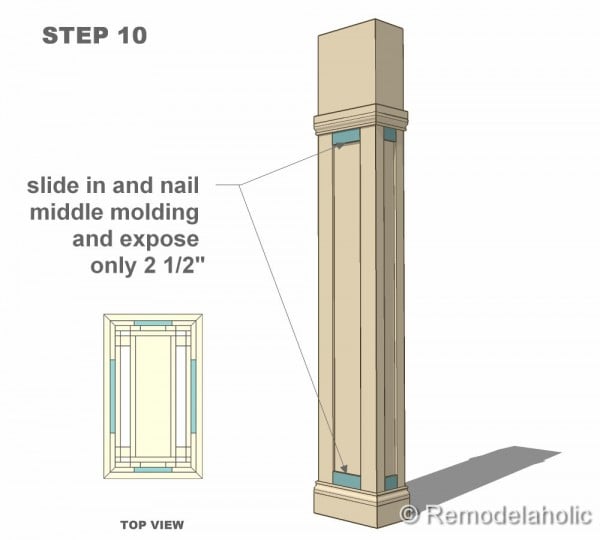
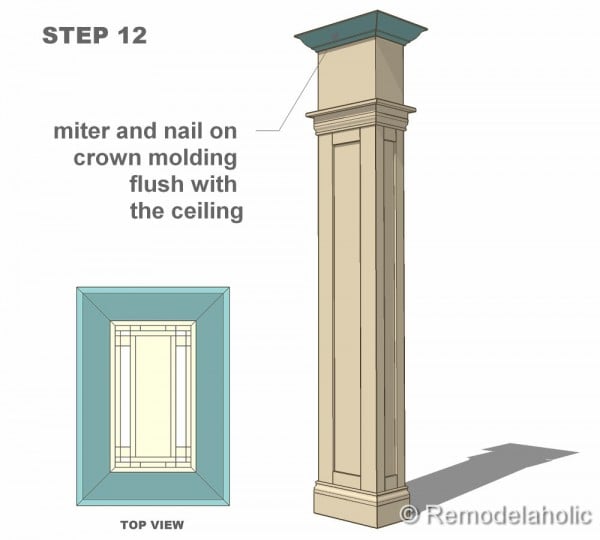
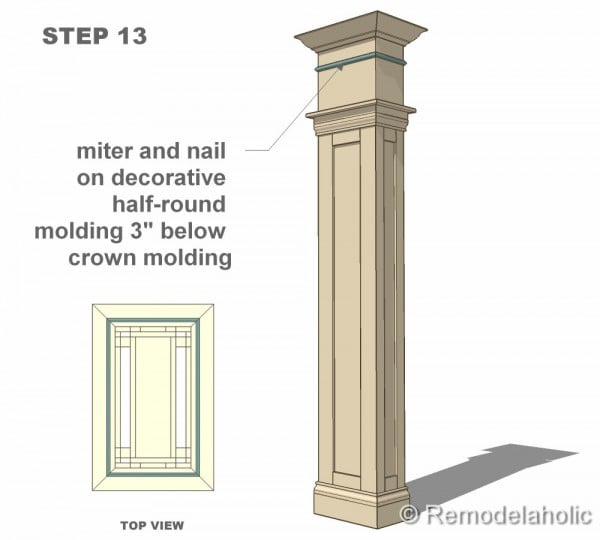
13 Construction Steps For Building An Interior Column


What do you think of the column plans? Do you want to give it a try in your house? Hope so, and if you do, I would love it if you sent me some pictures of the finished product! This was a great improvement to our living room and I will totally consider doing this project again in another house!
Thought I would throw in a before picture so you can see how much these columns did for our space! We’d lived there for about a year at this point so there are a few updates in these pictures but not much:
Before:
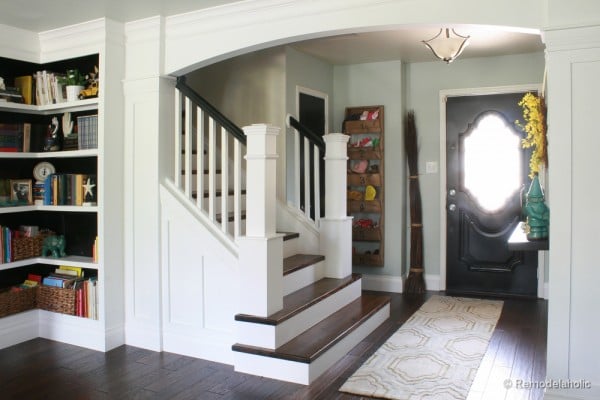
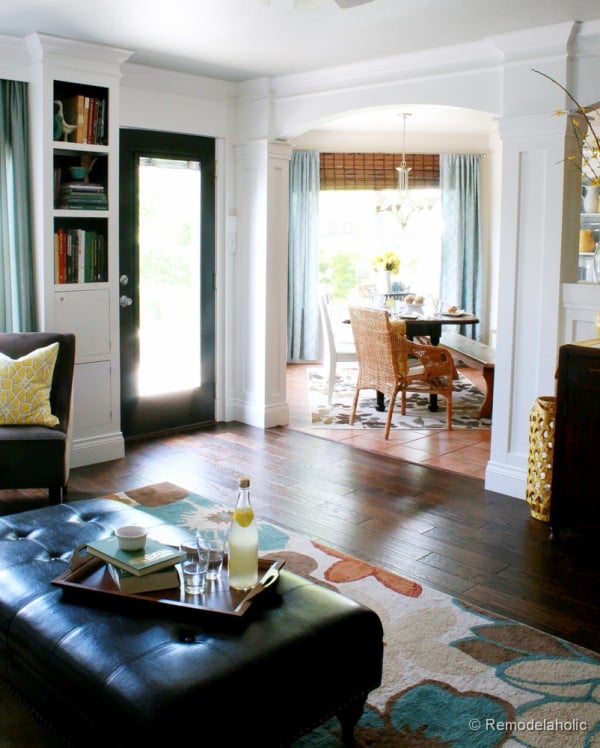
After:
Here are two other final shots of the space with the columns!
Don’t forget all the other free and premium plans that we have created for you to build. Be safe, follow all equipment safety rules and have fun!
I am the husband of the amazing Cassity of Remodelaholic. I love to problem solve and to design and build things inside and outside the house to make life better. I am a professional Landscape Architect by trade and love the outdoors.


AMAZING, Cassity! I have been waiting on this one. We could use something like this in our living room! Thanks for the detailed instruction! 🙂
(ps there is an ad popping up that is covering the 2nd paragraph of this post. it doesn’t show up immediately, but within a few seconds.)
You are welcome Michele. Now it is your turn to build one.
Looks great!
gotta say these trim details grabbed my eye in you LR reveal from yesterday, love the way the various architectural elements just gel so nicely together. + again … I just love the way you do such a phenomenal job presenting with diagrams. thanks.
I love what you did, of all the blog makeovers, this is my favorite!!!
I would love to do something like this to the opening of my hallway, that leads from the family room. I’m wondering if I could get your thoughts on this variable: the family room has a vaulted/slanted ceiling. The top of the hallway entrance is probably 5 feet below the ceiling in the family room. Would you just do the columns on the doorway? I would like to do something to dress it all up, and I can’t think of what to do with that giant blank wall. I can send a pic if you would like to see it! Thanks for the plans! I love the look!
Lisa, it really depends, a picture would be nice. Off the top of my head I think personally I would just dress up the doorway with a nice head casing and crown. The columns can be “holding up” that casing work at the top and it will look finished without a bunch of additional plans.
very helpful tutorial. Why do you need to cover the frame with sheetrock? It looks to me like you cover everything again with mdf. Couldn’t you just add the spacers to the framing and skip the sheetrock step? I’m sure I missed something so please bear with my dorky question!
You could skip that step, you just have to account for the 1/2 inch of space.
We put it on there, for a few reasons. First of all we started the project, wrapped it with sheet rock and then left it like that for 10 months while we had a baby… But the real reasons that actually helped with buildings is that having it as a foundation keep everything nice and square as the layers kept being added. Also 3 out of 5 of our columns were walls that already had sheetrock on them, and it was the easiest way to keep everything uniform since they all had the same dimensions.
But the truth is, you are absolutely right, as long as you account for that thickness, then you could skip that step.
How are you and your husband cutting the long mitered edges? I am building built-ins around my fireplace and want to do a paneled look on the sides by mitering the poplar side face frame and the trim on the side to have that clean look instead of butting them up. I’m just trying to decide if it is easier using the table saw or getting a 45 degree bit on a router.
Love your site! Thanks in advance for all the advise!
Kellyn,
DEFINITELY the table saw! It is So easy, just turn your blade to 45 degrees and run it through, easy as that!
OK, it took me a while, but I would like to send you a pic of the wall I’m talking about. I think it would be great to add the columns and header on the opening, but wonder if you have any thoughts about the rest of the wall. Can I send you a pic?
Lisa, sure you can send a picture. I can’t promise a speedy return though.
WOW! This is amazing! The before and after are incredible…like a totally different house! I need to save this, thank you so much!!!
Thanks for the kind comment!
Was wondering if you did the arches too? Do you have a tutorial for those? We have two columns that I would love to add the arch in between! Love the look. Great job.
I am glad that you asked about that. I have that on my list of tutorials to do. I do have a post about it here for the time being, if it helps.
Thank you for responding! I have asked questions on other blogs and never heard back. Was so nice to hear a follow up! Again, love the look!
TJ you are welcome! Thanks for reading our blog!
I am so amazed by this transformation! I am inspired to create similar (I hope) changes in my own home. I recently purchased a mitre saw and nail gun, and I have actually learned to use them! Thank you for sharing these plans!
Thanks Diana! You are welcome for the plans!
STUNNING! I will dream of this (and beg, plead and pout) until I can talk my husband into doing it! Thank you for the incredible instructions!
This is an absolutely amazing project. Very well done! it looks beautiful!
Suzi, thank you! It was a lot of hard work but well worth it.
Hmm is anyone else experiencing problems with the
images on this blog loading? I’m trying to determine if its
a problem on my end or if it’s the blog. Any responses would be
greatly appreciated.
LOVE your makeovers! Could you share the approx cost of the stairway makeover?
It was around $100. Here is the first post that we did of the stairs.
I love love love your blogs. We are in the process of buying a house and we were in desperate need of inspiration. Your work is beautiful, thank you for sharing it!
Selene, we are soo grateful that you love our blogs and are looking for inspiration. I know you will find a lot of great things. It is very exciting to be home owners, congratulations! Good luck with everything! Come back anytime.
Its a 15×17 room moderarely big size living room for my teenage son east facing but there is a column in the centre which I would like to camouflage it cant be removed. kindly advise.lucknow.India.
I know this is an old post, but I have been thinking of adding columns and moving a half wall to define spaces, reclaim wasted space, and create a better flow in our new-to-us home. You did a lot of the kinds of things I am thinking about and it is so helpful to see it finished like this.