Giving Your Closet Doors Some Character
Submitted By: Batchelors Way
At last an update on the Pirate Room!!!
We have finally finished Pimping out the closet doors.
(Don’t judge me on how long we spent on the closet doors!)
(Crazy I know, but it’s all in the details)
I’m going to share how we did ours and what we learned in the process.
(That implies we made some mistakes.)
(I call it the Learning curve.)
So, last we talked these were the boys doors.
Plain white!
Boring!!
Not very good for a Pirate!

Step one,
(Stick with me this is a long post)
I painted the doors a chocolate brown color.
I wasn’t very picky on the color,
so I just went with some left over opps paint my sister had.
That made the first step FREE!
(I love free.)
It was flat paint but was only the base coat for the faux finish so it didn’t matter.
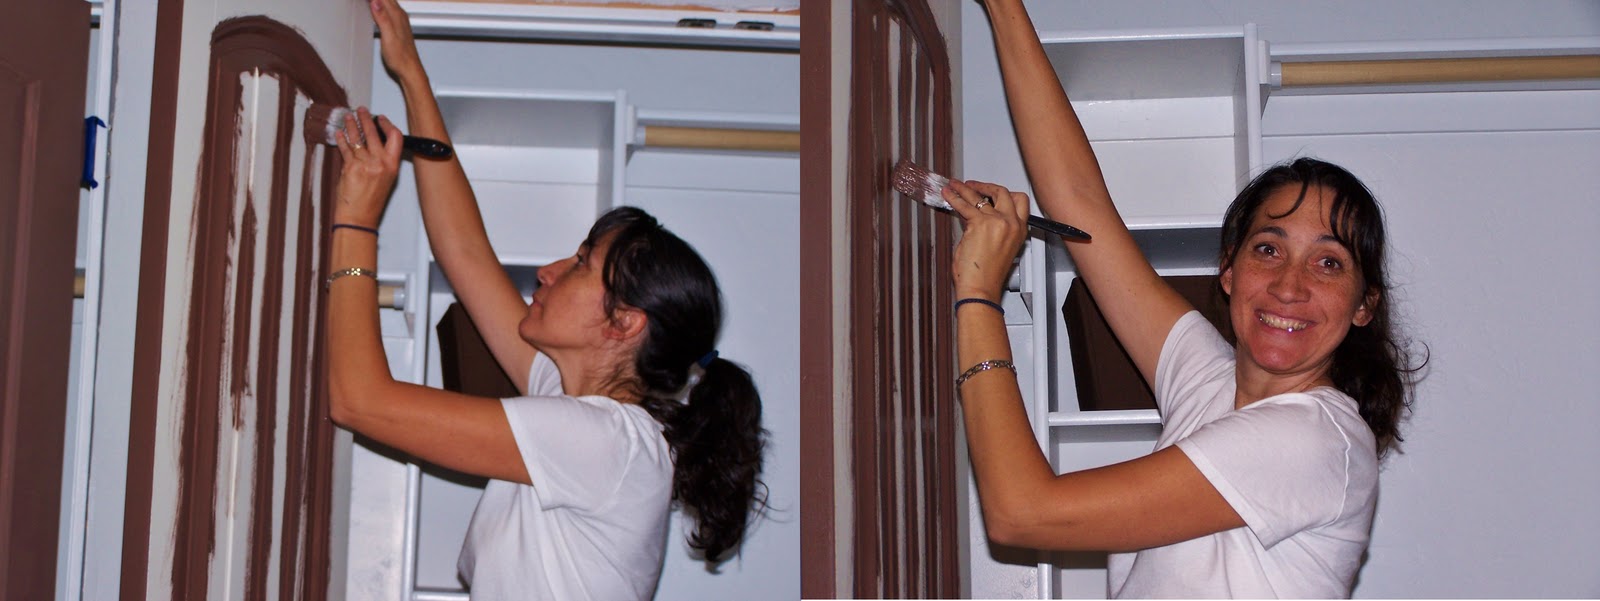
When done the doors looked like giant Hershey bars.
(I know I think too much about chocolate.)
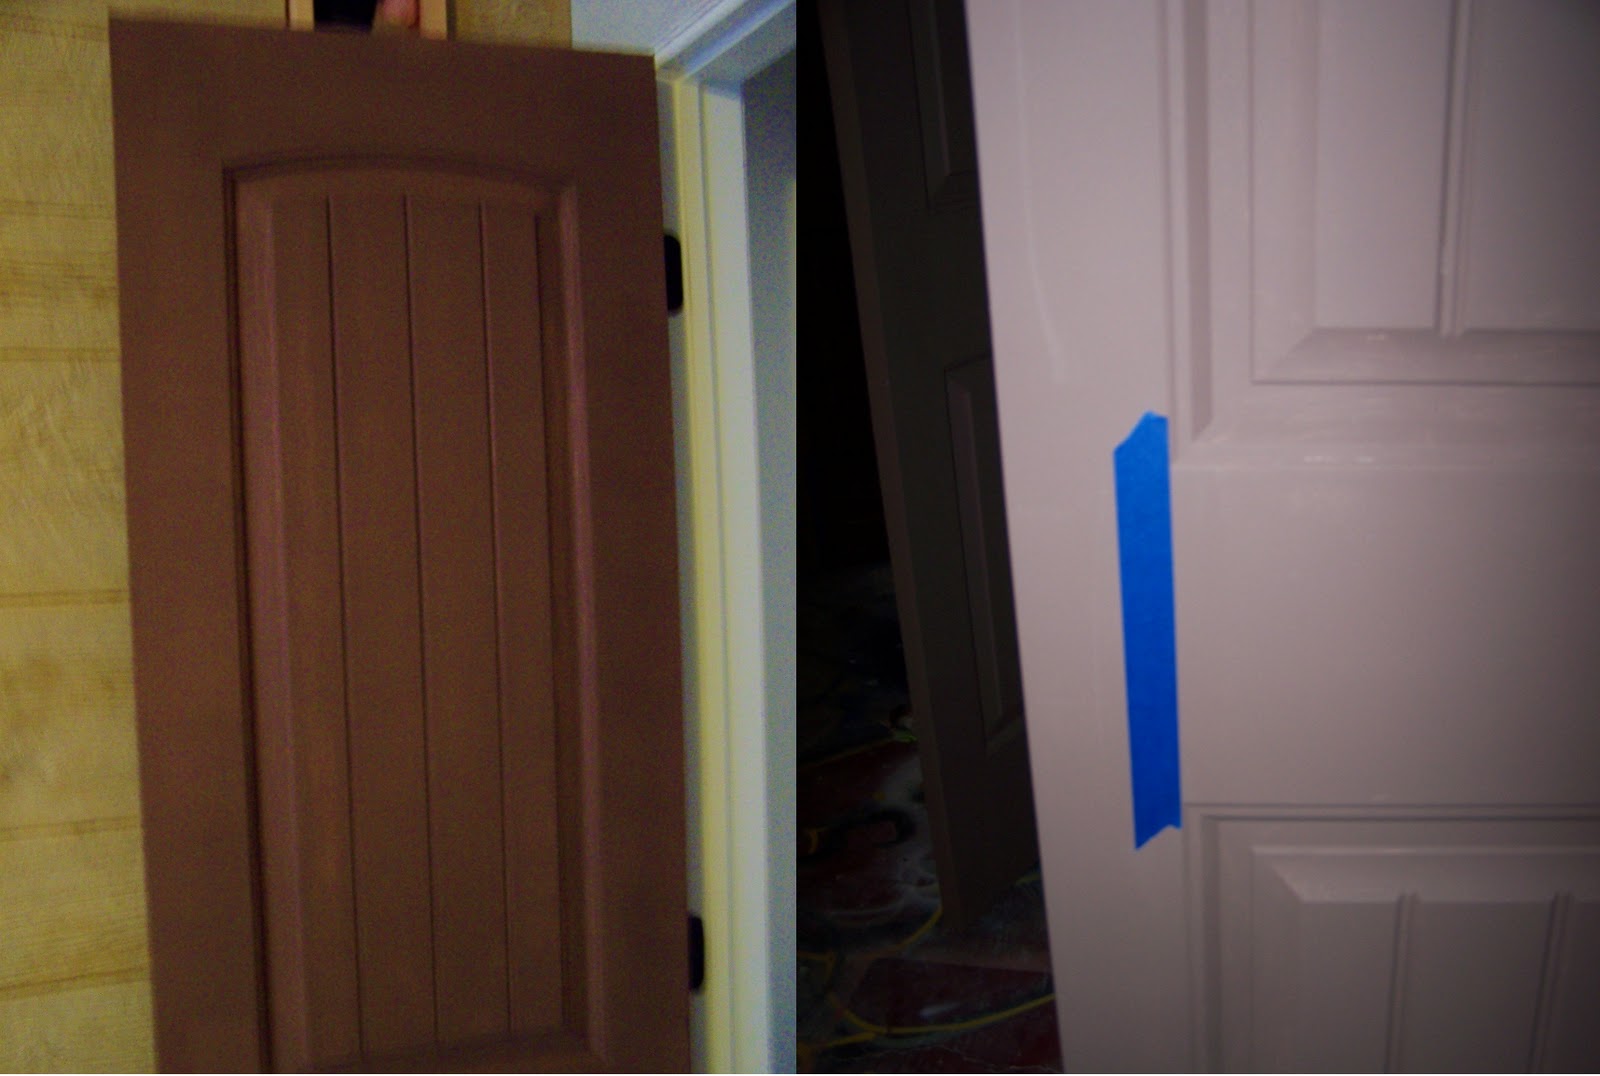
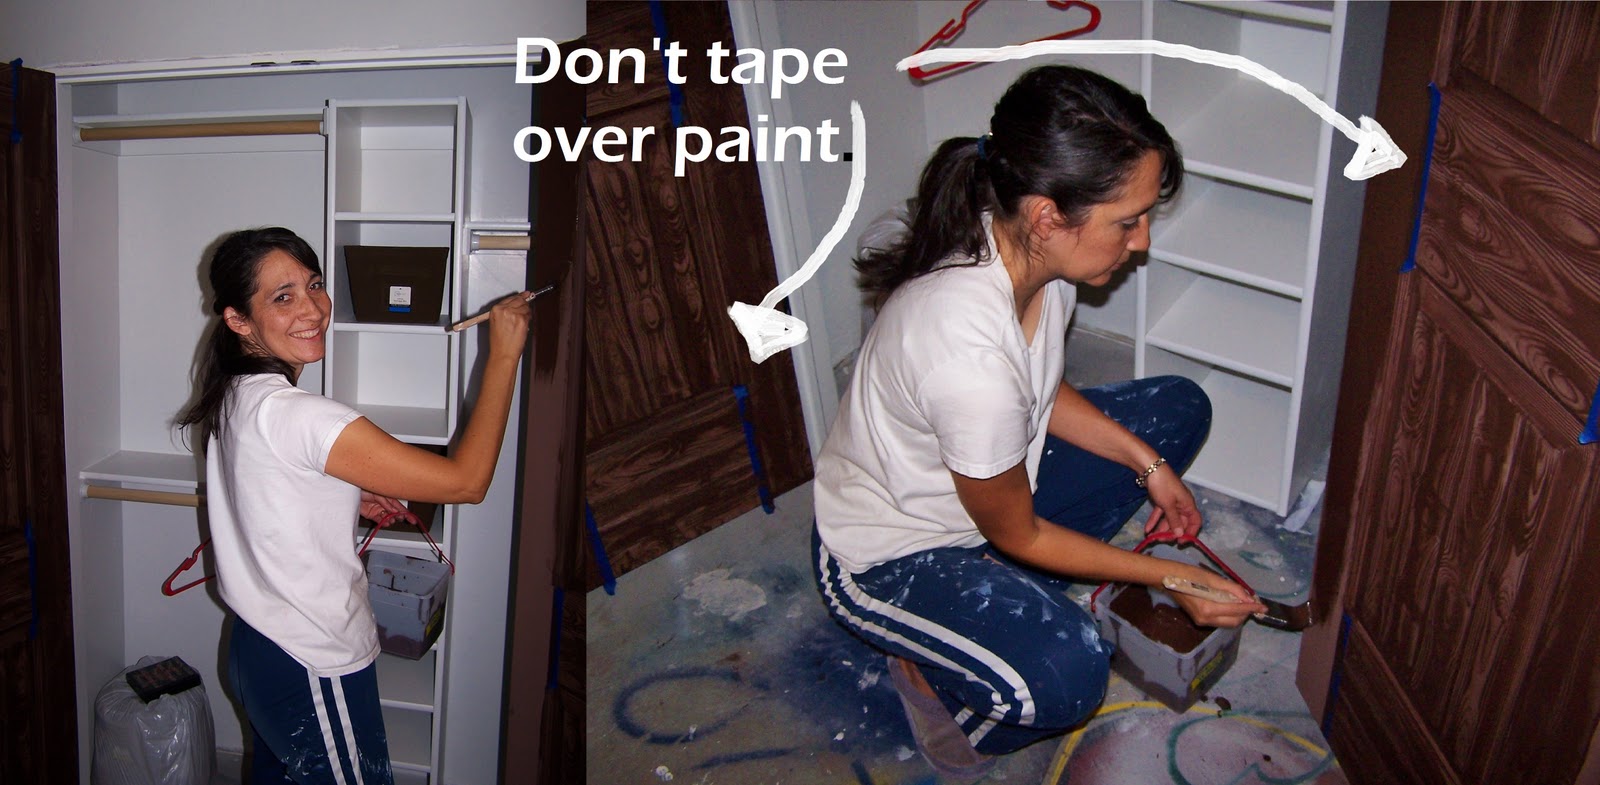
After they dried really well I prepped them for the next step.
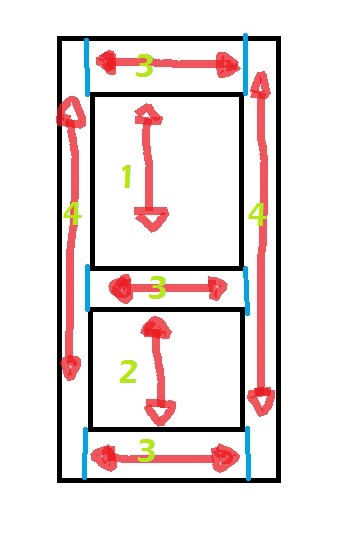
I used painters tape and taped off the middle, top and bottom sections.
(see below)
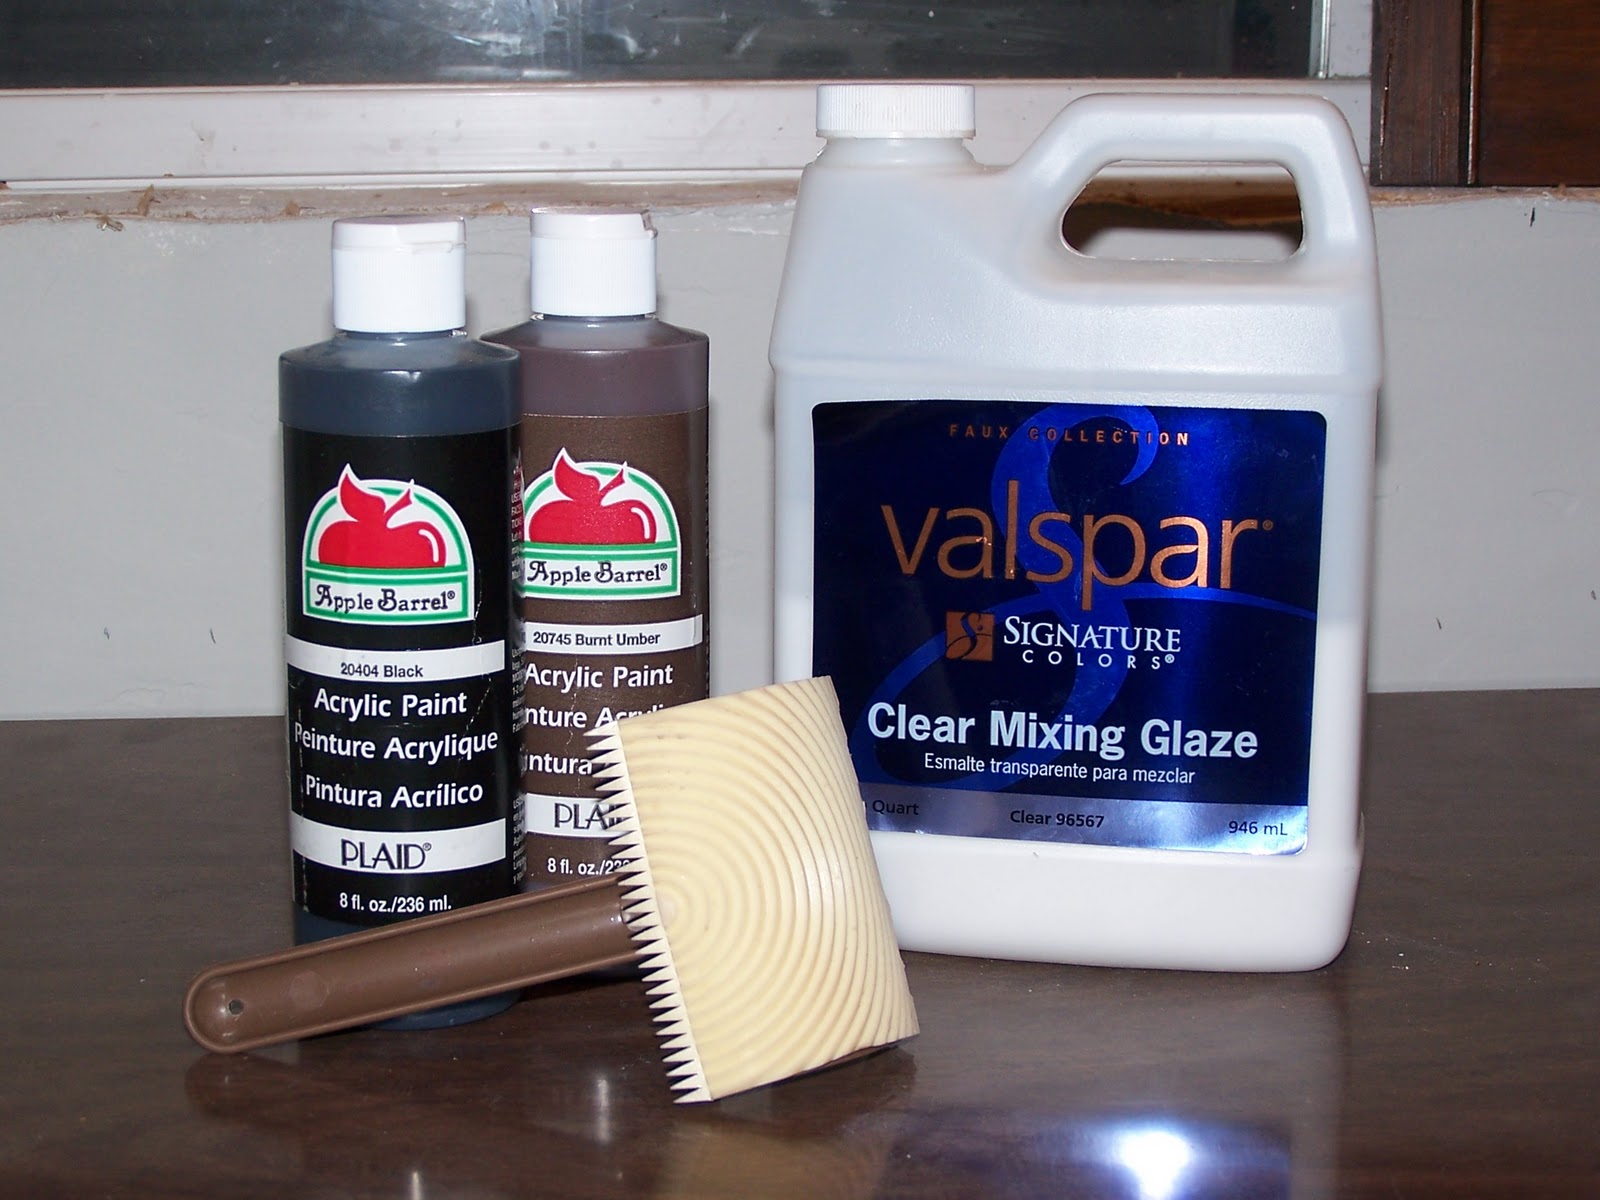
For the next step I used the following products:
Black and Brown craft paint
Valspar Clear Mixing Glaze
Wood graining tool
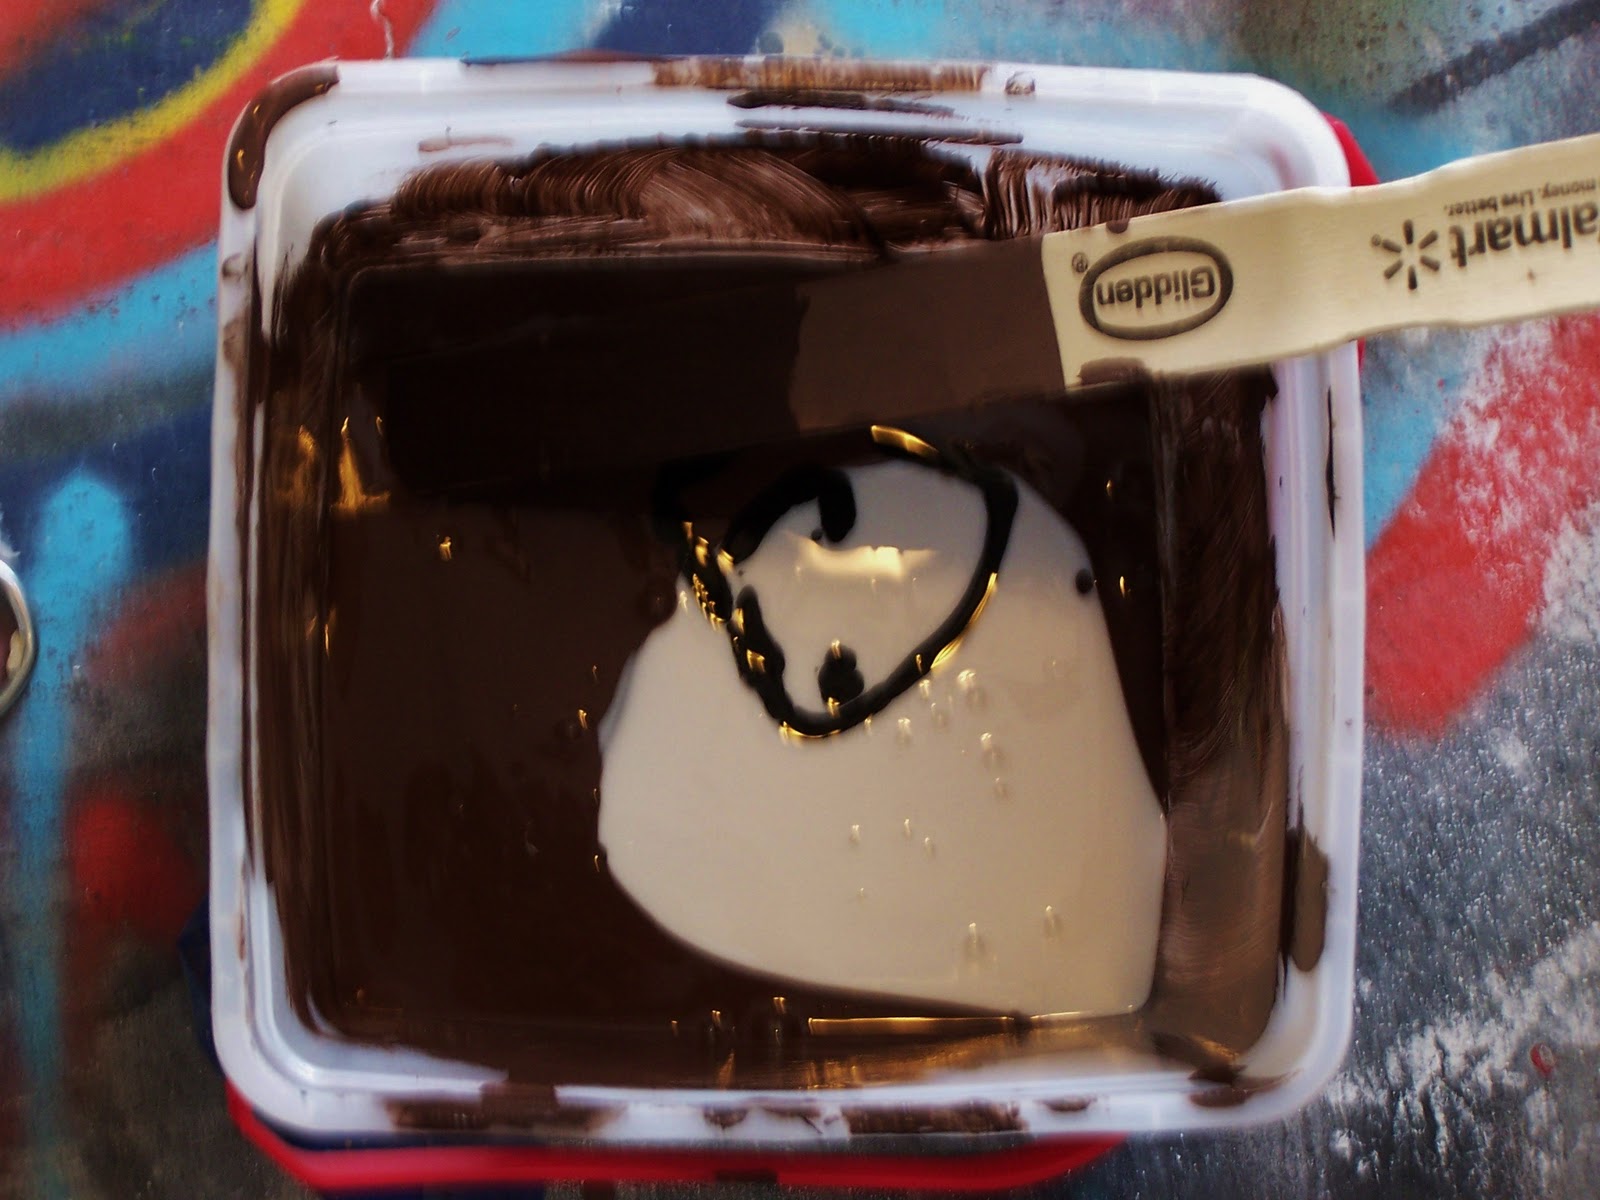
Then I just dumped a lot of brown craft paint and a little black
(cause I wanted it darker)
and some glaze into an ice cream bucket.
I’m not very scientific about it
but I took a picture so you could get and idea of how much of each I used.
(If its not right just dump more accordingly)
Then mix it up and your ready to start faux painting.
I just painted on the glaze in a section then I pulled the graining tool through the glaze,
gently rocking it as I went.

The grain needs to go the direction it would on a real wood door.
Below the red shows which direction I did the graining in each section.
The green numbers are the order I went in.
The blue is where I put the painters tape while doing glazing step one through three.
(This gives you a straight edge and looks nice.)
Take the tape off before you glaze sections #4.
Here’s where I made my first mistake.
(I know you can’t believe I make any mistakes!! lol )
After removing the tape I tried taping it over what I had glazed.
Don’t do this,
unless you want to have to go back and touch up where the tape rips off your new faux finish.
(And yes, I waited for it to dry!)
(Maybe if you waited a day it would work, but I’m too impatient for that.)
So, just use a steady hand on section four.
Here’s what I had when I finished this step.
(see below)
And here’s some tips I learned by trial and error.
1. Make long gentle rocks.
My first doors I just rocked it quickly which just made the door look fake with way to many knots.
(If you want to fix this like I may have done, just reglaze it and rock again.)
2. Don’t apply too much pressure.
You want a lot more of the glazed and small amounts of the base coat peeking through.
3. Stand back and look at it often and adjust your technique.
4. Start on the back where it won’t be as visible till you really get your technique down.
5. On the edges and hard to reached parts I used the comb part of the tool.
Since these parts would show the cross cut of the grain on a real wood door.

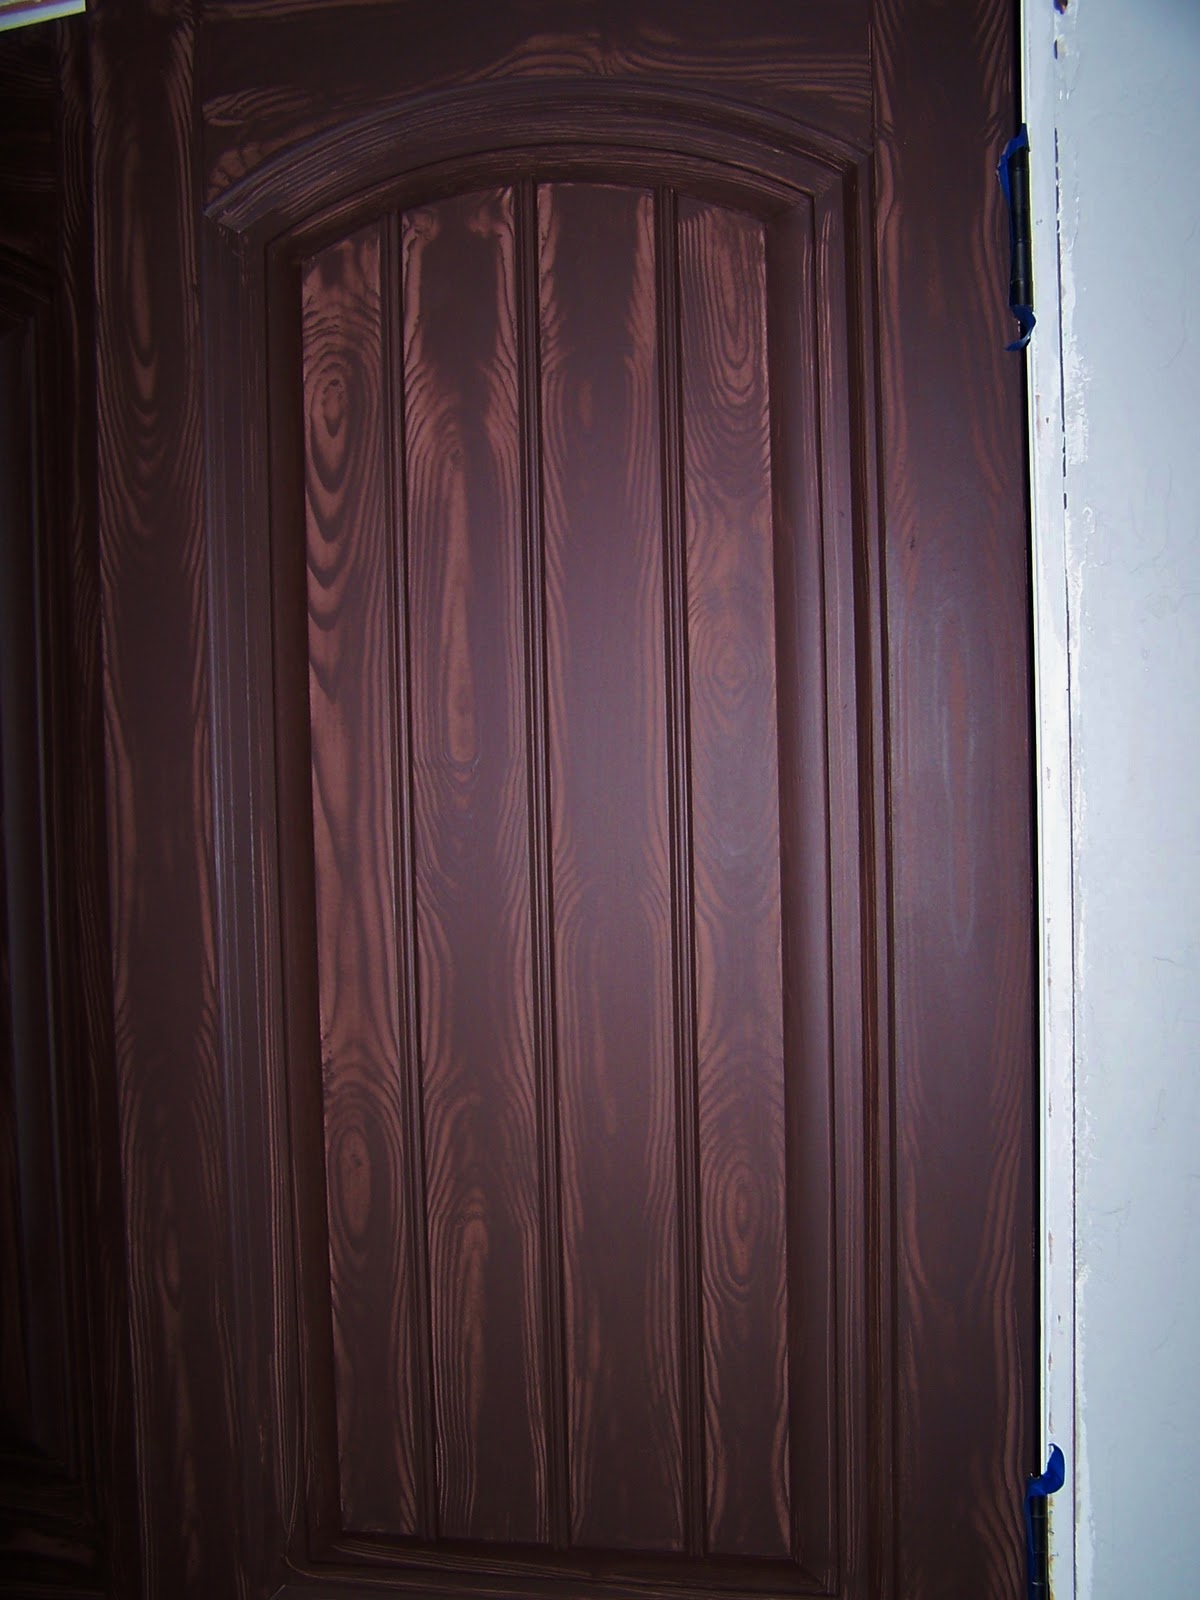
After you stand back and admire your work for awhile, let this dry for a few days.
Then your ready to put on the clear coat to protect it.
I use Minwax Polycrylic Protective finish in satin sheen.

Now we come to the part of the story that made me cry and curse!
The Clear Coat!
That sounds easy right?
Not!!!!!!
I painted the first coat with some leftover product I had from my bathroom.
It looked fine.
But the can suggest three coats.
I decided I would do two.
I ran out just after I started the second coat on the first door.
So off to the store I went so I could finish them that Saturday night.
I went to Walmart and purchased a new can for $16.22.
I came home and did the last coat.
After it dried it was freaking glossy.
It looked like crap!
I was so upset that I had done the second coat.
Then I realized that the section I had done with the first can was a nice satin finish.
I decided that I had purchased a can that had been mislabled!
I had just put a high gloss finish on all that hard work and it looked terrible.
I was so mad and decided to call the manufacture and demand justice.
I mean all that work and now I would have to sand off that shinny finish to apply a new one and probably screw up the faux paint finish.
I just knew I would have to start all over.
But that was Saturday and I had to wait until Monday to call.
All weekend every piece of wood I saw taunted me with,
“Look I have a nice satin finish!”
(I know your worrried that I’m talking to wood!)
Monday morning finally came and I made that fateful call to Minwax.
In case your in tears now, don’t worry the Minwax people helped fix my problems.
It turns out the only difference between gloss and satin finish it a flattening agent.
That agent tends to sink to the bottom.
You need to stir it well and often to get it off the bottom.
(Stir don’t shake, that produces bubbles.)
(Ok it says right on the can to stir and I had. Maybe not for three to five minutes like the lady on the phone said but I had stirred it!)
I also found out that I had purchased a can that was four years old!!
(You can image how settled that flattening agent was.)
She also taught me how to read the date code on the top of the can.
I also learned
(can’t believe how much I learned in one phone call)
that you don’t have to sand the gloss finish off.
The last coat applied is the one that reflects the light.
Armed with all my new knowledge I returned to Walmart,
returned my can,
found a new can on the shelf with a newer date,
and purchased it.
I then did a light sanding like you should between coats,
and stirred my new product for 5 minutes
(Yes, I timed it!)
I then repainted the doors and waited for it to dry.
Success!!!!!
If you are still reading this novel,
I hope this story saves you some heartache!!
Moral of the story STIR when it says stir!!!
So after much ado, here they are.

That could be the happy ending to our door story,
but we still have the iron studds to put on.
You can buy real iron studs from $1.50 to $3 per stud.
I needed 16 studs per door and I have four doors.
That’s 64 studs.
OK do the math,
that’s about $90-192 for just the studs.
Not in our budget!!!
Here’s what we did.
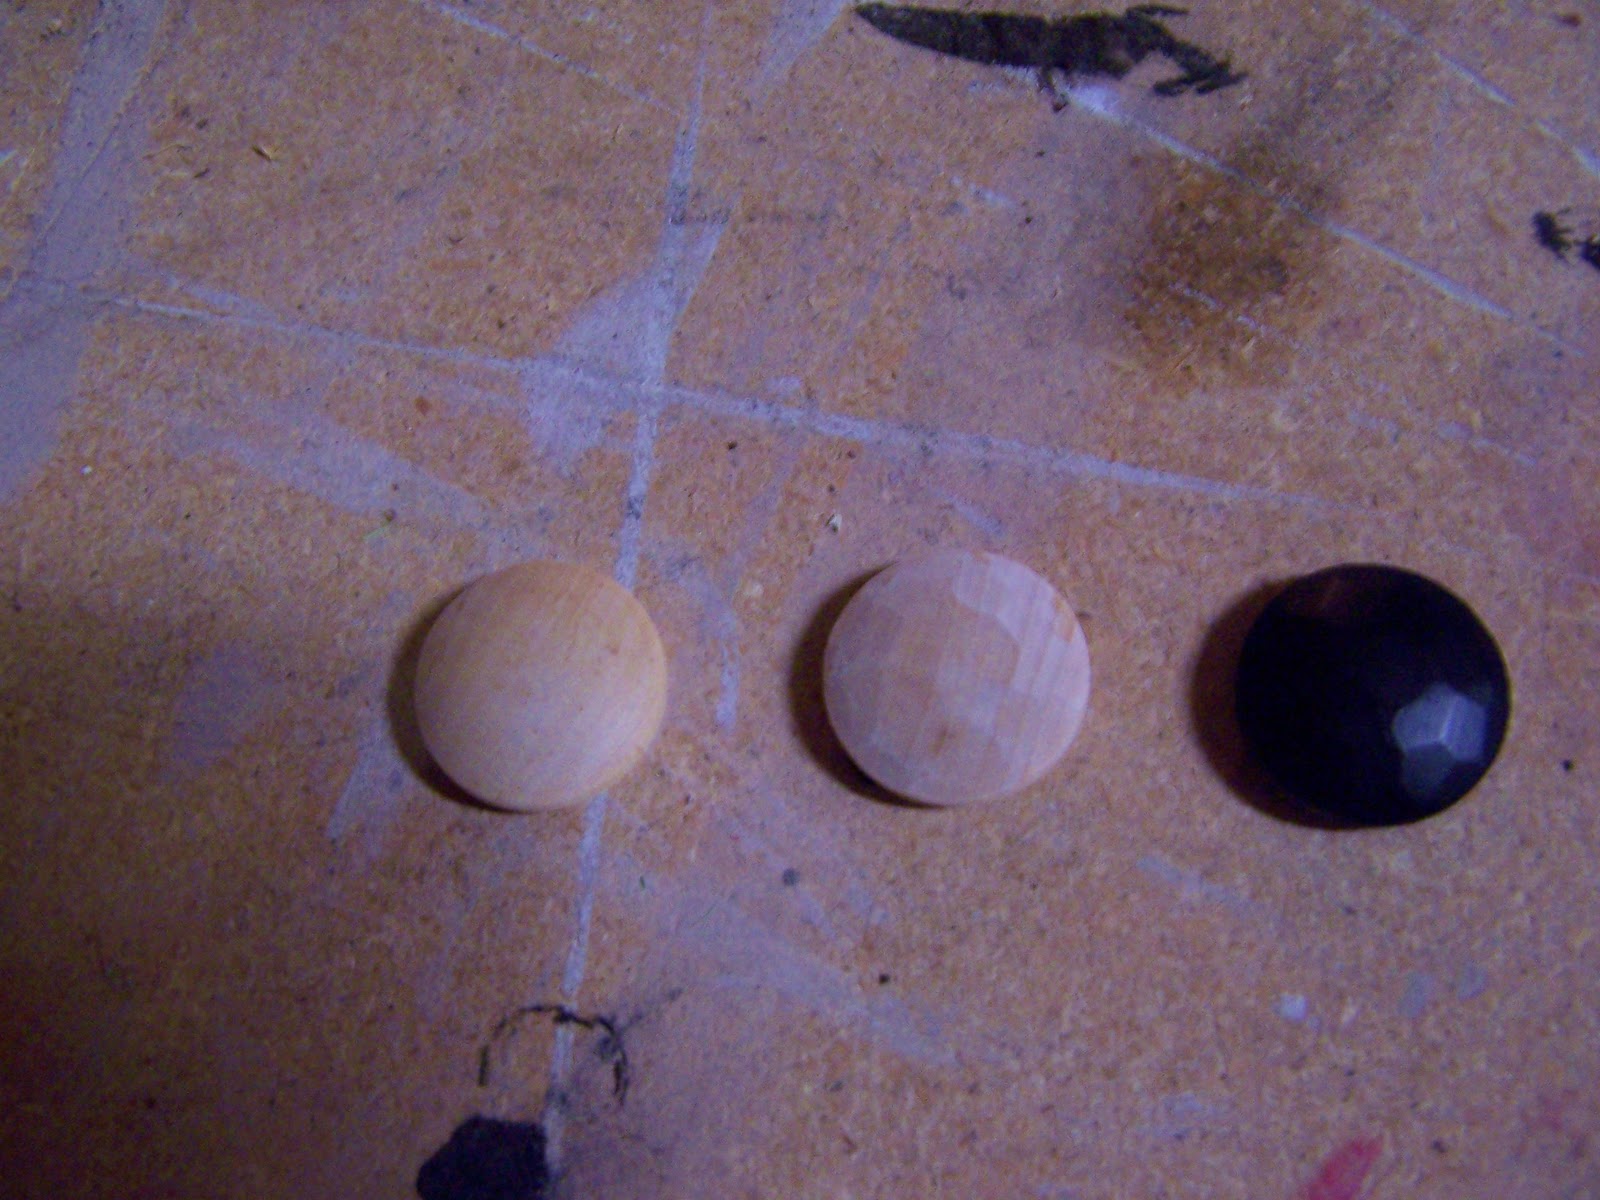
We purchased 1inch wood plugs or buttons.
They came in bags of 6 at Lowe’s.
They cost about $20 for all 64.
That saved me about $70 to $170.
Then Les sanded about 30 flat spots on each head with a belt sander.
(He’s just as crazy as I am.)
(That’s one of the reasons I love him so much.)
Next he sprayed them black and hand painted each one with a coat of stirred satin clear coat.
(I know I’m pictured slaving away painting those cute little buttons,)
( but I only painted like two. Les painted over 60!)
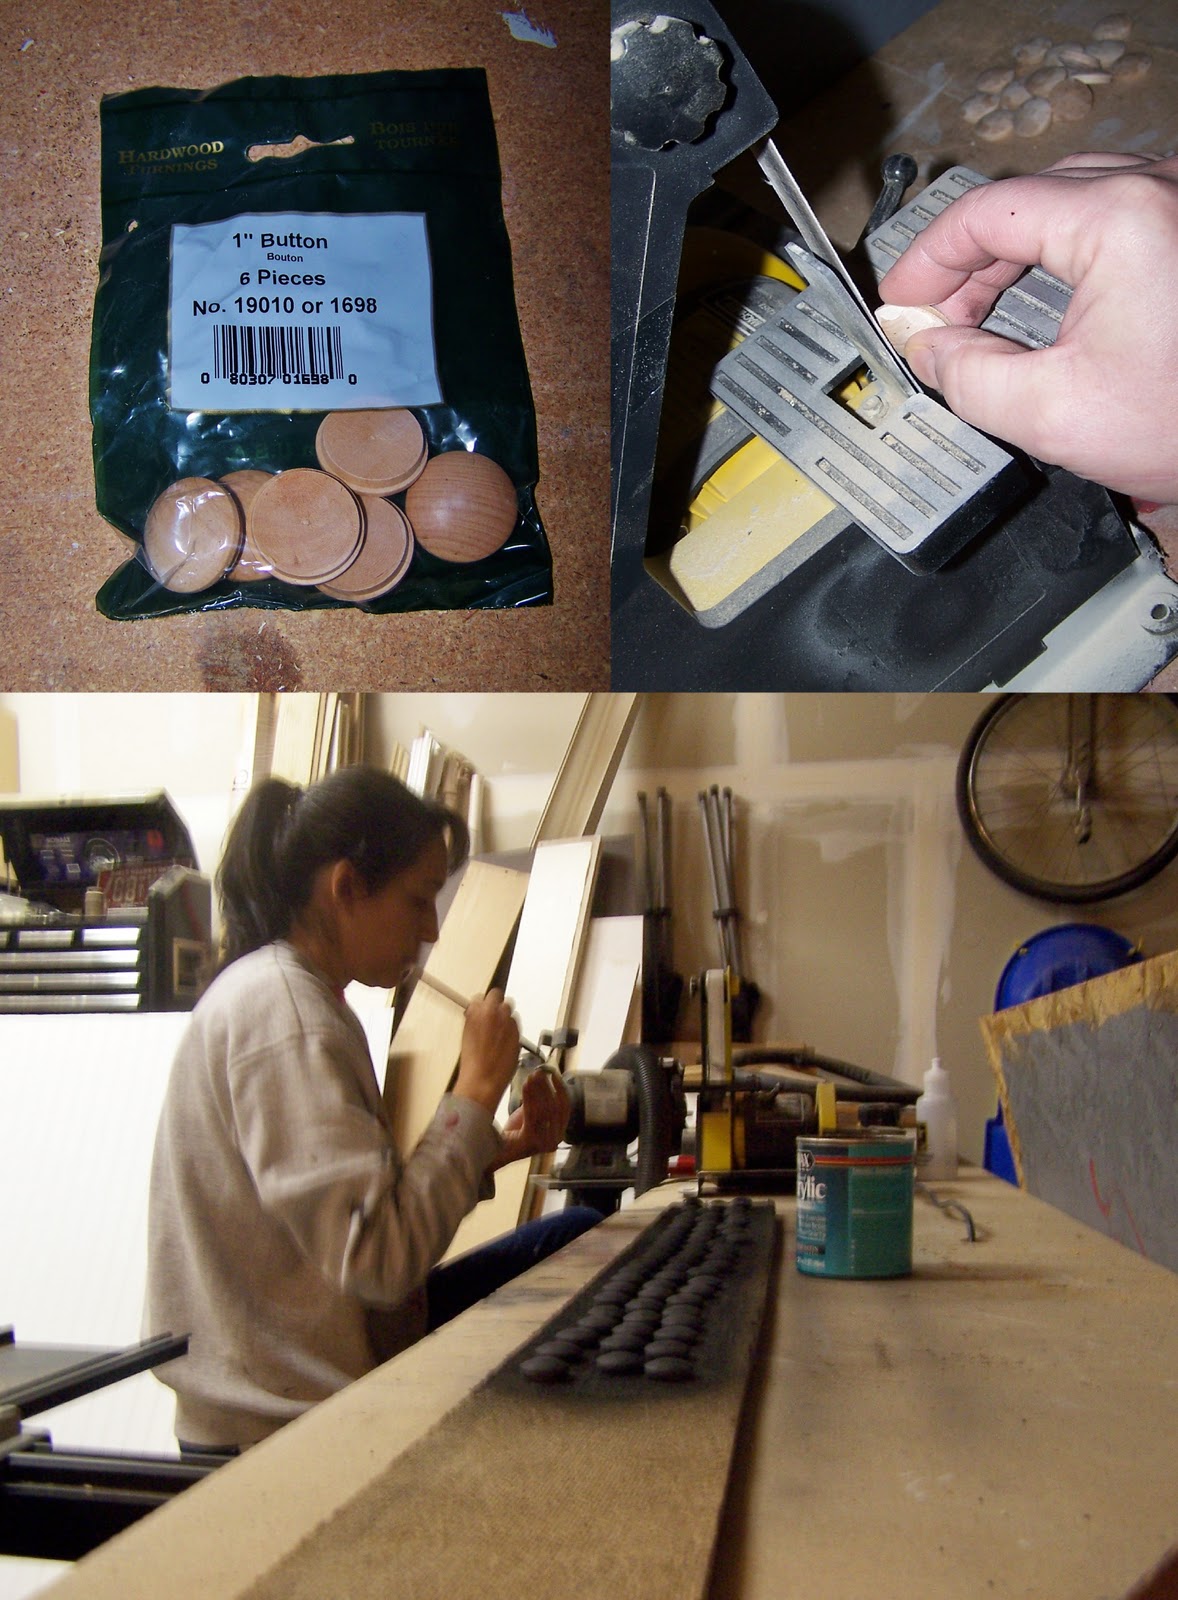
Here’s what they looked like out of the package, sanded, and finished.
This was totally Les’ project.
He makes me so proud.
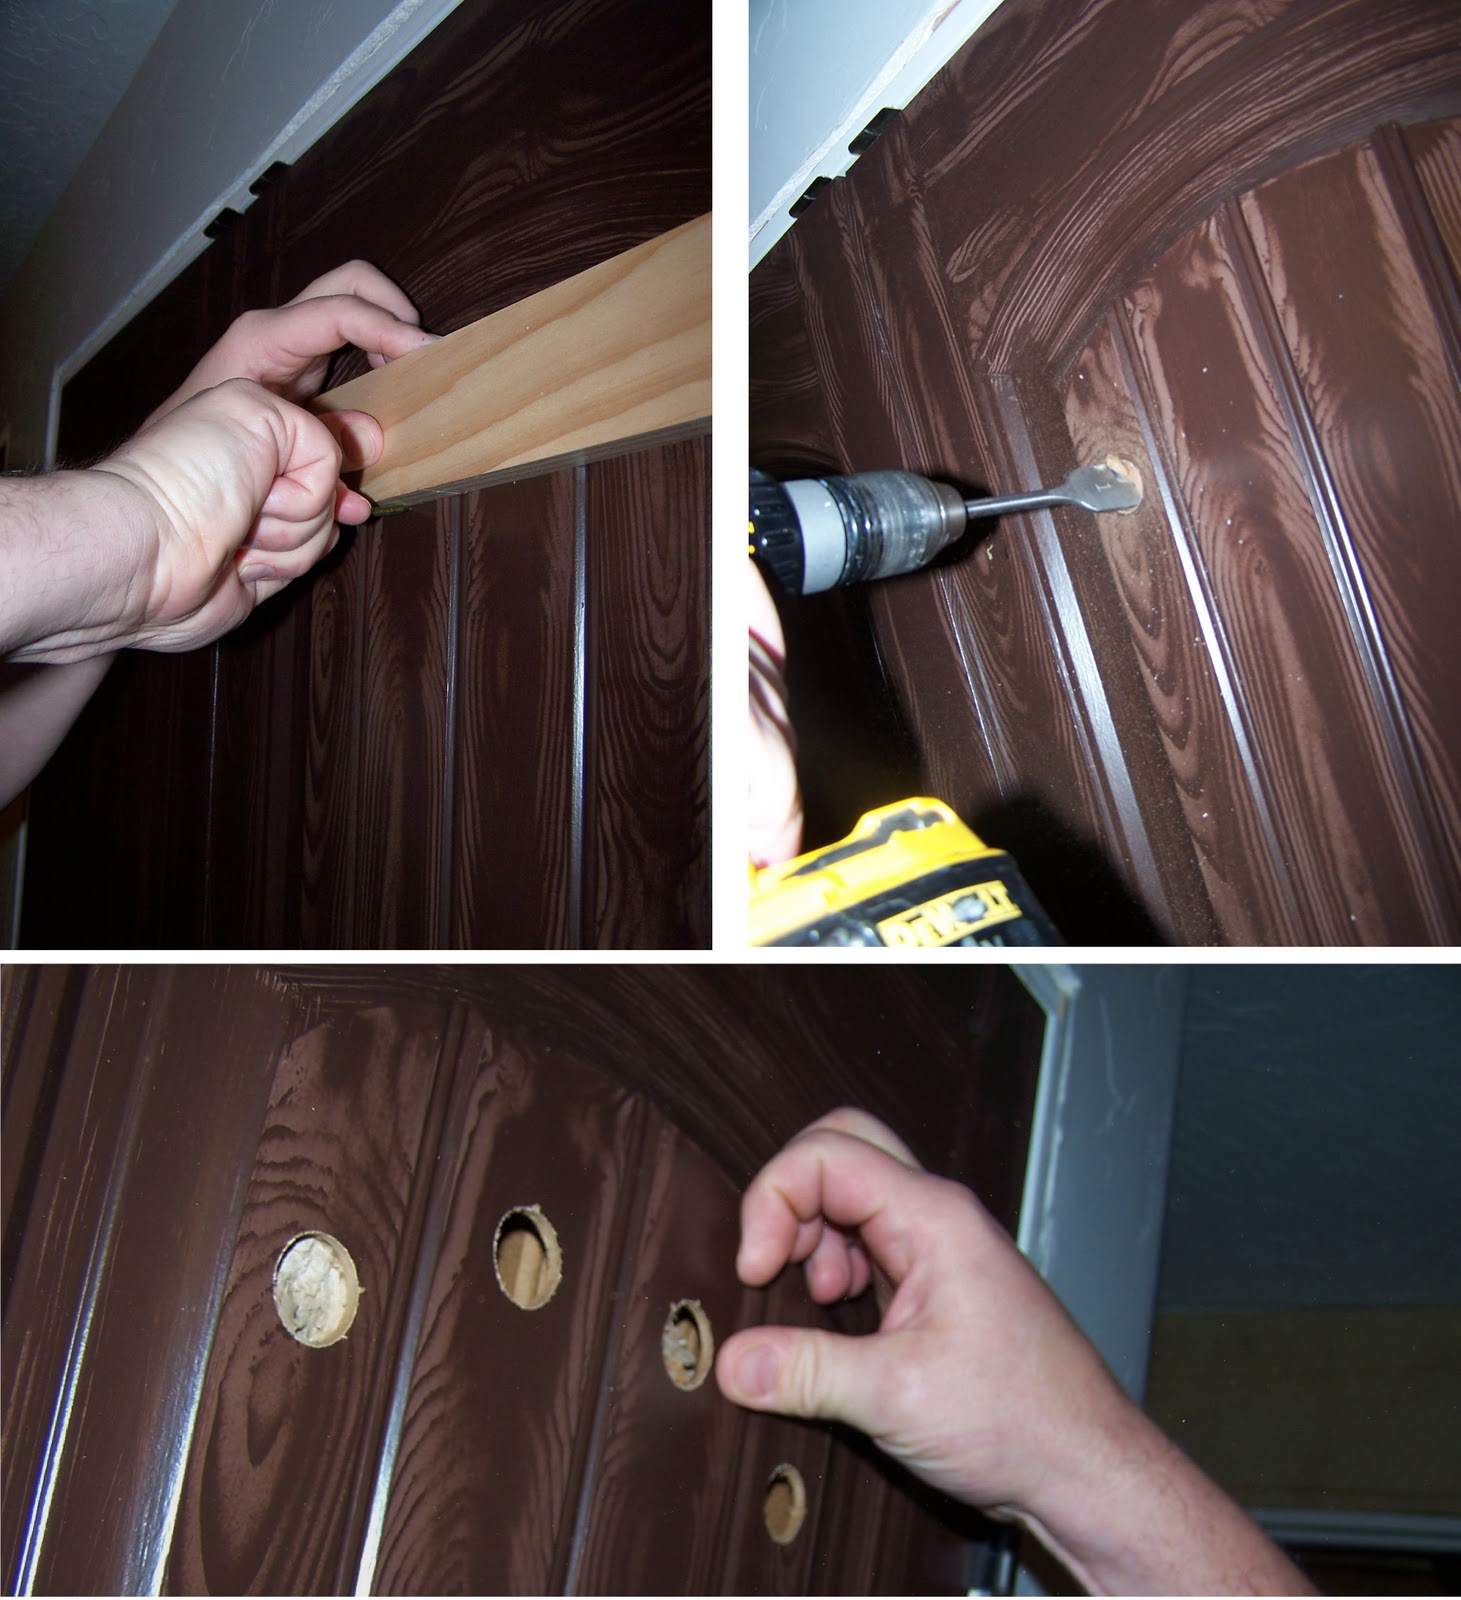
Next Les marked the door with his high tech gauge
(Scrap wood and a nail.)
Then he drilled the holes.
(Yes, this is scary making huge holes in your lovely new doors.)
We had a little learning curve here also.
Pay attention when drilling.
Our last door Les got a little use to it and didn’t realize the tip had pierced the backside of the door.
(Touch up! Its a lovely thing.)
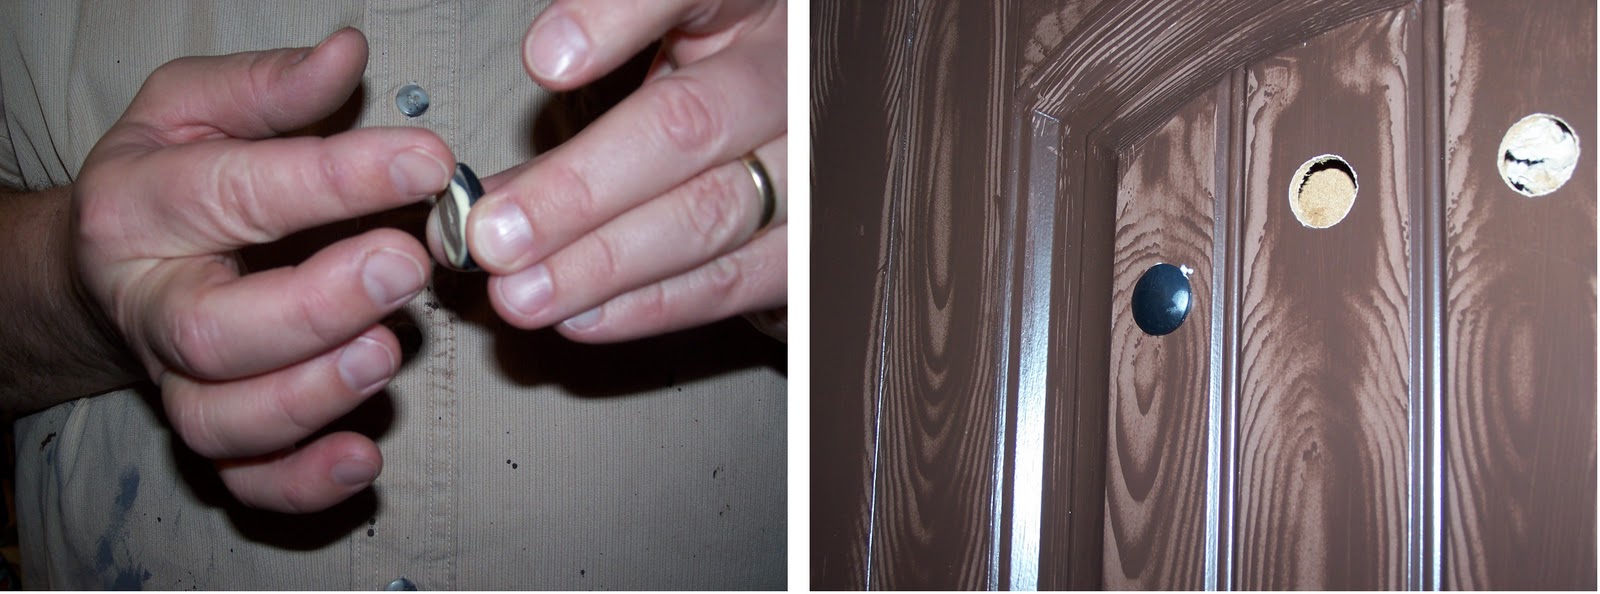
Les then used his thumb to clean up the fuzzies around the holes.
He used his fingers to apply the glue and popped them into place.
(Make sure you wipe up the excess glue before it dries.)
Last step was to add the handles.
We used gate handles.
They worked great except we had to use lag screws to attache them and then paint the heads.

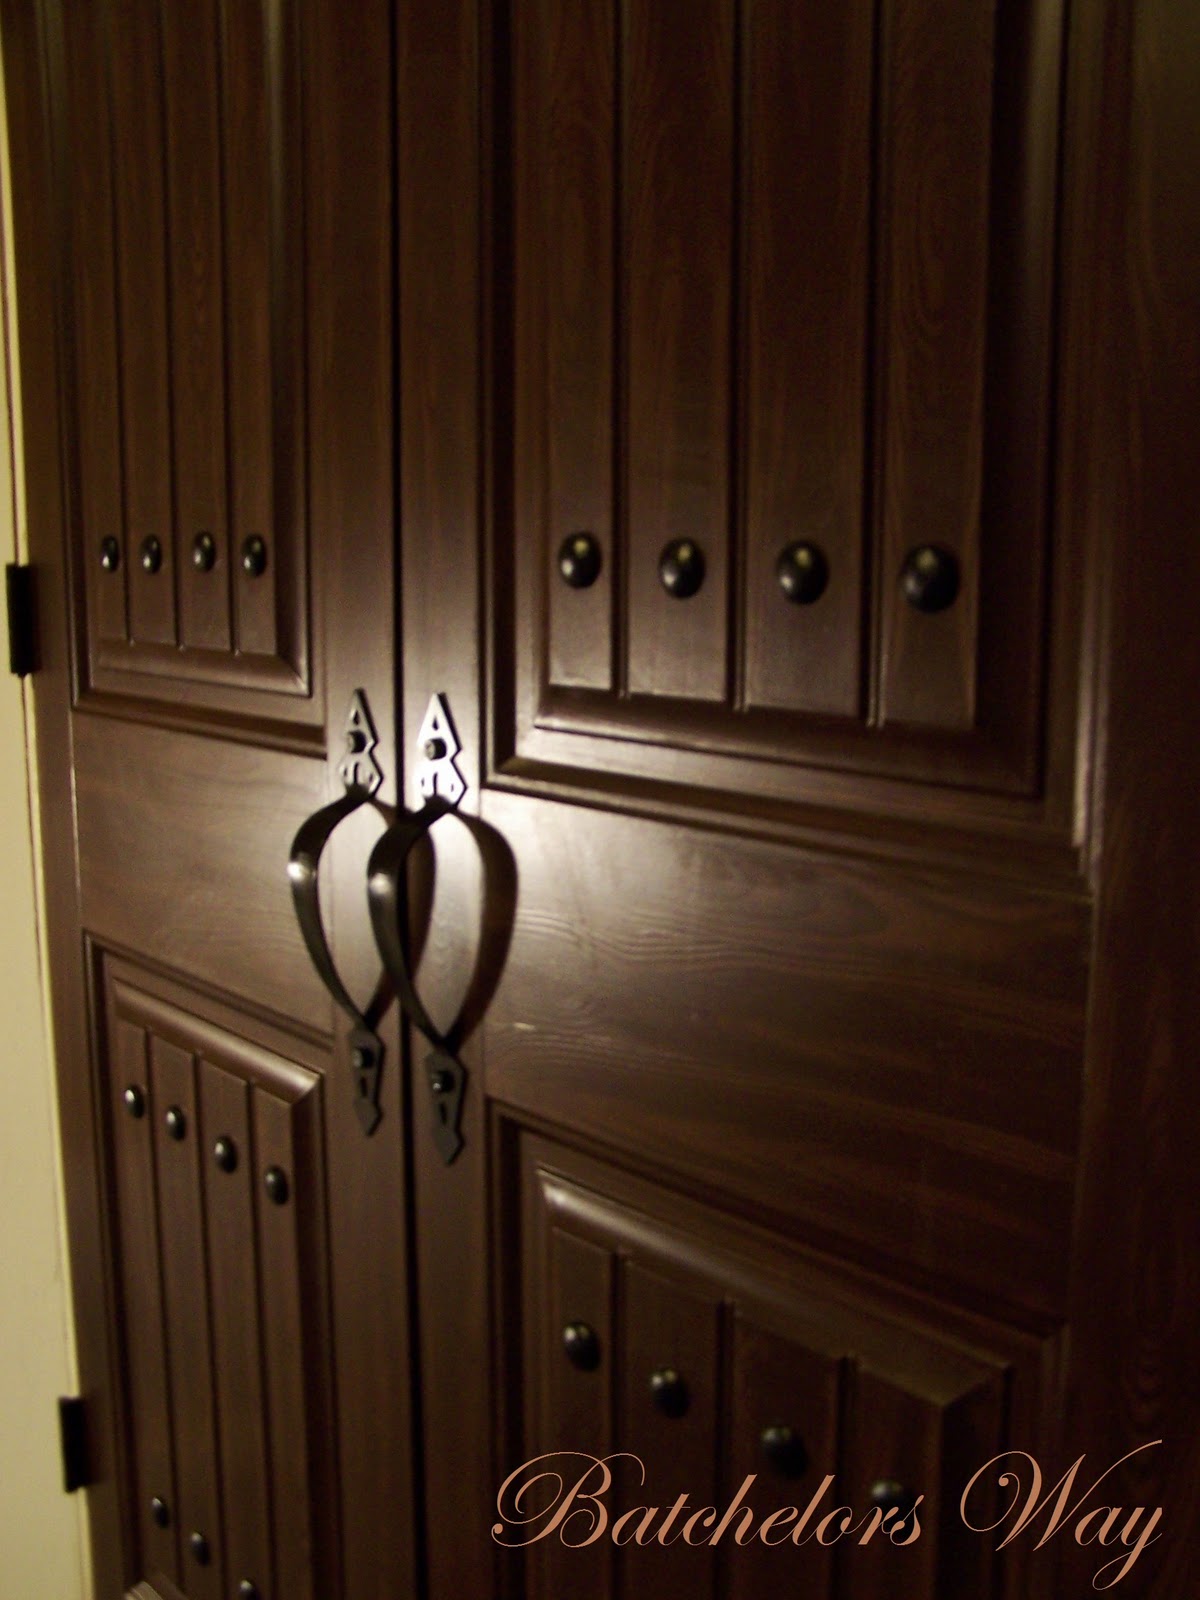
So finally here’s our Pirate closet doors.

Close ups.
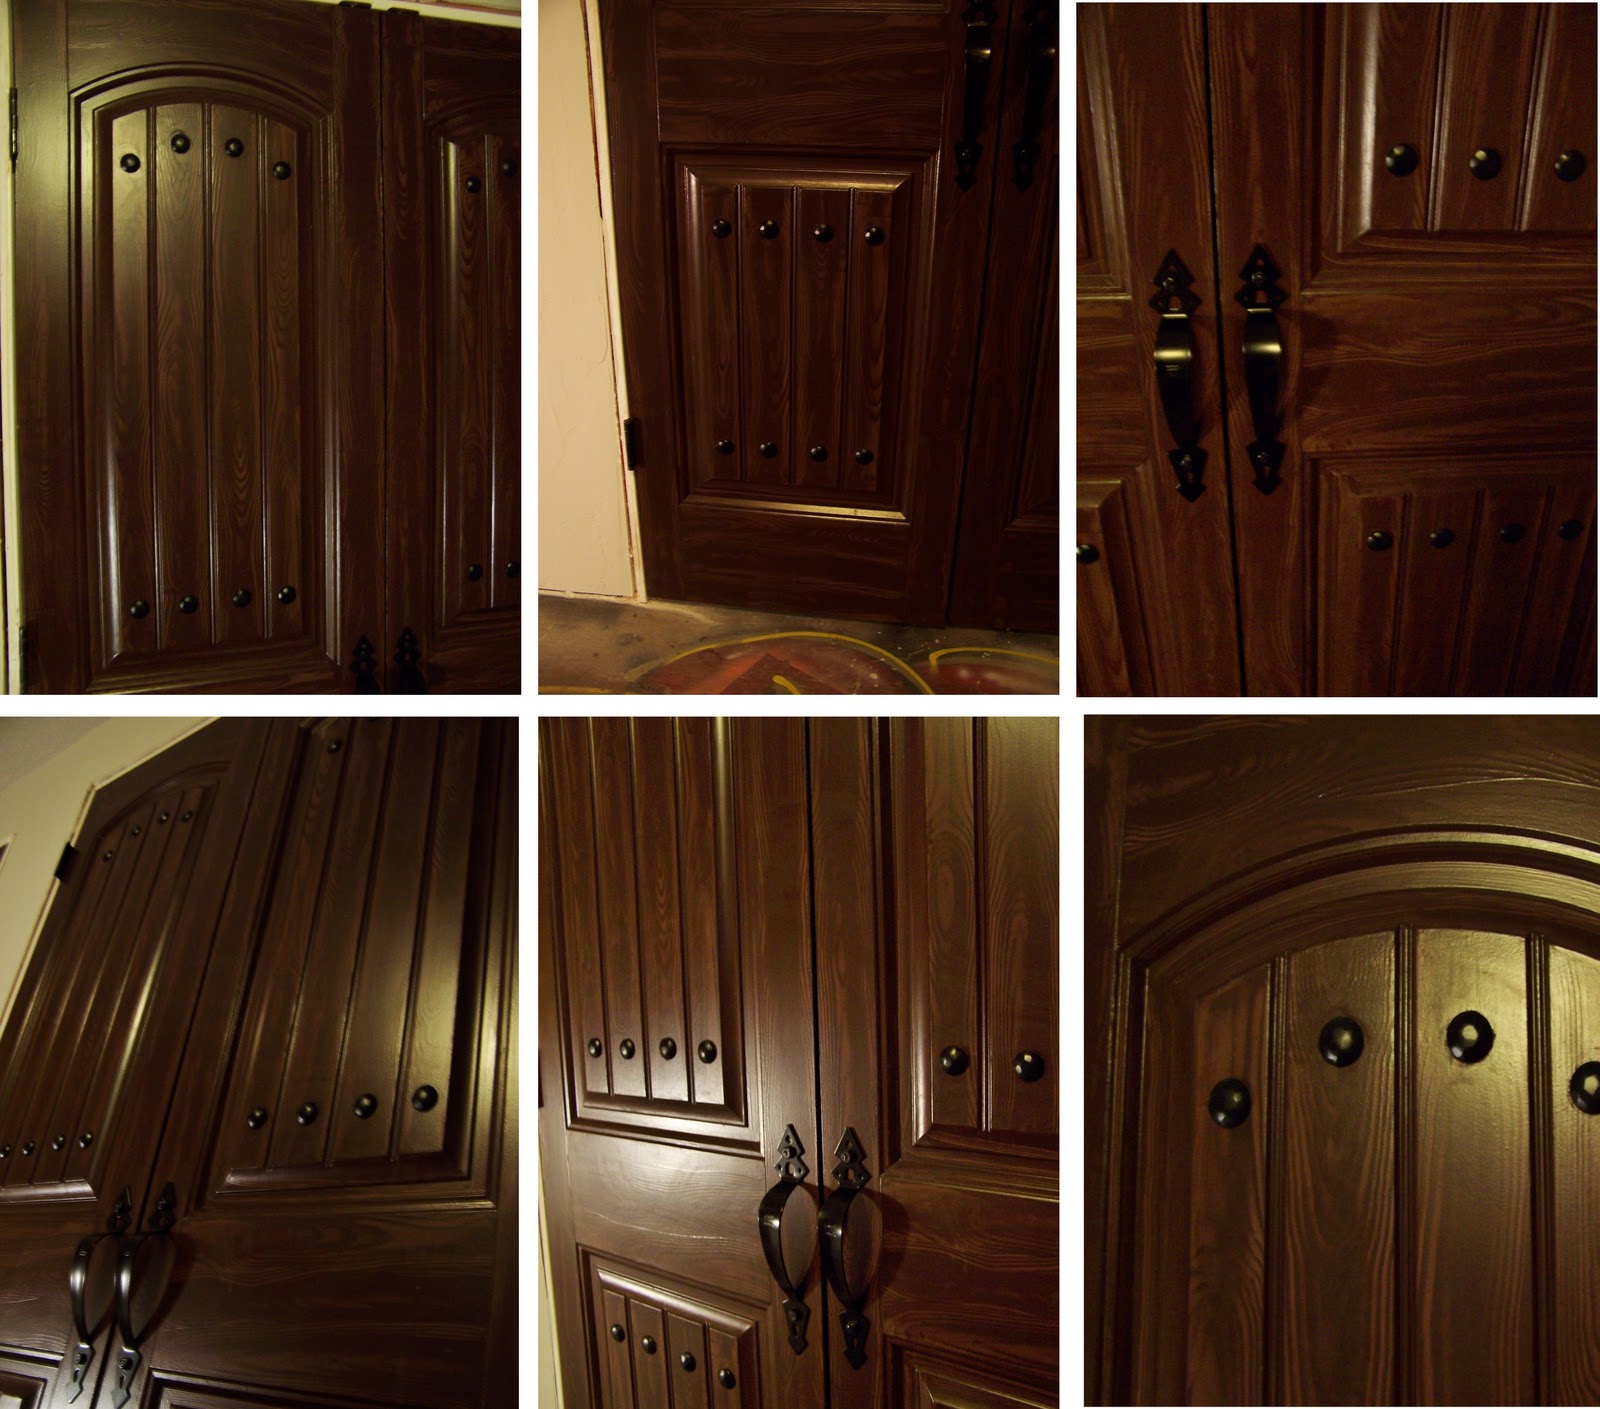
What do you think?
I would love to hear if you can sympathize with my learning curves
and if they are of any help to any one.
Well now for my favorite part.
How much did I save?
According to the guy at Lowe’s all four doors would have cost me $800 to $2000.
(depending on if they were solid wood or not)
How much did it cost us.
Doors(two from the Restore)………………………….$20
Doors(two damaged doors from Lowe’s)………..$57
Paint and clear coat……………………………………….$24
Handles……………………………………………………….$20
Wood buttons……………………………………………….$20
Misc. and door framing wood ………………………..$40
Grand Total for all four doors
$181
Got to love it!
I think they turned out pretty good.
Tell me what do ya think.
I need some comments after such an ordeal!!
Want more beautiful door inspiration? Check these out:
Making Your Front Door Unique! Tuscan Style
DIY Mirrored Closet Door Makeover
Old Barn Door Recycled into Kitchen Table
Cassity Kmetzsch started Remodelaholic after graduating from Utah State University with a degree in Interior Design. Remodelaholic is the place to share her love for knocking out walls, and building everything back up again to not only add function but beauty to her home. Together with her husband Justin, they have remodeled 6 homes and are working on a seventh. She is a mother of four amazing girls. Making a house a home is her favorite hobby.


You did an impressive job of transforming these doors! Love all the details.
I would be interested to know how to read the date codes on the Minwax cans. Buying out of date clearcoat never occurred to me but makes perfect sense. On occasion I have had the problem of the finish coat looking cloudy and I wonder if the product being out of date had anything to do with it.
Great job.
That’s the most amazing DIY door transformation EVER!!!!
Hats off to you and your hubby! Your Thank you for sharing all of your hard work and TIPS, especially the ones re: the wax.
OH MY GOSH!!!!!!! Your doors are just BEAUTIFUL!!!!!! A lot of hard work….but they are wonderful. I am, honestly, just sitting here with my mouth open! Gorgeous!!! 🙂
Thanks for the comment, Dona!
Wow! That was a lot of work and well worth it!! It is so awesome that you shared your journey to help others from not making the same mistakes. One more thing, how do you read the dates on the cans?
They are just Beautiful!!